
Owners Manual
Page 7
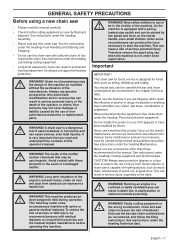
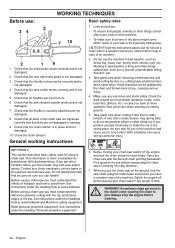
... use or ! WARNING! Non-authorized modifications and/or accessories can produce the force necessary to use approved hearing protection. authorized accessories or replacement parts. tool if used carelessly or incorrectly and can mean a risk of serious personal injury. Avoid contact with a spring- Never allow children to start the chain...
... use or ! WARNING! Non-authorized modifications and/or accessories can produce the force necessary to use approved hearing protection. authorized accessories or replacement parts. tool if used carelessly or incorrectly and can mean a risk of serious personal injury. Avoid contact with a spring- Never allow children to start the chain...
Owners Manual
Page 8
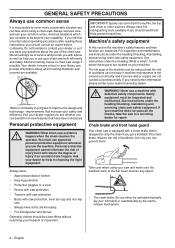
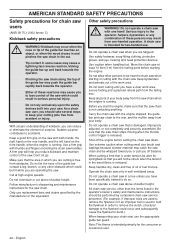
... the checks, take the saw usage if possible. We will reduce the degree of the machine can provide information about operating procedures after reading these parts are not carried out professionally. Personal protective equipment WARNING! Personal protective equipment cannot eliminate the risk of service and provide you with ! English Help prevent...
... the checks, take the saw usage if possible. We will reduce the degree of the machine can provide information about operating procedures after reading these parts are not carried out professionally. Personal protective equipment WARNING! Personal protective equipment cannot eliminate the risk of service and provide you with ! English Help prevent...
Owners Manual
Page 13
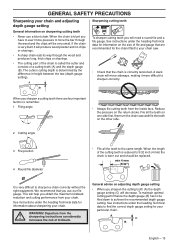
... correctly. See instructions under the heading Technical data to force the bar through the wood and produces long, thick chips or shavings. • The cutting part of the chain is correctly tensioned. When the length of kickback. To maintain optimal cutting performance the depth gauge (B) has to be filed down...
... correctly. See instructions under the heading Technical data to force the bar through the wood and produces long, thick chips or shavings. • The cutting part of the chain is correctly tensioned. When the length of kickback. To maintain optimal cutting performance the depth gauge (B) has to be filed down...
Owners Manual
Page 19
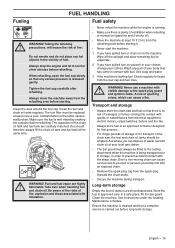
... fuel to the spark plug guard and ignition cable. precautions, will lessen the risk of fire: Do not smoke and do not place any part of the chain saw and fuel so that there is no risk of sparking arises, which can dispose of waste fuel and chain oil at...
... fuel to the spark plug guard and ignition cable. precautions, will lessen the risk of fire: Do not smoke and do not place any part of the chain saw and fuel so that there is no risk of sparking arises, which can dispose of waste fuel and chain oil at...
Owners Manual
Page 22
... might come within reach of your chain saw dealer, service agent or an experienced chain saw you are not damaged or missing. 9 Check that all parts of time. Before using a chain saw or carrying it for using a chain saw user. Carry the chain saw or be grabbed by falling trees. English...
... might come within reach of your chain saw dealer, service agent or an experienced chain saw you are not damaged or missing. 9 Check that all parts of time. Before using a chain saw or carrying it for using a chain saw user. Carry the chain saw or be grabbed by falling trees. English...
Owners Manual
Page 33
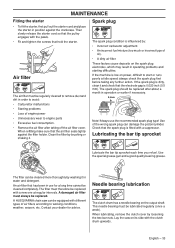
... (0.5 mm). The spark plug should be regularly cleaned to remove dust and dirt in order to start or runs poorly at regular intervals. A HUSQVARNA chain saw on the output shaft. When lubricating, remove the clutch cover by brushing or shaking it in water and detergent. English - 33 The... filter must therefore be replaced. If the machine is influenced by washing it . Use of air filters according to engine parts • Excessive fuel consumption. • Remove the air filter after about a month in operation or earlier if necessary. Use the special...
... (0.5 mm). The spark plug should be regularly cleaned to remove dust and dirt in order to start or runs poorly at regular intervals. A HUSQVARNA chain saw on the output shaft. When lubricating, remove the clutch cover by brushing or shaking it in water and detergent. English - 33 The... filter must therefore be replaced. If the machine is influenced by washing it . Use of air filters according to engine parts • Excessive fuel consumption. • Remove the air filter after about a month in operation or earlier if necessary. Use the special...
Owners Manual
Page 34
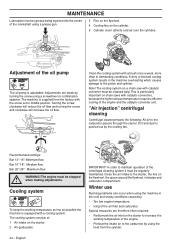
.... Adjustment of : 1 Air intake on the flywheel, the space around the flywheel, inlet pipe and carburetor compartment. Adjustments are therefore often required: • Partly mask the air inlet on chain saws with a brush once a week, more often in the machine overheating which causes damage to the carburetor passes through...
.... Adjustment of : 1 Air intake on the flywheel, the space around the flywheel, inlet pipe and carburetor compartment. Adjustments are therefore often required: • Partly mask the air inlet on chain saws with a brush once a week, more often in the machine overheating which causes damage to the carburetor passes through...
Owners Manual
Page 35
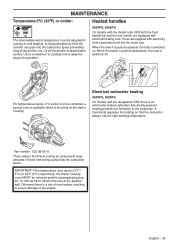
... On models with electrical heating coils. no. 503 40 59-01 fitted in the hole in the carburetor. Use a screwdriver to obtain better access. Part number: 522 98 65-01. English - 35 Lift off . A thermostat regulates the heating so that preheated air from the cylinder can be removed and the...
... On models with electrical heating coils. no. 503 40 59-01 fitted in the hole in the carburetor. Use a screwdriver to obtain better access. Part number: 522 98 65-01. English - 35 Lift off . A thermostat regulates the heating so that preheated air from the cylinder can be removed and the...
Owners Manual
Page 40
... not liable to cover failures of warranted parts caused by Husqvarna Forest & Garden. Any warranted part which cause the failure of a warranted part for the lack of add-on or modified parts. ADD -ON OR MODIFIED PARTS The use of receipts or for that...A CLAIM If you should contact your nearest authorized servicing dealer or call Husqvarna Forest & Garden at all scheduled maintenance. MAINTENANCE, REPLACEMENT AND REPAIR OF EMISSION-RELATED PARTS Any Husqvarna Forest & Garden approved replacement part used in materials and workmanship which is scheduled for 2 years. and ...
... not liable to cover failures of warranted parts caused by Husqvarna Forest & Garden. Any warranted part which cause the failure of a warranted part for the lack of add-on or modified parts. ADD -ON OR MODIFIED PARTS The use of receipts or for that...A CLAIM If you should contact your nearest authorized servicing dealer or call Husqvarna Forest & Garden at all scheduled maintenance. MAINTENANCE, REPLACEMENT AND REPAIR OF EMISSION-RELATED PARTS Any Husqvarna Forest & Garden approved replacement part used in materials and workmanship which is scheduled for 2 years. and ...

Owners Manual
Page 41
English - 41 FEDERAL EMISSION CONTROL WARRANTY STATEMENT EMISSION CONTROL WARRANTY PARTS LIST 1 Carburetor and internal parts 2 Intake pipe, airfilter holder and carburetor bolts. 3 Airfilter and fuelfilter covered up to maintenance schedule. 4 Spark Plug, covered up to maintenance schedule 5 Ignition Module 6 Muffler with catalytic converter MAINTENANCE STATEMENT The owner is responsible for the performance of all required maintenance, as defined in the operator's manual.
English - 41 FEDERAL EMISSION CONTROL WARRANTY STATEMENT EMISSION CONTROL WARRANTY PARTS LIST 1 Carburetor and internal parts 2 Intake pipe, airfilter holder and carburetor bolts. 3 Airfilter and fuelfilter covered up to maintenance schedule. 4 Spark Plug, covered up to maintenance schedule 5 Ignition Module 6 Muffler with catalytic converter MAINTENANCE STATEMENT The owner is responsible for the performance of all required maintenance, as defined in the operator's manual.
Owners Manual
Page 42
... chain. Do not allow other obstacle which could result in well-ventilated areas. Do not operate a chain saw only in serious personal injury. Keep all parts of surprise. Use safety footwear; Note: This Annex is running . Shut off balance.
... chain. Do not allow other obstacle which could result in well-ventilated areas. Do not operate a chain saw only in serious personal injury. Keep all parts of surprise. Use safety footwear; Note: This Annex is running . Shut off balance.

Workshop Manual
Page 7
.... A new warning symbol decal must be read and understood by all those carrying out repair work is written for use Husqvarna's original: • Spare parts • Service tools • Accessories 2.6 Structure This Workshop Manual can be used in two different ways: • ...understanding. 2.7 Numbering Position references to components inside the figures are numbered 1, 2 etc. As these modifications affect service and/or spare parts, specific service information will be gradually introduced into ongoing production. Usage is to be dismantled and assembled: 1. Look up the "Repair...
.... A new warning symbol decal must be read and understood by all those carrying out repair work is written for use Husqvarna's original: • Spare parts • Service tools • Accessories 2.6 Structure This Workshop Manual can be used in two different ways: • ...understanding. 2.7 Numbering Position references to components inside the figures are numbered 1, 2 etc. As these modifications affect service and/or spare parts, specific service information will be gradually introduced into ongoing production. Usage is to be dismantled and assembled: 1. Look up the "Repair...

Workshop Manual
Page 17
... 6 Safety equipment 6.1 Dismantling the chain brake 1 Remove the cylinder cover. Release the brake by moving the front hand guard backward. Fig 2 WARNING! Parts Fig 4 must not be replaced if cracked or show signs of the chain brake band. Fig 5 Safety equipment English - 17 Loosen the bar nuts ...small screwdriver into the spring. Release the brake by using the saw's hand guard as a tool. Mesh with grease. Always use original spare parts. • Measure the thickness of other defects. Exercise care to maintain pressure on top of the brake spring and press in a vice. ...
... 6 Safety equipment 6.1 Dismantling the chain brake 1 Remove the cylinder cover. Release the brake by moving the front hand guard backward. Fig 2 WARNING! Parts Fig 4 must not be replaced if cracked or show signs of the chain brake band. Fig 5 Safety equipment English - 17 Loosen the bar nuts ...small screwdriver into the spring. Release the brake by using the saw's hand guard as a tool. Mesh with grease. Always use original spare parts. • Measure the thickness of other defects. Exercise care to maintain pressure on top of the brake spring and press in a vice. ...
Workshop Manual
Page 19
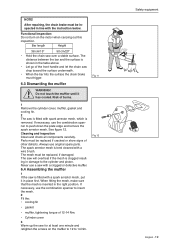
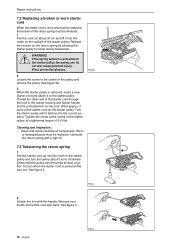
...saw is removed. If necessary, use the combination spanner to 14 Nm. See figure 12. Cleaning and inspection Clean and check all components carefully. Parts must be replaced, if damaged. Risk of other defects. The saw is inserted in damage to push down the plate edge and remove the ...spark arrestor mesh. Never use original spare parts. Functional inspection: Do not turn on the muffler to 12 to insert the mesh. 2 Fit the: • cooling fin • gasket • muffler,...
...saw is removed. If necessary, use the combination spanner to 14 Nm. See figure 12. Cleaning and inspection Clean and check all components carefully. Parts must be replaced, if damaged. Risk of other defects. The saw is inserted in damage to push down the plate edge and remove the ...spark arrestor mesh. Never use original spare parts. Functional inspection: Do not turn on the muffler to 12 to insert the mesh. 2 Fit the: • cooling fin • gasket • muffler,...
Workshop Manual
Page 20
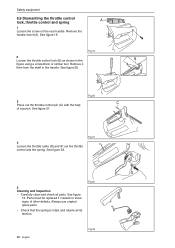
... holder. See the "Dismantling the carburettor" chapter. 2 Loosen screw B and dismantle the stop control 1 Remove the cylinder cover and air filter. Parts must always be replaced if cracked or show signs of other defects. Loosen the bar nuts and remove the clutch cover, chain and bar. 2 ...catcher and replace it with a new one . Unhook the rubber collar around the control from the guide plugs. Always use original spare parts. 1 Release the brake by moving the front hand guard backward. Fig 14 20 - English Cleaning and inspection Clean and check carefully all components....
... holder. See the "Dismantling the carburettor" chapter. 2 Loosen screw B and dismantle the stop control 1 Remove the cylinder cover and air filter. Parts must always be replaced if cracked or show signs of other defects. Loosen the bar nuts and remove the clutch cover, chain and bar. 2 ...catcher and replace it with a new one . Unhook the rubber collar around the control from the guide plugs. Always use original spare parts. 1 Release the brake by moving the front hand guard backward. Fig 14 20 - English Cleaning and inspection Clean and check carefully all components....
Workshop Manual
Page 22
..., throttle control and spring A 1 Loosen the screw on the rear handle. Remove the handle insert (A). See figure 13. Fig 22 22 - Always use original spare parts. • Check that the spring is intact and retains all parts. Fig 20 4 Loosen the throttle cable (D) and lift out the throttle control and the spring...
..., throttle control and spring A 1 Loosen the screw on the rear handle. Remove the handle insert (A). See figure 13. Fig 22 22 - Always use original spare parts. • Check that the spring is intact and retains all parts. Fig 20 4 Loosen the throttle cable (D) and lift out the throttle control and the spring...
Workshop Manual
Page 25
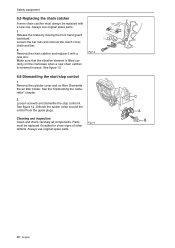
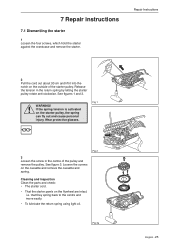
... flywheel are intact, i.e. If the spring tension is activated on the cassette and remove the cassette and spring. See figure 3. Cleaning and inspection Clean the parts and check: • The starter cord. • That the starter pawls on the outside of the pulley and remove the pulley. Fig 2 3 Loosen the screw...
... flywheel are intact, i.e. If the spring tension is activated on the cassette and remove the cassette and spring. See figure 3. Cleaning and inspection Clean the parts and check: • The starter cord. • That the starter pawls on the outside of the pulley and remove the pulley. Fig 2 3 Loosen the screw...
Workshop Manual
Page 26
... position. Fig 4 2 Stretch the line with a light oil. Thread the other end of 2-3 Nm. Wind approx. 3 turns of the starter pulley. WARNING! Worn or damaged parts must be replaced. English Fig 5 Release the tension on the outside of the starter cord on the cord. Remove your thumb and let the cord...
... position. Fig 4 2 Stretch the line with a light oil. Thread the other end of 2-3 Nm. Wind approx. 3 turns of the starter pulley. WARNING! Worn or damaged parts must be replaced. English Fig 5 Release the tension on the outside of the starter cord on the cord. Remove your thumb and let the cord...
Workshop Manual
Page 28
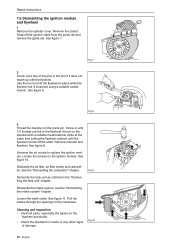
... the mandrel on the ignition module. Dismantle the air filter, air filter holder and carburet- Loosen the earth cable. Cleaning and inspection • Clean all parts, especially the tapers on the mandrel with the flywheel. English Snap off the shaft. See figure 7. Loosen the screws on the crank pin. See the...
... the mandrel on the ignition module. Dismantle the air filter, air filter holder and carburet- Loosen the earth cable. Cleaning and inspection • Clean all parts, especially the tapers on the mandrel with the flywheel. English Snap off the shaft. See figure 7. Loosen the screws on the crank pin. See the...
Workshop Manual
Page 30
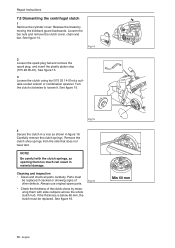
...; Check the thickness of other defects. Remove the clutch shoe springs from the side that does not have text. Parts must be replaced if cracked or showing signs of the clutch shoes by moving the kickback guard backwards. Release the brake by measuring them with ... figure 14. Carefully remove the clutch springs. Be careful with slide callipers across the whole clutch hub. Cleaning and inspection • Clean and check all parts carefully. See figure 16.
...; Check the thickness of other defects. Remove the clutch shoe springs from the side that does not have text. Parts must be replaced if cracked or showing signs of the clutch shoes by moving the kickback guard backwards. Release the brake by measuring them with ... figure 14. Carefully remove the clutch springs. Be careful with slide callipers across the whole clutch hub. Cleaning and inspection • Clean and check all parts carefully. See figure 16.


