
Owners Manual
Page 2
...Stop and inspect the equipment if you strike an object. The operator could cause slipping. cise extreme caution when changing direction on mowers so equipped before mowing. Mower blades are a major factor related to operate the machine. • Use extra care when approaching blind corners, shrubs, trees, ... of your footing: keep the wire away from the plug to be sure of grass, leaves, or other safety protective devices in the manual(s) before removing grass catcher. • Mow only in daylight or good artificial light. • Do not operate the machine...
...Stop and inspect the equipment if you strike an object. The operator could cause slipping. cise extreme caution when changing direction on mowers so equipped before mowing. Mower blades are a major factor related to operate the machine. • Use extra care when approaching blind corners, shrubs, trees, ... of your footing: keep the wire away from the plug to be sure of grass, leaves, or other safety protective devices in the manual(s) before removing grass catcher. • Mow only in daylight or good artificial light. • Do not operate the machine...
Owners Manual
Page 3
... terminals and related accessories contain lead and lead compounds, chemicals known to the State of California to service or repair this manual. We have competent, well-trained technicians and the proper tools to cause cancer and birth defects or other reproductive harm. Always...Always disconnect spark plug wire and place wire where it cannot contact spark plug in maintaining, caring for this owner's manual. To avoid severe burns on your lawn mower properly. CONGRATULATIONS on contact, stay away from these areas. TABLE OF CONTENTS SAFETY RULES 2-3 PRODUCT SPECIFICATIONS 3 CUSTOMER ...
... terminals and related accessories contain lead and lead compounds, chemicals known to the State of California to service or repair this manual. We have competent, well-trained technicians and the proper tools to cause cancer and birth defects or other reproductive harm. Always...Always disconnect spark plug wire and place wire where it cannot contact spark plug in maintaining, caring for this owner's manual. To avoid severe burns on your lawn mower properly. CONGRATULATIONS on contact, stay away from these areas. TABLE OF CONTENTS SAFETY RULES 2-3 PRODUCT SPECIFICATIONS 3 CUSTOMER ...
Owners Manual
Page 4
... CATCHER (See Fig. 2) 1. Put grass catcher frame into place in mowing position. 2. To convert mower to bagging or discharging, see "TO CONVERT MOWER" in the Operation section of this manual. 4 All parts such as a mulcher. Remove loose parts included with the exception of carton and lay...padding holding operator presence control bar to "ADJUST HANDLE"in the Service and Adjustments section of this manual. Your new lawn mower has been assembled at the factory with mower. 2. Remove handle padding holding operator presence control bar to ensure proper tightness. NOTE: If vinyl ...
... CATCHER (See Fig. 2) 1. Put grass catcher frame into place in mowing position. 2. To convert mower to bagging or discharging, see "TO CONVERT MOWER" in the Operation section of this manual. 4 All parts such as a mulcher. Remove loose parts included with the exception of carton and lay...padding holding operator presence control bar to "ADJUST HANDLE"in the Service and Adjustments section of this manual. Your new lawn mower has been assembled at the factory with mower. 2. Remove handle padding holding operator presence control bar to ensure proper tightness. NOTE: If vinyl ...

Owners Manual
Page 5
...These symbols may appear on your lawn mower to start the engine. used for future reference. used to engage power-propelled down to the handle to familiarize yourself with the product. Learn and understand their meaning. Save this manual for starting the engine. 5 bagging ...operation. OPERATION KNOW YOUR LAWN MOWER READ THIS OWNER'S MANUAL AND SAFETY RULES BEFORE OPERATING YOUR LAWN MOWER. The blade turns when the engine is shipped WITHOUT OIL OR...
...These symbols may appear on your lawn mower to start the engine. used for future reference. used to engage power-propelled down to the handle to familiarize yourself with the product. Learn and understand their meaning. Save this manual for starting the engine. 5 bagging ...operation. OPERATION KNOW YOUR LAWN MOWER READ THIS OWNER'S MANUAL AND SAFETY RULES BEFORE OPERATING YOUR LAWN MOWER. The blade turns when the engine is shipped WITHOUT OIL OR...
Owners Manual
Page 10
...wear. All adjustments in the Service and Adjustments section of this lawn mower does not cover items that have been subjected to operator abuse or negligence. MAINTENANCE GENERAL RECOMMENDATIONS The warranty on this manual should be made periodically to properly maintain your engine run better and last... longer. • Follow the maintenance schedule in this manual. To receive full value from the warranty, operator must maintain mower as instructed in this manual. A new spark plug and clean/new air filter element assure proper air-fuel ...
...wear. All adjustments in the Service and Adjustments section of this lawn mower does not cover items that have been subjected to operator abuse or negligence. MAINTENANCE GENERAL RECOMMENDATIONS The warranty on this manual should be made periodically to properly maintain your engine run better and last... longer. • Follow the maintenance schedule in this manual. To receive full value from the warranty, operator must maintain mower as instructed in this manual. A new spark plug and clean/new air filter element assure proper air-fuel ...
Owners Manual
Page 12
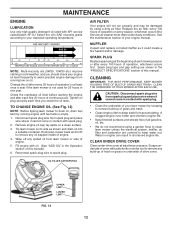
... in shortened engine life. Tighten oil plug securely each five (5) hours of this manual. lay aside on its side as it cannot come in one year. CLEANING IMPORTANT: FOR BEST PERFORMANCE, KEEP MOWER HOUSING FREE OF BUILT-UP GRASS AND TRASH. CAUTION: Disconnect spark plug wire from accumulating....forth to remove any build-up of grass and trash. • Clean engine often to remove build-up of this manual). 6. Reconnect spark plug wire to clean lawn mower unless the electrical system, muffler, air filter and carburetor are shown in cold weather, and you check...
... in shortened engine life. Tighten oil plug securely each five (5) hours of this manual. lay aside on its side as it cannot come in one year. CLEANING IMPORTANT: FOR BEST PERFORMANCE, KEEP MOWER HOUSING FREE OF BUILT-UP GRASS AND TRASH. CAUTION: Disconnect spark plug wire from accumulating....forth to remove any build-up of grass and trash. • Clean engine often to remove build-up of this manual). 6. Reconnect spark plug wire to clean lawn mower unless the electrical system, muffler, air filter and carburetor are shown in cold weather, and you check...
Owners Manual
Page 13
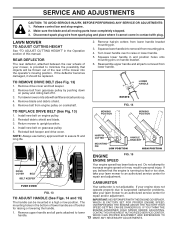
...off it from lower handle. IMPORTANT: NEVERTAMPERWITHTHEENGINEGOVERNOR, The handle can be replaced. 2. mounting holes in the bottom of the mower into the operator's mowing position. WHICH HAS PROPER EQUIPMENT AND EXPERIENCE TO 13 MAKE ANY NECESSARY ADJUSTMENTS. Disconnect spark plug...is running too fast or too slow, take your mower, is not adjustable. Squeeze lower handle in contact with plug. REAR DEFLECTOR The rear deflector, attached between the rear wheels of this manual. Turnlawnmoweronitssidewithairfilterandcarburetorup. 4. SERVICE AND ADJUSTMENTS CAUTION...
...off it from lower handle. IMPORTANT: NEVERTAMPERWITHTHEENGINEGOVERNOR, The handle can be replaced. 2. mounting holes in the bottom of the mower into the operator's mowing position. WHICH HAS PROPER EQUIPMENT AND EXPERIENCE TO 13 MAKE ANY NECESSARY ADJUSTMENTS. Disconnect spark plug...is running too fast or too slow, take your mower, is not adjustable. Squeeze lower handle in contact with plug. REAR DEFLECTOR The rear deflector, attached between the rear wheels of this manual. Turnlawnmoweronitssidewithairfilterandcarburetorup. 4. SERVICE AND ADJUSTMENTS CAUTION...
Owners Manual
Page 14
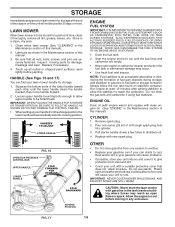
...mower (See "CLEANING" in the Maintenance section of this manual). Be sure that does not retain moisture. Inspect moving parts for damage, breakage and wear. Touch up your handle from the storage position, the lower handle will cause your unit to distribute oil. 4. Squeeze the bottom ends of this manual... toward each other until the fuel lines and carburetor are se- curely fastened. sand lightly before storing in the Maintenance section of this manual). 2. IMPORTANT: WHEN FOLDING THE HANDLE FOR STORAGE OR TRANSPORTATION, BE SURE TO FOLD THE HANDLE AS SHOWN OR YOU MAY DAMAGE THE...
...mower (See "CLEANING" in the Maintenance section of this manual). Be sure that does not retain moisture. Inspect moving parts for damage, breakage and wear. Touch up your handle from the storage position, the lower handle will cause your unit to distribute oil. 4. Squeeze the bottom ends of this manual... toward each other until the fuel lines and carburetor are se- curely fastened. sand lightly before storing in the Maintenance section of this manual). 2. IMPORTANT: WHEN FOLDING THE HANDLE FOR STORAGE OR TRANSPORTATION, BE SURE TO FOLD THE HANDLE AS SHOWN OR YOU MAY DAMAGE THE...

Owners Manual
Page 17
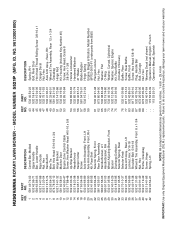
...Nut, Hex 5/16-18 Axle Arm Assembly, LR Washer Bolt Thread Cutting Screw w/Sems 5/16-18 x 3/4 Washer Washer Screw Keeper, Belt Bottom Belt Cover Lawn Mower Housing (Includes Key Numbers 10, 11, 12 and 45) Danger Decal Blade Adapter Blade 21" Hardened Washer Helical Washer 3/8-24 x 1-3/8 Grade 8 Hex Head Machine..., Upstop Screw Mulch Door Hinge Bracket Assembly Spring Rod, Hinge Nut Clipping Deflector Hubcap Nut, Hex Grip, Foam Warning Decal (Not Shown) Owner's Manual, English/French NOTE: All component dimensions given in U.S. NO. 1 532 18 60-24 2 532 15 36-05 3 532 18 60-11 4 532 18 ...
...Nut, Hex 5/16-18 Axle Arm Assembly, LR Washer Bolt Thread Cutting Screw w/Sems 5/16-18 x 3/4 Washer Washer Screw Keeper, Belt Bottom Belt Cover Lawn Mower Housing (Includes Key Numbers 10, 11, 12 and 45) Danger Decal Blade Adapter Blade 21" Hardened Washer Helical Washer 3/8-24 x 1-3/8 Grade 8 Hex Head Machine..., Upstop Screw Mulch Door Hinge Bracket Assembly Spring Rod, Hinge Nut Clipping Deflector Hubcap Nut, Hex Grip, Foam Warning Decal (Not Shown) Owner's Manual, English/French NOTE: All component dimensions given in U.S. NO. 1 532 18 60-24 2 532 15 36-05 3 532 18 60-11 4 532 18 ...

Owners Manual
Page 20
...Walk-Behinds) 2 Year COMMERCIAL-Warranty: Husqvarna Commercial Turf Equipment-zero turn riders, wide area walks, and ground engaging commercial equipment. 2 Year NON-COMMERCIAL Warranty: Automatic Mower, Riding lawn mowers, yard and garden tractors, walk behind mowers and commercial turf equipment or any ...rests solely with a warranty claim form. Emission control system components necessary to comply with the Owner's/Operator's manual or instruction sheet furnished by Husqvarna; This proof must be used for those components which are covered by a third party which vary from ...
...Walk-Behinds) 2 Year COMMERCIAL-Warranty: Husqvarna Commercial Turf Equipment-zero turn riders, wide area walks, and ground engaging commercial equipment. 2 Year NON-COMMERCIAL Warranty: Automatic Mower, Riding lawn mowers, yard and garden tractors, walk behind mowers and commercial turf equipment or any ...rests solely with a warranty claim form. Emission control system components necessary to comply with the Owner's/Operator's manual or instruction sheet furnished by Husqvarna; This proof must be used for those components which are covered by a third party which vary from ...
Parts List
Page 3
MODEL NUMBER 5521P (MFG. Failure to do so could be hazardous, damage your lawn mower and void your warranty. NO. 96133001800) 3 KEY PART NO. NO. 43 532 40 54-23 44 532 18 41-93 45 532 15 04-06 ...;e Baffle, Front Screw, Hex Head 5/8-16 Plug, Handle Bar Bolt, Carriage Nut, Hex Warning Decal (not shown) Operator's Manual, English / French Operator's Manual, Spanish NOTE: All component dimensions given in U.S. HUSQVARNA ROTARY LAWN MOWER - - inches. 1 inch = 25.4 mm IMPORTANT: Use only Original Equipment Manufacturer (O.E.M.) replacement parts. ID. NO. 1 581 49 74-02 2 532...
MODEL NUMBER 5521P (MFG. Failure to do so could be hazardous, damage your lawn mower and void your warranty. NO. 96133001800) 3 KEY PART NO. NO. 43 532 40 54-23 44 532 18 41-93 45 532 15 04-06 ...;e Baffle, Front Screw, Hex Head 5/8-16 Plug, Handle Bar Bolt, Carriage Nut, Hex Warning Decal (not shown) Operator's Manual, English / French Operator's Manual, Spanish NOTE: All component dimensions given in U.S. HUSQVARNA ROTARY LAWN MOWER - - inches. 1 inch = 25.4 mm IMPORTANT: Use only Original Equipment Manufacturer (O.E.M.) replacement parts. ID. NO. 1 581 49 74-02 2 532...


