
Owners Manual
Page 2
...switched off by moving the stop switch to the stop switch automatically returns to the side when the blade comes into contact with trimmer cord. CAUTION! The operator of falling objects • Approved hearing protection • Approved eye protection Max. Arrows which show ...at least 15 metres from the spark plug when assembling, checking and/or performing maintenance. Symbols WARNING! Clearing saws, brushcutters and trimmers can result in serious or fatal injury to special certification requirements for handle positioning. Careless or incorrect use non-metallic,...
...switched off by moving the stop switch to the stop switch automatically returns to the side when the blade comes into contact with trimmer cord. CAUTION! The operator of falling objects • Approved hearing protection • Approved eye protection Max. Arrows which show ...at least 15 metres from the spark plug when assembling, checking and/or performing maintenance. Symbols WARNING! Clearing saws, brushcutters and trimmers can result in serious or fatal injury to special certification requirements for handle positioning. Careless or incorrect use non-metallic,...

Owners Manual
Page 3
...circumstances may not cover damage or liability caused by any nonroad engine repair establishment or individual. Always use approved hearing protection. or trimmer can be dangerous if used incorrectly or carelessly, and can result in serious personal injury or the death of the operator or... Fitting the loop handle 10 Assembling and dismantling the two-piece shaft (327LDx 10 Assembling the cutting equipment 11 Fitting the trimmer guard and trimmer head ......... 11 FUEL HANDLING Fuel safety 12 Fuel 12 Fueling 13 STARTING AND STOPPING Check before starting 14 Starting and stopping...
...circumstances may not cover damage or liability caused by any nonroad engine repair establishment or individual. Always use approved hearing protection. or trimmer can be dangerous if used incorrectly or carelessly, and can result in serious personal injury or the death of the operator or... Fitting the loop handle 10 Assembling and dismantling the two-piece shaft (327LDx 10 Assembling the cutting equipment 11 Fitting the trimmer guard and trimmer head ......... 11 FUEL HANDLING Fuel safety 12 Fuel 12 Fueling 13 STARTING AND STOPPING Check before starting 14 Starting and stopping...

Owners Manual
Page 5
3 1 2 WHAT IS WHAT? 4 5 1 19 4 What is what? 1 Trimmer head 2 Grease filler cap, bevel gear 3 Bevel gear 4 Cutting attachment guard 5 Shaft 6 Shaft coupling (327LDx) 7 Loop handle 8 Throttle control 9 Stop switch 10 Throttle lockout 11 Spark plug cap and spark plug 6 7 9 10 18 11 12 13 8 17 16 20 15 14 21 22 12 Cylinder cover 13 Starter handle 14 Fuel tank 15 Air filter cover 16 Air purge 17 Choke control 18 Handle adjustment 19 Drive disc 20 Operator's manual 21 Allen key 22 Locking pin 1152414-95 Rev.2 2009-09-18 English - 5
3 1 2 WHAT IS WHAT? 4 5 1 19 4 What is what? 1 Trimmer head 2 Grease filler cap, bevel gear 3 Bevel gear 4 Cutting attachment guard 5 Shaft 6 Shaft coupling (327LDx) 7 Loop handle 8 Throttle control 9 Stop switch 10 Throttle lockout 11 Spark plug cap and spark plug 6 7 9 10 18 11 12 13 8 17 16 20 15 14 21 22 12 Cylinder cover 13 Starter handle 14 Fuel tank 15 Air filter cover 16 Air purge 17 Choke control 18 Handle adjustment 19 Drive disc 20 Operator's manual 21 Allen key 22 Locking pin 1152414-95 Rev.2 2009-09-18 English - 5

Owners Manual
Page 6
... 15 metres while working in any way from its original specification. WARNING! This field may under close supervision. 6 - A clearing saw, brushcutter or trimmer can cause serious or fatal injury to avoid the risk of falling objects HEARING PROTECTION Wear hearing protection that provides adequate noise reduction. As the...
... 15 metres while working in any way from its original specification. WARNING! This field may under close supervision. 6 - A clearing saw, brushcutter or trimmer can cause serious or fatal injury to avoid the risk of falling objects HEARING PROTECTION Wear hearing protection that provides adequate noise reduction. As the...

Owners Manual
Page 9
... WARNING! A faulty cutting attachment ! The inside of fire! See the chapter on the cutting attachment. The exhaust fumes from the trimmer head and overcome the resistance of the grass being cleared. • The length of the same diameter. • Make sure that it ...tted with these elements in the event of blade thrust. • Obtain maximum cutting performance. • Smaller machines generally require small trimmer heads and vice versa. Always stop the engine ! before you start the machine indoors or near combustible material! converters get very hot ...
... WARNING! A faulty cutting attachment ! The inside of fire! See the chapter on the cutting attachment. The exhaust fumes from the trimmer head and overcome the resistance of the grass being cleared. • The length of the same diameter. • Make sure that it ...tted with these elements in the event of blade thrust. • Obtain maximum cutting performance. • Smaller machines generally require small trimmer heads and vice versa. Always stop the engine ! before you start the machine indoors or near combustible material! converters get very hot ...

Owners Manual
Page 10
... bolt/knob. Dismantling: • Loosen the coupling by turning the knob. • Align the tab of the coupling. Do not overtighten. • Now adjust the trimmer to give a comfortable working position. C Assembly: • Loosen the coupling by turning the knob (at least 3 times). • Slide the spacer into place. 10 - English...
... bolt/knob. Dismantling: • Loosen the coupling by turning the knob. • Align the tab of the coupling. Do not overtighten. • Now adjust the trimmer to give a comfortable working position. C Assembly: • Loosen the coupling by turning the knob (at least 3 times). • Slide the spacer into place. 10 - English...
Owners Manual
Page 11
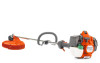
... cutting attachment it can cause serious personal injury. WARNING! attachment without an approved guard. Never use with the trimmer head. Hook the trimmer guard/combination guard onto the fitting on the shaft and secure with the corresponding hole in the gear housing...drive disc aligns with the bolt (L). • Fit the drive disc (B) on the trimmer head/plastic blades (H) in the centre hole of rotation. Fitting the trimmer guard and trimmer head • Fit the correct trimmer guard (A) for use a cutting ! ASSEMBLY Assembling the cutting equipment WARNING! ! H...
... cutting attachment it can cause serious personal injury. WARNING! attachment without an approved guard. Never use with the trimmer head. Hook the trimmer guard/combination guard onto the fitting on the shaft and secure with the corresponding hole in the gear housing...drive disc aligns with the bolt (L). • Fit the drive disc (B) on the trimmer head/plastic blades (H) in the centre hole of rotation. Fitting the trimmer guard and trimmer head • Fit the correct trimmer guard (A) for use a cutting ! ASSEMBLY Assembling the cutting equipment WARNING! ! H...

Owners Manual
Page 14
...support flange is a risk of at surface. Not with your foot!). return choke control to fill the bulb. Replace the trimmer head or trimmer guard if they have a locking force of serious personal injury. Always move the machine away from the refuelling area before you feel some ... start the machine. The bulb need not be correctly fitted and undamaged before starting Starting and stopping • Check that the trimmer head and trimmer guard are not damaged or cracked. Choke: Set the choke control in the choke position. 14 - English WARNING!
...support flange is a risk of at surface. Not with your foot!). return choke control to fill the bulb. Replace the trimmer head or trimmer guard if they have a locking force of serious personal injury. Always move the machine away from the refuelling area before you feel some ... start the machine. The bulb need not be correctly fitted and undamaged before starting Starting and stopping • Check that the trimmer head and trimmer guard are not damaged or cracked. Choke: Set the choke control in the choke position. 14 - English WARNING!

Owners Manual
Page 16
... zone. 5 Keep a good balance and a firm foothold. 16 - machine nor anyone approaches. Never lean over the cutting attachment guard. WORKING TECHNIQUES General working with a trimmer. Take great care when working area. WARNING! You must be kept outside the safety zone of the ! Children, animals, onlookers and helpers should ask an...
... zone. 5 Keep a good balance and a firm foothold. 16 - machine nor anyone approaches. Never lean over the cutting attachment guard. WORKING TECHNIQUES General working with a trimmer. Take great care when working area. WARNING! You must be kept outside the safety zone of the ! Children, animals, onlookers and helpers should ask an...

Owners Manual
Page 17
... damaging plants by shortening the cord to 10-12 cm and reducing the engine speed. Keep the trimmer head just above the ground and tilt it can lead to serious engine damage. Sometimes branches or ...fences, etc., than full throttle so that the cord lasts longer and to reduce the wear on the trimmer head. 1152414-95 Rev.2 2009-09-18 English - 17 WARNING! Hold the cord parallel to and ...above the ground at an angle. Avoid pressing the trimmer head against the ground as this type can easily remove grass and weeds up . Grass trimming with ...
... damaging plants by shortening the cord to 10-12 cm and reducing the engine speed. Keep the trimmer head just above the ground and tilt it can lead to serious engine damage. Sometimes branches or ...fences, etc., than full throttle so that the cord lasts longer and to reduce the wear on the trimmer head. 1152414-95 Rev.2 2009-09-18 English - 17 WARNING! Hold the cord parallel to and ...above the ground at an angle. Avoid pressing the trimmer head against the ground as this type can easily remove grass and weeds up . Grass trimming with ...

Owners Manual
Page 22
... Check that there are tight. Replace the guard if it has been exposed to mufflers fitted with a suppressor. Replace the trimmer head if necessary. X Check that the stop switch works correctly. Remove it . Replace if necessary. Replace the spark plug. English 1152414-95 ... gap. Check that the guard is filled three-quarters full with a suppressor. Fill if necessary using special grease. Check that the trimmer head is fitted with lubricant. X Check that the spark plug is undamaged and not cracked. Clean the outside of the machine. ...
... Check that there are tight. Replace the guard if it has been exposed to mufflers fitted with a suppressor. Replace the trimmer head if necessary. X Check that the stop switch works correctly. Remove it . Replace if necessary. Replace the spark plug. English 1152414-95 ... gap. Check that the guard is filled three-quarters full with a suppressor. Fill if necessary using special grease. Check that the trimmer head is fitted with lubricant. X Check that the spark plug is undamaged and not cracked. Clean the outside of the machine. ...

Owners Manual
Page 24
...listed. English 1152414-95 Rev.2 2009-09-18 Powerhead model 327LDx Accessories Arbor shaft thread M10 Plastic blades Trimmer head Type Tricut Ø 300 mm T25 S35 T35 Cutting attachment guard, Art. no. 503 93 42...model 327LDx Accessories Cultivator attachment CAC Edger attachment EAC Pole saw attachment PAC Blower attachment BAC Hedge trimmer attachment HAC Art No. 952 71 19-07 952 71 19-08 952 71 19-10... 537 42 54-01 The accessories have been developed mainly for the Husqvarna 125LD trimmer, but can also be used in combination with the specified power heads have been...
...listed. English 1152414-95 Rev.2 2009-09-18 Powerhead model 327LDx Accessories Arbor shaft thread M10 Plastic blades Trimmer head Type Tricut Ø 300 mm T25 S35 T35 Cutting attachment guard, Art. no. 503 93 42...model 327LDx Accessories Cultivator attachment CAC Edger attachment EAC Pole saw attachment PAC Blower attachment BAC Hedge trimmer attachment HAC Art No. 952 71 19-07 952 71 19-08 952 71 19-10... 537 42 54-01 The accessories have been developed mainly for the Husqvarna 125LD trimmer, but can also be used in combination with the specified power heads have been...


