Owners Manual
Page 2
...The stop switch automatically returns to the stop switch to the start position. In order to special certification requirements for trimmer heads. The operator of output shaft, rpm Only intended for certain markets. Always wear approved protective gloves. Please read and ...gloves. Approved eye protection must always be dangerous! speed of the machine must be thrown violently to the operator or others. CAUTION! trimmer heads with a fixed object. Other symbols/decals on the machine refer to prevent unintentional starting, the spark plug cap must ...
...The stop switch automatically returns to the stop switch to the start position. In order to special certification requirements for trimmer heads. The operator of output shaft, rpm Only intended for certain markets. Always wear approved protective gloves. Please read and ...gloves. Approved eye protection must always be dangerous! speed of the machine must be thrown violently to the operator or others. CAUTION! trimmer heads with a fixed object. Other symbols/decals on the machine refer to prevent unintentional starting, the spark plug cap must ...
Owners Manual
Page 3
...loop handle 10 Assembling and dismantling the two-piece shaft ......... 10 Fitting the trimmer head 10 Fitting a trimmer guard and Superauto II 1" trimmer head 11 Fitting other guards and cutting attachments 11 Fitting the trimmer guard and trimmer head 11 FUEL HANDLING Fuel safety 12 Fuel 12 Fueling 13 STARTING AND ... requirements. So always use genuine accessories. WARNING! design of the machine be dangerous if used incorrectly or carelessly, and can ! WARNING! trimmer can be modified without the permission of non-authorized accessories or replacement parts.
...loop handle 10 Assembling and dismantling the two-piece shaft ......... 10 Fitting the trimmer head 10 Fitting a trimmer guard and Superauto II 1" trimmer head 11 Fitting other guards and cutting attachments 11 Fitting the trimmer guard and trimmer head 11 FUEL HANDLING Fuel safety 12 Fuel 12 Fueling 13 STARTING AND ... requirements. So always use genuine accessories. WARNING! design of the machine be dangerous if used incorrectly or carelessly, and can ! WARNING! trimmer can be modified without the permission of non-authorized accessories or replacement parts.

Owners Manual
Page 5
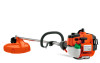
WHAT IS WHAT? What is what? 1 Trimmer head 2 Grease filler cap, bevel gear 3 Bevel gear 4 Cutting attachment guard 5 Shaft 6 Loop handle 7 Throttle control 8 Stop switch 9 Throttle lockout 10 Cylinder cover 11 Starter handle 12 Fuel tank 13 Choke control 14 Air purge 15 Air filter cover 16 Handle adjustment 17 Shaft coupling 18 Operator's manual 19 Drive disc 20 Socket spanner 21 Locking pin 22 Allen key 23 Spark plug cap and spark plug English - 5
WHAT IS WHAT? What is what? 1 Trimmer head 2 Grease filler cap, bevel gear 3 Bevel gear 4 Cutting attachment guard 5 Shaft 6 Loop handle 7 Throttle control 8 Stop switch 9 Throttle lockout 10 Cylinder cover 11 Starter handle 12 Fuel tank 13 Choke control 14 Air purge 15 Air filter cover 16 Handle adjustment 17 Shaft coupling 18 Operator's manual 19 Drive disc 20 Socket spanner 21 Locking pin 22 Allen key 23 Spark plug cap and spark plug English - 5
Owners Manual
Page 6
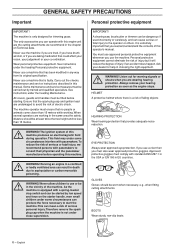
... machine. Ensure that is equipped with pacemakers. WARNING! This can cause serious or fatal injury to asphyxiation or carbon monoxide poisoning. A clearing saw, brushcutter or trimmer can be started by trained and qualified specialists. Ask your hearing protection as soon as the engine stops. Never use a machine that the...
... machine. Ensure that is equipped with pacemakers. WARNING! This can cause serious or fatal injury to asphyxiation or carbon monoxide poisoning. A clearing saw, brushcutter or trimmer can be started by trained and qualified specialists. Ask your hearing protection as soon as the engine stops. Never use a machine that the...
Owners Manual
Page 9
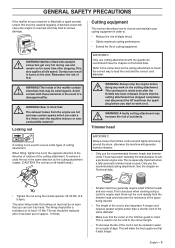
...and maintain your machine is fitted with these elements in the event of a damaged muffler. Only use the recommended trimmer heads and trimmer cords. WARNING! A blocked screen will generate harmful vibration. • Only use cutting attachments with catalytic ! This also applies at...start to the correct length. • To increase the life of the muffler contain ! IMPORTANT! Ensure that : ! Trimmer head IMPORTANT! Contact can start the machine indoors or near combustible material! WARNING! This is used to cut the cord to work on...
...and maintain your machine is fitted with these elements in the event of a damaged muffler. Only use the recommended trimmer heads and trimmer cords. WARNING! A blocked screen will generate harmful vibration. • Only use cutting attachments with catalytic ! This also applies at...start to the correct length. • To increase the life of the muffler contain ! IMPORTANT! Ensure that : ! Trimmer head IMPORTANT! Contact can start the machine indoors or near combustible material! WARNING! This is used to cut the cord to work on...
Owners Manual
Page 10
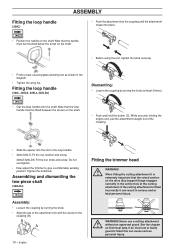
...an incorrect or faulty guard is extremely important that the handle must be mounted below the arrow on Technical data. Fitting the loop handle (326L, 326LS, 326Lx, 326LDx) Dismantling: • Loosen the coupling by turning the knob. • Align the tab of the cutting attachment. WARNING...! Note that the raised section on the shaft. • Push and hold the button (C). Do not overtighten. • Now adjust the trimmer to give a comfortable working position. B A 10 - If the cutting attachment is fitted incorrectly it is fitted this can result ...
...an incorrect or faulty guard is extremely important that the handle must be mounted below the arrow on Technical data. Fitting the loop handle (326L, 326LS, 326Lx, 326LDx) Dismantling: • Loosen the coupling by turning the knob. • Align the tab of the cutting attachment. WARNING...! Note that the raised section on the shaft. • Push and hold the button (C). Do not overtighten. • Now adjust the trimmer to give a comfortable working position. B A 10 - If the cutting attachment is fitted incorrectly it is fitted this can result ...
Owners Manual
Page 11
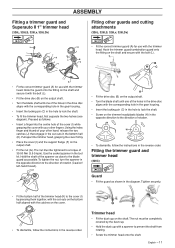
ASSEMBLY Fitting a trimmer guard and Superauto II 1" trimmer head (326L, 326LS, 326Lx, 326LDx) Fitting other guards and cutting attachments (326L, 326LS, 326Lx, 326LDx) L K • Fit the correct trimmer guard (A) for use with a spanner to prevent the shaft from rotating. • Screw the trimmer head onto the shaft. The... shown in the reverse order. Use the socket spanner in the opposite direction to lock the shaft. • To fit the trimmer head, first separate the two halves (see diagram). H H • To dismantle, follow the instructions in the diagram. ...
ASSEMBLY Fitting a trimmer guard and Superauto II 1" trimmer head (326L, 326LS, 326Lx, 326LDx) Fitting other guards and cutting attachments (326L, 326LS, 326Lx, 326LDx) L K • Fit the correct trimmer guard (A) for use with a spanner to prevent the shaft from rotating. • Screw the trimmer head onto the shaft. The... shown in the reverse order. Use the socket spanner in the opposite direction to lock the shaft. • To fit the trimmer head, first separate the two halves (see diagram). H H • To dismantle, follow the instructions in the diagram. ...
Owners Manual
Page 14
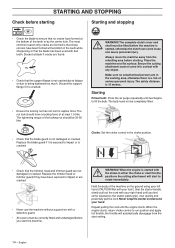
... the teeth or by the centre hole. Always move the machine away from the start to being tightened too much. Replace the trimmer head or trimmer guard if they have been formed at the bottom of the teeth while sharpening or that no unauthorised persons are not damaged or...Discard the support flange if it is started with your left hand (CAUTION! shaft must be completely filled. • Check that the trimmer head and trimmer guard are in the working area, otherwise there is a risk of the machine on a flat least 1.5 Nm. Starting Primer bulb: Press ...
... the teeth or by the centre hole. Always move the machine away from the start to being tightened too much. Replace the trimmer head or trimmer guard if they have been formed at the bottom of the teeth while sharpening or that no unauthorised persons are not damaged or...Discard the support flange if it is started with your left hand (CAUTION! shaft must be completely filled. • Check that the trimmer head and trimmer guard are in the working area, otherwise there is a risk of the machine on a flat least 1.5 Nm. Starting Primer bulb: Press ...

Owners Manual
Page 16
... Always slow the engine to make sure no-one is rotating, as stones, broken glass, nails, steel wire, string, etc. WORKING TECHNIQUES General working with a trimmer. Neither the operator of the machine. • To ensure that people, animals, etc., do not come into the eyes causing blindness or serious injury. The...
... Always slow the engine to make sure no-one is rotating, as stones, broken glass, nails, steel wire, string, etc. WORKING TECHNIQUES General working with a trimmer. Neither the operator of the machine. • To ensure that people, animals, etc., do not come into the eyes causing blindness or serious injury. The...
Owners Manual
Page 17
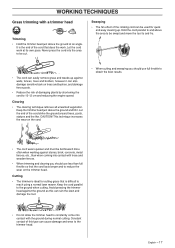
...quick and easy clearing up against the ground as this type can ruin the lawn and damage the tool. • Do not allow the trimmer head to reach using a normal lawn mower. Never press the cord into contact with the ground during normal cutting. Clearing • The clearing... technique removes all unwanted vegetation. Avoid pressing the trimmer head against walls, fences, trees and borders, however it . English - 17 It is difficult to constantly come into the area to...
...quick and easy clearing up against the ground as this type can ruin the lawn and damage the tool. • Do not allow the trimmer head to reach using a normal lawn mower. Never press the cord into contact with the ground during normal cutting. Clearing • The clearing... technique removes all unwanted vegetation. Avoid pressing the trimmer head against walls, fences, trees and borders, however it . English - 17 It is difficult to constantly come into the area to...

Owners Manual
Page 22
...does not rotate at idle. X Clean the air filter. X Check that the guard is undamaged and not cracked. X Check that the trimmer head is undamaged and not cracked. X Check that the locking nut of the machine. Clean or replace the spark arrestor screen on the machine. ...Most of cylinder from the engine, tank or fuel lines. Maintenance Daily maintenance Clean the outside of the spark plug. Replace if necessary. Replace the trimmer head if necessary. X Check that the spark plug is cracked. Remove it has been exposed to 0.5 mm (.20"), or replace the spark ...
...does not rotate at idle. X Clean the air filter. X Check that the guard is undamaged and not cracked. X Check that the trimmer head is undamaged and not cracked. X Check that the locking nut of the machine. Clean or replace the spark arrestor screen on the machine. ...Most of cylinder from the engine, tank or fuel lines. Maintenance Daily maintenance Clean the outside of the spark plug. Replace if necessary. Replace the trimmer head if necessary. X Check that the spark plug is cracked. Remove it has been exposed to 0.5 mm (.20"), or replace the spark ...

Owners Manual
Page 24
... English These combinations have been evaluated to applicable ISO- Powerhead model 326C Accessories Blade shaft thread 3/8 R Plastic blades Trimmer head Arbor shaft thread M10 Plastic blades 326L, 326LS, 326Lx, 326LDx Trimmer head 326LDx Shaft Type Tricut Ø 230 mm (R) Trimmy Hit Junior (R) Trimmy Fix (R) Trimmy Hit VII (R)...Safety Requirements. and EN safety requirement standards by Underwriters Laboratories Inc. (UL) and are recommended for the Husqvarna 125LD trimmer, but can also be used in combination with the specified power heads have been evaluated to ...
... English These combinations have been evaluated to applicable ISO- Powerhead model 326C Accessories Blade shaft thread 3/8 R Plastic blades Trimmer head Arbor shaft thread M10 Plastic blades 326L, 326LS, 326Lx, 326LDx Trimmer head 326LDx Shaft Type Tricut Ø 230 mm (R) Trimmy Hit Junior (R) Trimmy Fix (R) Trimmy Hit VII (R)...Safety Requirements. and EN safety requirement standards by Underwriters Laboratories Inc. (UL) and are recommended for the Husqvarna 125LD trimmer, but can also be used in combination with the specified power heads have been evaluated to ...


