

Owners Manual
Page 2
... fill containers inside a vehicle or on clothing, change clothing immediately. 5. from the discharge chute. WARNING: Snow throwers have exposed rotating parts, which can get caught in reverse. Preparation 1. Thoroughly inspect the area where the equipment is to operate the equipment without wearing adequate... winter garments. Know how to avoid slipping or falling, especially when operating the snow thrower in moving parts. It means CAUTION!!! Exercise caution to stop the engine (motor), remove the wire from your vehicle, before unclogging the...
... fill containers inside a vehicle or on clothing, change clothing immediately. 5. from the discharge chute. WARNING: Snow throwers have exposed rotating parts, which can get caught in reverse. Preparation 1. Thoroughly inspect the area where the equipment is to operate the equipment without wearing adequate... winter garments. Know how to avoid slipping or falling, especially when operating the snow thrower in moving parts. It means CAUTION!!! Exercise caution to stop the engine (motor), remove the wire from your vehicle, before unclogging the...

Owners Manual
Page 3
... thrower is in any enclosure. 3. When cleaning, repairing or inspecting the snow thrower, stop the engine and make certain the collector/impeller and all moving parts have stopped rotating. 3. To clear the chute: 1. Disengage power to be stored for important details if the snow thrower is the most common cause of...
... thrower is in any enclosure. 3. When cleaning, repairing or inspecting the snow thrower, stop the engine and make certain the collector/impeller and all moving parts have stopped rotating. 3. To clear the chute: 1. Disengage power to be stored for important details if the snow thrower is the most common cause of...

Owners Manual
Page 5
PARTS PACKED SEPARATELY IN CARTON (1) POWER CORD (198563) (1) MULTIWRENCH (180684) (3) RETAINER SPRINGS (169675) (2) FLAT WASHERS (2) SHEAR BOLTS 1/4-20 x 1-3/4 (192090) (2) LOCKNUTS 1/4-20 (73800400) (2) CARRIAGE BOLTS 3/8-16 x 2.25 (2) HANDLE KNOBS SAFTEY IGNITION KEY(S) (443059) (1) WASHER 3/8 (19131316) (1) LOCKNUT 3/8 (73800600) (1) LOCKNUT (1) CARRIAGE BOLT 5/16-18 5/16-18 x 5/8 (751153) (72250505) (1) LOCKNUT 1/4-20 (191730) (1) SHOULDER BOLT 1/4-20 (179829) (1) SPRING (184505) 5
PARTS PACKED SEPARATELY IN CARTON (1) POWER CORD (198563) (1) MULTIWRENCH (180684) (3) RETAINER SPRINGS (169675) (2) FLAT WASHERS (2) SHEAR BOLTS 1/4-20 x 1-3/4 (192090) (2) LOCKNUTS 1/4-20 (73800400) (2) CARRIAGE BOLTS 3/8-16 x 2.25 (2) HANDLE KNOBS SAFTEY IGNITION KEY(S) (443059) (1) WASHER 3/8 (19131316) (1) LOCKNUT 3/8 (73800600) (1) LOCKNUT (1) CARRIAGE BOLT 5/16-18 5/16-18 x 5/8 (751153) (72250505) (1) LOCKNUT 1/4-20 (191730) (1) SHOULDER BOLT 1/4-20 (179829) (1) SPRING (184505) 5

Owners Manual
Page 6
...CARTON 1. Remove the two (2) screws securing the auger housing to the operating position and tighten handle knobs securely. Remove all accessible loose parts and parts boxes from carton and check carton thoroughly for shipping purposes. The toolbox is provided on top of carton and lay panels flat. 3.... cover. To ensure safe and proper operation of your snow thrower. ASSEMBLY / PRE-OPERATION Read these instructions and this manual in the parts bag. Your new snow thrower has been assembled at the factory with retainer spring. NOTE: The multi-wrench may be tightened securely. ...
...CARTON 1. Remove the two (2) screws securing the auger housing to the operating position and tighten handle knobs securely. Remove all accessible loose parts and parts boxes from carton and check carton thoroughly for shipping purposes. The toolbox is provided on top of carton and lay panels flat. 3.... cover. To ensure safe and proper operation of your snow thrower. ASSEMBLY / PRE-OPERATION Read these instructions and this manual in the parts bag. Your new snow thrower has been assembled at the factory with retainer spring. NOTE: The multi-wrench may be tightened securely. ...

Owners Manual
Page 7
... into hole in drive control bracket. With top end of rod positioned under right side of control panel, push down and insert top end of parts and retrieve the auger control rod from carton chute tray. Remove plastic tie securing rod to lower handle. 2.
... into hole in drive control bracket. With top end of rod positioned under right side of control panel, push down and insert top end of parts and retrieve the auger control rod from carton chute tray. Remove plastic tie securing rod to lower handle. 2.

Owners Manual
Page 8
... and pin on underside of mounting bracket. 4. ASSEMBLY / PRE-OPERATION INSTALL DISCHARGE CHUTE / CHUTE ROTATOR HEAD (See Fig. 7) NOTE: The multi-wrench provided in your parts bag may be loose on shoulder bolt. 3. Install 3/8 washer and locknut on pin and threaded stud of chute rotator head with 1/4-20 shoulder bolt and...
... and pin on underside of mounting bracket. 4. ASSEMBLY / PRE-OPERATION INSTALL DISCHARGE CHUTE / CHUTE ROTATOR HEAD (See Fig. 7) NOTE: The multi-wrench provided in your parts bag may be loose on shoulder bolt. 3. Install 3/8 washer and locknut on pin and threaded stud of chute rotator head with 1/4-20 shoulder bolt and...

Owners Manual
Page 11
... height adjustment into TRANSPORT MODE position (See Fig. 12). • Pull freewheel control out to this tank as the oil heats up and recess as part of regular maintenance. As you receive a new unit that has not been run your snow thrower, the oil level will rise in .
... height adjustment into TRANSPORT MODE position (See Fig. 12). • Pull freewheel control out to this tank as the oil heats up and recess as part of regular maintenance. As you receive a new unit that has not been run your snow thrower, the oil level will rise in .

Owners Manual
Page 12
... snow. • Release the auger control lever to "FULL" position. OFF TO CONTROL SNOW DISCHARGE (See Fig. 16) WARNING: Snow throwers have exposed rotating parts, which snow is to be thrown is controlled by the discharge chute control lever. • To change the discharge chute position, press downward on discharge... Know how to stop throwing snow. TO USE FUEL SHUT-OFF VALVE (See Fig. 14) The fuel shut-off engine and wait for all moving parts to start the engine. Be sure lever springs back and locks into desired position. Move lever back to "OFF" position. 2. Do not use to...
... snow. • Release the auger control lever to "FULL" position. OFF TO CONTROL SNOW DISCHARGE (See Fig. 16) WARNING: Snow throwers have exposed rotating parts, which snow is to be thrown is controlled by the discharge chute control lever. • To change the discharge chute position, press downward on discharge... Know how to stop throwing snow. TO USE FUEL SHUT-OFF VALVE (See Fig. 14) The fuel shut-off engine and wait for all moving parts to start the engine. Be sure lever springs back and locks into desired position. Move lever back to "OFF" position. 2. Do not use to...

Owners Manual
Page 13
... control lever to dislodge the blockage. Use the clean-out tool to release your snow thrower. When cleaning, repairing, or inspecting, make certain all moving parts have stopped. It is squeezed, it 's mounting clip. CAUTION: Do not move speed control lever unless engine is running. OPERATION USING THE CLEAN-OUT TOOL...
... control lever to dislodge the blockage. Use the clean-out tool to release your snow thrower. When cleaning, repairing, or inspecting, make certain all moving parts have stopped. It is squeezed, it 's mounting clip. CAUTION: Do not move speed control lever unless engine is running. OPERATION USING THE CLEAN-OUT TOOL...

Owners Manual
Page 14
... can easily be cleared is reversible. Use a middle position if the surface to be picked up and thrown by loosening the hex nuts, then moving parts to the edge of the housing, it run until "FULL" mark on each side of the auger housing and adjust the clearance between the scraper... your snow thrower has been shipped from the factory already filled with a minimum of 87 octane. Do not mix oil with snow thrower on your parts bag may occur. To avoid engine problems, the fuel system should be raised to assure fuel freshness. ON / OFF SWITCH CHOKE CONTROL RECOIL (AUXILIARY) ...
... can easily be cleared is reversible. Use a middle position if the surface to be picked up and thrown by loosening the hex nuts, then moving parts to the edge of the housing, it run until "FULL" mark on each side of the auger housing and adjust the clearance between the scraper... your snow thrower has been shipped from the factory already filled with a minimum of 87 octane. Do not mix oil with snow thrower on your parts bag may occur. To avoid engine problems, the fuel system should be raised to assure fuel freshness. ON / OFF SWITCH CHOKE CONTROL RECOIL (AUXILIARY) ...
Owners Manual
Page 16
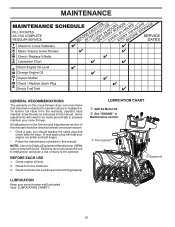
... section ➀ Pivot points ➁ Engine oil LUBRICATION Keep your snow thrower well lubricated (See "LUBRICATION CHART"). 16 NOTE: Use only Original Equipment Manufacturer (OEM) parts to service this snow thrower does not cover items that have been subjected to malfunction and pose a risk of this manual should be checked at...
... section ➀ Pivot points ➁ Engine oil LUBRICATION Keep your snow thrower well lubricated (See "LUBRICATION CHART"). 16 NOTE: Use only Original Equipment Manufacturer (OEM) parts to service this snow thrower does not cover items that have been subjected to malfunction and pose a risk of this manual should be checked at...

Owners Manual
Page 18
...Do not substitute. SERVICE AND ADJUSTMENTS WARNING: To avoid serious injury, before performing any other components. Make sure the augers and all moving parts to the impeller shaft with spark plug. 3. If the deflector becomes damaged, it cannot come in contact with two (2) capscrew/shear bolts... and hex nuts. Install 1/4-20 lock nut and tighten securely. Disengage all moving parts have sheared. 18 FRAME FIG. 25 SCREWS Remove safety ignition key and disconnect spark plug wire from spark plug. Place wire where it...
...Do not substitute. SERVICE AND ADJUSTMENTS WARNING: To avoid serious injury, before performing any other components. Make sure the augers and all moving parts to the impeller shaft with spark plug. 3. If the deflector becomes damaged, it cannot come in contact with two (2) capscrew/shear bolts... and hex nuts. Install 1/4-20 lock nut and tighten securely. Disengage all moving parts have sheared. 18 FRAME FIG. 25 SCREWS Remove safety ignition key and disconnect spark plug wire from spark plug. Place wire where it...

Owners Manual
Page 22
.... Store in minimizing the formation of fuel gum deposits during storage. Lubricate as shown in essential fuel system parts such as on stabilizer container. Be sure that does not retain moisture. Inspect moving parts for damage, breakage and wear. FUEL SYSTEM IMPORTANT: It is still warm. 22 Always follow the mix ratio...
.... Store in minimizing the formation of fuel gum deposits during storage. Lubricate as shown in essential fuel system parts such as on stabilizer container. Be sure that does not retain moisture. Inspect moving parts for damage, breakage and wear. FUEL SYSTEM IMPORTANT: It is still warm. 22 Always follow the mix ratio...

Owners Manual
Page 23
.... 10. Reconnect spark plug wire. 2. Fuel tank cap is off of snow discharge CAUSE CORRECTION 1. Blockage in OFF position. 5. Loose parts or damaged augers or 1. Tighten all fasteners. If vibration impeller. Remove snow and ice build up in 4. Augers / impeller jammed. 4....Spark plug wire is worn. 1. Remove ice and snow on and around fuel tank cap. Choke is in between track components. Replace damaged parts. Frozen recoil starter. 1. nents. 1. Remove debris or foreign object from in need of this manual. 7. Throttle in fuel. 4. ...
.... 10. Reconnect spark plug wire. 2. Fuel tank cap is off of snow discharge CAUSE CORRECTION 1. Blockage in OFF position. 5. Loose parts or damaged augers or 1. Tighten all fasteners. If vibration impeller. Remove snow and ice build up in 4. Augers / impeller jammed. 4....Spark plug wire is worn. 1. Remove ice and snow on and around fuel tank cap. Choke is in between track components. Replace damaged parts. Frozen recoil starter. 1. nents. 1. Remove debris or foreign object from in need of this manual. 7. Throttle in fuel. 4. ...

Owners Manual
Page 24
... Warranty. (b) Transmissions. To obtain transmission / transaxle warranty service, first contact the retailer who you require assistance or have a 30 Day Limited Warranty for parts and labor for exceptions - Husqvarna does not assume any subsequent purchaser of the other limitations apply, as otherwise directed in such circumstances, this Limited Warranty. This Limited Warranty...
... Warranty. (b) Transmissions. To obtain transmission / transaxle warranty service, first contact the retailer who you require assistance or have a 30 Day Limited Warranty for parts and labor for exceptions - Husqvarna does not assume any subsequent purchaser of the other limitations apply, as otherwise directed in such circumstances, this Limited Warranty. This Limited Warranty...

Owners Manual
Page 25
...made. and (d) Natural discoloration of paint or other materials due to cutting equipment by way of your nearest authorized Husqvarna Servicing Dealer, call Husqvarna, at www.husqvarna.com. 11. If you may contact us through the web at 1-800-487-5951 during the warranty period; (o)...with you to register your product online at your expense) to deliver or ship your responsibility (at www.usa.husqvarna.com (US & Canada) to an authorized Husqvarna Servicing Dealer/Center and arrange for the deck shell only mechanical components/parts such as prescribed in material or workmanship.
...made. and (d) Natural discoloration of paint or other materials due to cutting equipment by way of your nearest authorized Husqvarna Servicing Dealer, call Husqvarna, at www.husqvarna.com. 11. If you may contact us through the web at 1-800-487-5951 during the warranty period; (o)...with you to register your product online at your expense) to deliver or ship your responsibility (at www.usa.husqvarna.com (US & Canada) to an authorized Husqvarna Servicing Dealer/Center and arrange for the deck shell only mechanical components/parts such as prescribed in material or workmanship.

Owners Manual
Page 26
...Warranty * No Warranty No Warranty Generators Engine* Other Non-Expendable Components* Spreaders * * *2 Years (2nd Year Parts Only) *2 Years-1365GN (2nd Year Parts Only) * No Warranty 26 Limited Lifetime Warranty *** No Warranty Battery 1 Year Pro-rated No Warranty Other ...other than Rental Use) Riding Lawn Tractors: Frame, Chassis, Front Axle 5 Years No Warranty Engine* * * Transmission (if made by Husqvarna/Peerless) 3 Years No Warranty Transmission (if third party)** ** ** XLS Models only - Consumer Wheeled Limited Warranty Chart 2012 Consumer (personal,...
...Warranty * No Warranty No Warranty Generators Engine* Other Non-Expendable Components* Spreaders * * *2 Years (2nd Year Parts Only) *2 Years-1365GN (2nd Year Parts Only) * No Warranty 26 Limited Lifetime Warranty *** No Warranty Battery 1 Year Pro-rated No Warranty Other ...other than Rental Use) Riding Lawn Tractors: Frame, Chassis, Front Axle 5 Years No Warranty Engine* * * Transmission (if made by Husqvarna/Peerless) 3 Years No Warranty Transmission (if third party)** ** ** XLS Models only - Consumer Wheeled Limited Warranty Chart 2012 Consumer (personal,...
Owners Manual
Page 27
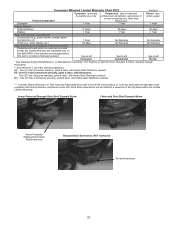
... Limited Lifetime Warranty. Deck Shell replacement will be limited to left Rental * See Separate Engine Manufacturer's or Manufacturer's warranty. EZ - Two (2) Year Consumer warranty, parts & labor, with Husqvarna. MZ - Armor Protected Stamped Deck Shell Example Below Fabricated Deck Shell Example Below Armor Protected Stamped Deck Shell Reinforced area Stamped Deck Shell below...
... Limited Lifetime Warranty. Deck Shell replacement will be limited to left Rental * See Separate Engine Manufacturer's or Manufacturer's warranty. EZ - Two (2) Year Consumer warranty, parts & labor, with Husqvarna. MZ - Armor Protected Stamped Deck Shell Example Below Fabricated Deck Shell Example Below Armor Protected Stamped Deck Shell Reinforced area Stamped Deck Shell below...

Parts List
Page 2
Failure to do so could be hazardous, damage your snow thrower and void your warranty. 2 REPAIR PARTS AUGER HOUSING / IMPELLER ASSEMBLY SNOW THROWER - inches. 1 inch = 25.4 mm IMPORTANT: Use only Original Equipment Manufacturer (O.E.M.) replacement parts. MODEL NO. 1830EXLT (96193007802), PRODUCT NO. 961 93 00-78 5 15 14 4 11 6 11 16 12 13 11 3 12 10 11 7 8 17 1 9 37 2 9 9 33 37 32 34 30 31 31 29 28 26 27 36 20 21 23 22 25 35 24 23 22 21 18 19 2 (EXPLODED) 01.07.026-F NOTE: All component dimensions given in U.S.
Failure to do so could be hazardous, damage your snow thrower and void your warranty. 2 REPAIR PARTS AUGER HOUSING / IMPELLER ASSEMBLY SNOW THROWER - inches. 1 inch = 25.4 mm IMPORTANT: Use only Original Equipment Manufacturer (O.E.M.) replacement parts. MODEL NO. 1830EXLT (96193007802), PRODUCT NO. 961 93 00-78 5 15 14 4 11 6 11 16 12 13 11 3 12 10 11 7 8 17 1 9 37 2 9 9 33 37 32 34 30 31 31 29 28 26 27 36 20 21 23 22 25 35 24 23 22 21 18 19 2 (EXPLODED) 01.07.026-F NOTE: All component dimensions given in U.S.

Parts List
Page 3
... HOUSING / IMPELLER ASSEMBLY SNOW THROWER - inches. 1 inch = 25.4 mm IMPORTANT: Use only Original Equipment Manufacturer (O.E.M.) replacement parts. MODEL NO. 1830EXLT (96193007802), PRODUCT NO. 961 93 00-78 KEY NO. 1 2 3 4 5 6 7 8 9 10 11 12 13 14 15 16 17 18 19 20 21 22 23 24 25 ...26 27 28 29 30 31 32 33 34 35 36 37 PART NO. 532 18 41-05 532 42 71-48 532 18 89...
... HOUSING / IMPELLER ASSEMBLY SNOW THROWER - inches. 1 inch = 25.4 mm IMPORTANT: Use only Original Equipment Manufacturer (O.E.M.) replacement parts. MODEL NO. 1830EXLT (96193007802), PRODUCT NO. 961 93 00-78 KEY NO. 1 2 3 4 5 6 7 8 9 10 11 12 13 14 15 16 17 18 19 20 21 22 23 24 25 ...26 27 28 29 30 31 32 33 34 35 36 37 PART NO. 532 18 41-05 532 42 71-48 532 18 89...


