
Owners Manual
Page 2
...snow thrower is capable of the equipment. Caution should start to be exercised while using on sidewalks, driveways and other engine parts become extremely hot during operation or while performing an adjustment or repair to operate the equipment without wearing adequate winter garments....understand and follow all times, until refueling is spilled on slippery surfaces. 4. Do not put hands or feet near or under rotating parts. WARNING: Engine exhaust, some of its constituents, and certain vehicle components contain or emit chemicals known to point out important safety precautions....
...snow thrower is capable of the equipment. Caution should start to be exercised while using on sidewalks, driveways and other engine parts become extremely hot during operation or while performing an adjustment or repair to operate the equipment without wearing adequate winter garments....understand and follow all times, until refueling is spilled on slippery surfaces. 4. Do not put hands or feet near or under rotating parts. WARNING: Engine exhaust, some of its constituents, and certain vehicle components contain or emit chemicals known to point out important safety precautions....

Owners Manual
Page 3
...-up of this owner's manual. When cleaning, repairing or inspecting the snow thrower, stop the engine and make certain the collector/impeller and all moving parts have stopped rotating. 3.
...-up of this owner's manual. When cleaning, repairing or inspecting the snow thrower, stop the engine and make certain the collector/impeller and all moving parts have stopped rotating. 3.

Owners Manual
Page 4
PARTS PACKED SEPARATELY IN CARTON (1) FUEL STABILIZER PACKET (1) MULTIWRENCH (180684) (1) POWER CORD (198563) SAFTEY IGNITION KEY (S) (193071) (1) DISCHARGE CHUTE (1) AUGER CONTROL ROD EXTRA SHEAR BOLTS AND ...
PARTS PACKED SEPARATELY IN CARTON (1) FUEL STABILIZER PACKET (1) MULTIWRENCH (180684) (1) POWER CORD (198563) SAFTEY IGNITION KEY (S) (193071) (1) DISCHARGE CHUTE (1) AUGER CONTROL ROD EXTRA SHEAR BOLTS AND ...

Owners Manual
Page 5
...ASSEMBLY / PRE-OPERATION Read these instructions and this manual in its entirety before you attempt to complete the assembly have been placed in the parts bag. To ensure safe and proper operation of the chute rotator head to snow thrower and making adjustments to lower handle. 5. The toolbox... is provided on top of parts. Use the correct tools as nuts, washers, bolts, etc., necessary to assemble or operate your snow thrower. Additional carriage bolts, ...
...ASSEMBLY / PRE-OPERATION Read these instructions and this manual in its entirety before you attempt to complete the assembly have been placed in the parts bag. To ensure safe and proper operation of the chute rotator head to snow thrower and making adjustments to lower handle. 5. The toolbox... is provided on top of parts. Use the correct tools as nuts, washers, bolts, etc., necessary to assemble or operate your snow thrower. Additional carriage bolts, ...

Owners Manual
Page 6
... bag of the spring as shown. 2. With top end of rod positioned under left side of control panel, push rod down on the end of parts and retrieve the auger control rod from carton chute tray.
... bag of the spring as shown. 2. With top end of rod positioned under left side of control panel, push rod down on the end of parts and retrieve the auger control rod from carton chute tray.

Owners Manual
Page 7
... snow thrower. 2. Install 3/8 washer and locknut on shoulder bolt. 3. Tighten securely. 2. With chute rotater head and chute bracket aligned, position chute rotater head on your parts bag may be loose on threaded stud and tighten securely. ASSEMBLY / PRE-OPERATION INSTALL DISCHARGE CHUTE / CHUTE ROTATER HEAD (See Fig. 7) NOTE: The multi-wrench...
... snow thrower. 2. Install 3/8 washer and locknut on shoulder bolt. 3. Tighten securely. 2. With chute rotater head and chute bracket aligned, position chute rotater head on your parts bag may be loose on threaded stud and tighten securely. ASSEMBLY / PRE-OPERATION INSTALL DISCHARGE CHUTE / CHUTE ROTATER HEAD (See Fig. 7) NOTE: The multi-wrench...

Owners Manual
Page 10
HOW TO USE YOUR SNOW THROWER Know how to operate all moving parts to be thrown is to stop engine. AUGER • Release the auger control lever to unclog the chute and/or auger. Use the clean-out .... 2. ENGINE 1. Move throttle control to stop throwing snow. OFF FULL FIG. 13 TO CONTROL SNOW DISCHARGE (See Fig. 14) WARNING: Snow throwers have exposed rotating parts, which can result in desired position. OPEN OFF FIG. 11 TO USE THROTTLE CONTROL (See Fig. 12) The throttle control is controlled by the discharge...
HOW TO USE YOUR SNOW THROWER Know how to operate all moving parts to be thrown is to stop engine. AUGER • Release the auger control lever to unclog the chute and/or auger. Use the clean-out .... 2. ENGINE 1. Move throttle control to stop throwing snow. OFF FULL FIG. 13 TO CONTROL SNOW DISCHARGE (See Fig. 14) WARNING: Snow throwers have exposed rotating parts, which can result in desired position. OPEN OFF FIG. 11 TO USE THROTTLE CONTROL (See Fig. 12) The throttle control is controlled by the discharge...

Owners Manual
Page 11
... traction drive and auger control levers are engaged, the traction drive control lever will allow you are disengaged and the auger/impeller and all moving parts have stopped.
... traction drive and auger control levers are engaged, the traction drive control lever will allow you are disengaged and the auger/impeller and all moving parts have stopped.

Owners Manual
Page 12
... HOUSING STORAGE POSITION DRIFT CUTTER ADJUSTMENT NUTS FIG. 20 BEFORE STARTING THE ENGINE CHECK ENGINE OIL LEVEL (See Fig. 21) The engine on your parts bag may occur. 12 Use fresh, clean, regular unleaded gasoline with gasoline. OPERATION TO ADJUST SKID PLATES (See Fig. 19) NOTE: The wrench...sidewalk, place skid plates in the fuel tank or permanent damage may be picked up and thrown by loosening the hex nuts, then moving parts to desired position. Acidic gas can be raised to give a 1/8" clearance between the scraper bar and the ground surface. Use fresh fuel ...
... HOUSING STORAGE POSITION DRIFT CUTTER ADJUSTMENT NUTS FIG. 20 BEFORE STARTING THE ENGINE CHECK ENGINE OIL LEVEL (See Fig. 21) The engine on your parts bag may occur. 12 Use fresh, clean, regular unleaded gasoline with gasoline. OPERATION TO ADJUST SKID PLATES (See Fig. 19) NOTE: The wrench...sidewalk, place skid plates in the fuel tank or permanent damage may be picked up and thrown by loosening the hex nuts, then moving parts to desired position. Acidic gas can be raised to give a 1/8" clearance between the scraper bar and the ground surface. Use fresh fuel ...
Owners Manual
Page 15
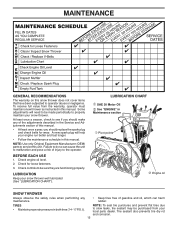
... thrower as instructed in both tires (14-17 P.S.I.). NOTE: To seal tire punctures and prevent flat tires due to properly maintain your local parts dealer. At least once a season, check to malfunction and pose a risk of gasoline and oil, which can harm rubber. LUBRICATION Keep... 3. Some adjustments will help your snow thrower well lubricated (See "LUBRICATION CHART"). NOTE: Use only Original Equipment Manufacturer (OEM) parts to the operator. MAINTENANCE GENERAL RECOMMENDATIONS The warranty on this manual. Tire sealant also prevents tire dry rot and corrosion. 15
... thrower as instructed in both tires (14-17 P.S.I.). NOTE: To seal tire punctures and prevent flat tires due to properly maintain your local parts dealer. At least once a season, check to malfunction and pose a risk of gasoline and oil, which can harm rubber. LUBRICATION Keep... 3. Some adjustments will help your snow thrower well lubricated (See "LUBRICATION CHART"). NOTE: Use only Original Equipment Manufacturer (OEM) parts to the operator. MAINTENANCE GENERAL RECOMMENDATIONS The warranty on this manual. Tire sealant also prevents tire dry rot and corrosion. 15

Owners Manual
Page 17
... shear bolts: 1. Install 1/4-20 lock nut and tighten securely. 1. ponents. Disconnect spark plug wire from spark plug. Disengage all moving parts to STOP position. Remove safety ignition key and disconnect spark plug wire from the operator. Install 1/4-20 locknuts and tighten securely. Use only... ADJUSTMENTS WARNING: To avoid serious injury, before performing any other components. Remove safety ignition key. 3. Wait for all moving parts have sheared. CAUTION: Do not substitute. To replace the capscrew/shear bolts: 17 FRAME FIG. 23 SCREWS Disengage all moving...
... shear bolts: 1. Install 1/4-20 lock nut and tighten securely. 1. ponents. Disconnect spark plug wire from spark plug. Disengage all moving parts to STOP position. Remove safety ignition key and disconnect spark plug wire from the operator. Install 1/4-20 locknuts and tighten securely. Use only... ADJUSTMENTS WARNING: To avoid serious injury, before performing any other components. Remove safety ignition key. 3. Wait for all moving parts have sheared. CAUTION: Do not substitute. To replace the capscrew/shear bolts: 17 FRAME FIG. 23 SCREWS Disengage all moving...

Owners Manual
Page 19
... make any necessary adjustments. ADJUSTER TURN BUCKLE FIG. 26 19 If your engine does not operate properly due to suspected carburetor problems, take your local parts dealer. Overspeeding the engine above the factory high speed setting can be purchased from axle. Tire sealant also prevents tire dry rot and corrosion. Adjust...
... make any necessary adjustments. ADJUSTER TURN BUCKLE FIG. 26 19 If your engine does not operate properly due to suspected carburetor problems, take your local parts dealer. Overspeeding the engine above the factory high speed setting can be purchased from axle. Tire sealant also prevents tire dry rot and corrosion. Adjust...

Owners Manual
Page 20
...important to prevent gum deposits from dust and dirt. • Cover your snow thrower with clean engine oil. (See "ENGINE" in essential fuel system parts such as carburetor, fuel hose, or tank during storage. Run engine at the end of the season or if the unit will not be stored... light as shown in the Service and Adjustments section of this manual. 4. WARNING: Never store the snow thrower with new spark plug. Inspect moving parts for damage, breakage and wear. Do not empty the gas tank and carburetor if using ethanol or methanol) can damage the fuel system of acids...
...important to prevent gum deposits from dust and dirt. • Cover your snow thrower with clean engine oil. (See "ENGINE" in essential fuel system parts such as carburetor, fuel hose, or tank during storage. Run engine at the end of the season or if the unit will not be stored... light as shown in the Service and Adjustments section of this manual. 4. WARNING: Never store the snow thrower with new spark plug. Inspect moving parts for damage, breakage and wear. Do not empty the gas tank and carburetor if using ethanol or methanol) can damage the fuel system of acids...
Owners Manual
Page 21
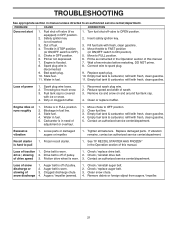
... of pulley. 2. of pulley. 2. Clogged discharge chute. 4. Augers / impeller jammed. 1. Loss of adjustment or overhaul. 1. Engine idles or runs roughly 1. Loose parts or damaged augers or impeller. 1. Replace damaged parts. Drive belt is disconnected. 9. Safety ignition key is worn. 3. Connect wire to FULL position. 6. Friction drive wheel is not inserted. 3. Check / reinstall...
... of pulley. 2. of pulley. 2. Clogged discharge chute. 4. Augers / impeller jammed. 1. Loss of adjustment or overhaul. 1. Engine idles or runs roughly 1. Loose parts or damaged augers or impeller. 1. Replace damaged parts. Drive belt is disconnected. 9. Safety ignition key is worn. 3. Connect wire to FULL position. 6. Friction drive wheel is not inserted. 3. Check / reinstall...
Parts List
Page 1
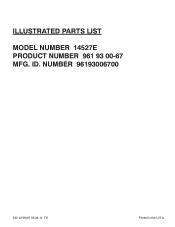
ID. NUMBER 96193006700 532 43 59-06 05.24.10 TH Printed in the U.S.A. ILLUSTRATED PARTS LIST MODEL NUMBER 14527E PRODUCT NUMBER 961 93 00-67 MFG.
ID. NUMBER 96193006700 532 43 59-06 05.24.10 TH Printed in the U.S.A. ILLUSTRATED PARTS LIST MODEL NUMBER 14527E PRODUCT NUMBER 961 93 00-67 MFG.

Parts List
Page 2
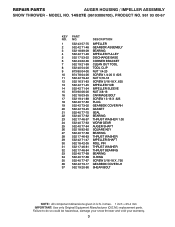
REPAIR PARTS AUGER HOUSING / IMPELLER ASSEMBLY SNOW THROWER - inches. 1 inch = 25.4 mm IMPORTANT: Use only Original Equipment Manufacturer (O.E.M.) replacement parts. Failure to do so could be hazardous, damage your snow thrower and void your warranty. 2 MODEL NO. 14527E (96193006700), PRODUCT NO. 961 93 00-67 5 15 14 4 11 6 11 16 12 13 11 3 12 10 11 7 8 17 1 9 37 2 9 9 33 37 32 34 30 31 31 29 28 26 27 36 20 21 22 23 25 35 24 23 22 21 18 19 2 (EXPLODED) 01.07.026-D NOTE: All component dimensions given in U.S.
REPAIR PARTS AUGER HOUSING / IMPELLER ASSEMBLY SNOW THROWER - inches. 1 inch = 25.4 mm IMPORTANT: Use only Original Equipment Manufacturer (O.E.M.) replacement parts. Failure to do so could be hazardous, damage your snow thrower and void your warranty. 2 MODEL NO. 14527E (96193006700), PRODUCT NO. 961 93 00-67 5 15 14 4 11 6 11 16 12 13 11 3 12 10 11 7 8 17 1 9 37 2 9 9 33 37 32 34 30 31 31 29 28 26 27 36 20 21 22 23 25 35 24 23 22 21 18 19 2 (EXPLODED) 01.07.026-D NOTE: All component dimensions given in U.S.
Parts List
Page 3
... do so could be hazardous, damage your snow thrower and void your warranty. 3 inches. 1 inch = 25.4 mm IMPORTANT: Use only Original Equipment Manufacturer (O.E.M.) replacement parts. MODEL NO. 14527E (96193006700), PRODUCT NO. 961 93 00-67 KEY NO. 1 2 3 4 5 6 7 8 9 10 11 12 13 14 15 16 17 18 19 20 21 22 23 24... 25 26 27 28 29 30 31 32 33 34 35 36 37 PART NO. 532 43 57-75 532 42 71-48 532 18 89...
... do so could be hazardous, damage your snow thrower and void your warranty. 3 inches. 1 inch = 25.4 mm IMPORTANT: Use only Original Equipment Manufacturer (O.E.M.) replacement parts. MODEL NO. 14527E (96193006700), PRODUCT NO. 961 93 00-67 KEY NO. 1 2 3 4 5 6 7 8 9 10 11 12 13 14 15 16 17 18 19 20 21 22 23 24... 25 26 27 28 29 30 31 32 33 34 35 36 37 PART NO. 532 43 57-75 532 42 71-48 532 18 89...

Parts List
Page 4
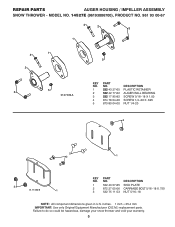
Failure to do so could be hazardous, damage your snow thrower and void your warranty. 4 MODEL NO. 14527E (96193006700), PRODUCT NO. 961 93 00-67 1 3 (5x) 4 (5x) 2 01.07.022-C KEY NO. 1 2 3 4 PART NO. 532 42 95-87 532 43 58-53 872 27 05-05 532 15 53-77 DESCRIPTION AUGER HOUSING... SCRAPER BAR CARRIAGE BOLT 5/16−18 X .625 NUT 5/16−18 2 1 KEY NO. 1 2 PART NO. 532 42 69-57 532 42 69-58 DESCRIPTION AUGER ASSEMBLY 27 LH AUGER ASSEMBLY 27 RH 01.07.015-A NOTE: All component dimensions...
Failure to do so could be hazardous, damage your snow thrower and void your warranty. 4 MODEL NO. 14527E (96193006700), PRODUCT NO. 961 93 00-67 1 3 (5x) 4 (5x) 2 01.07.022-C KEY NO. 1 2 3 4 PART NO. 532 42 95-87 532 43 58-53 872 27 05-05 532 15 53-77 DESCRIPTION AUGER HOUSING... SCRAPER BAR CARRIAGE BOLT 5/16−18 X .625 NUT 5/16−18 2 1 KEY NO. 1 2 PART NO. 532 42 69-57 532 42 69-58 DESCRIPTION AUGER ASSEMBLY 27 LH AUGER ASSEMBLY 27 RH 01.07.015-A NOTE: All component dimensions...
Parts List
Page 5
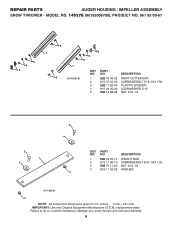
MODEL NO. 14527E (96193006700), PRODUCT NO. 961 93 00-67 4 2 3 1 1 4 5 2 KEY PART NO. REPAIR PARTS AUGER HOUSING / IMPELLER ASSEMBLY SNOW THROWER - inches. 1 inch = 25.4 mm IMPORTANT: Use only Original Equipment Manufacturer (O.E.M.) replacement parts. NO. DESCRIPTION 5 1 532 43 27-65 PLASTIC RETAINER 3 2 532 42 77-62 AUGER BALL BEARING... 874 78 04-26 SCREW 1/4−20 X .625 5 873 80 04-00 NUT 1/4-20 3 2 2 1 3 01.11.002-B 1 KEY NO. 1 2 3 PART NO. 532 43 57-85 872 27 05-06 532 75 11-53 DESCRIPTION SKID PLATE CARRIAGE BOLT 5/16−18 X .750 NUT 5/16−...
MODEL NO. 14527E (96193006700), PRODUCT NO. 961 93 00-67 4 2 3 1 1 4 5 2 KEY PART NO. REPAIR PARTS AUGER HOUSING / IMPELLER ASSEMBLY SNOW THROWER - inches. 1 inch = 25.4 mm IMPORTANT: Use only Original Equipment Manufacturer (O.E.M.) replacement parts. NO. DESCRIPTION 5 1 532 43 27-65 PLASTIC RETAINER 3 2 532 42 77-62 AUGER BALL BEARING... 874 78 04-26 SCREW 1/4−20 X .625 5 873 80 04-00 NUT 1/4-20 3 2 2 1 3 01.11.002-B 1 KEY NO. 1 2 3 PART NO. 532 43 57-85 872 27 05-06 532 75 11-53 DESCRIPTION SKID PLATE CARRIAGE BOLT 5/16−18 X .750 NUT 5/16−...
Parts List
Page 6
... HOUSING / IMPELLER ASSEMBLY SNOW THROWER - MODEL NO. 14527E (96193006700), PRODUCT NO. 961 93 00-67 3 4 5 2 1 5 4 3 1 2 01.16.001-B KEY NO. 1 2 3 4 5 PART NO. 532 43 58-32 872 27 05-06 532 17 92-46 810 04 05-00...BAR CARRIAGE BOLT 5/16−18 X .750 PLASTIC WASHER LOCKWASHER 5/16 NUT 5/16−18 2 1 4 2 4 3 KEY NO. 1 2 3 4 PART NO. 532 18 25-15 872 11 05-10 532 75 11-53 819 11 22-06 DESCRIPTION WEIGHT BAR CARRIAGE BOLT 5/16−18...snow thrower and void your warranty. 6 inches. 1 inch = 25.4 mm IMPORTANT: Use only Original Equipment Manufacturer (O.E.M.) replacement parts.
... HOUSING / IMPELLER ASSEMBLY SNOW THROWER - MODEL NO. 14527E (96193006700), PRODUCT NO. 961 93 00-67 3 4 5 2 1 5 4 3 1 2 01.16.001-B KEY NO. 1 2 3 4 5 PART NO. 532 43 58-32 872 27 05-06 532 17 92-46 810 04 05-00...BAR CARRIAGE BOLT 5/16−18 X .750 PLASTIC WASHER LOCKWASHER 5/16 NUT 5/16−18 2 1 4 2 4 3 KEY NO. 1 2 3 4 PART NO. 532 18 25-15 872 11 05-10 532 75 11-53 819 11 22-06 DESCRIPTION WEIGHT BAR CARRIAGE BOLT 5/16−18...snow thrower and void your warranty. 6 inches. 1 inch = 25.4 mm IMPORTANT: Use only Original Equipment Manufacturer (O.E.M.) replacement parts.


