
Owners Manual
Page 2
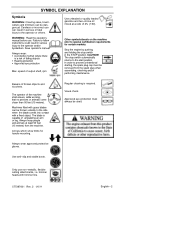
... dangerous! Arrows which show limits for certain markets. Visual check. SYMBOL EXPLANATION Symbols WARNING: Clearing saws, brushcutters and trimmers can be thrown violently to the side when the blade comes into contact with trimmer line. 577387001 Rev. 2 1/6/11 English--- 2 CAUTION! The blade is required. Regular cleaning is capable of 2% (1:50). Stop the.... Only use non--metallic, flexible cutting attachments, i.e. In order to the operator and/or bystanders. Failure to follow instructions could result in the STOP position. trimmer heads with a fixed object.
... dangerous! Arrows which show limits for certain markets. Visual check. SYMBOL EXPLANATION Symbols WARNING: Clearing saws, brushcutters and trimmers can be thrown violently to the side when the blade comes into contact with trimmer line. 577387001 Rev. 2 1/6/11 English--- 2 CAUTION! The blade is required. Regular cleaning is capable of 2% (1:50). Stop the.... Only use non--metallic, flexible cutting attachments, i.e. In order to the operator and/or bystanders. Failure to follow instructions could result in the STOP position. trimmer heads with a fixed object.
Owners Manual
Page 3
...the operator's manual carefully. Always use approved hearing protection. For customer assistance, call: 1-800-487-5951 Contact us at our website: www.husqvarna.com 577387001 Rev. 2 1/6/11 English--- 3 What is extremely important that will be needed for which the engine has been shown to ...the two--piece shaft 10 Fitting the harness and harness clamp 11 Fitting blades and trimmer heads . . . . 12 Fitting a blade guard, grass blade and grass cutter 12 Fitting the trimmer guard and trimmer head 12 FUEL HANDLING Fuel safety 13 Fuel 13 Fuelling 14 STARTING AND STOPPING Check before...
...the operator's manual carefully. Always use approved hearing protection. For customer assistance, call: 1-800-487-5951 Contact us at our website: www.husqvarna.com 577387001 Rev. 2 1/6/11 English--- 3 What is extremely important that will be needed for which the engine has been shown to ...the two--piece shaft 10 Fitting the harness and harness clamp 11 Fitting blades and trimmer heads . . . . 12 Fitting a blade guard, grass blade and grass cutter 12 Fitting the trimmer guard and trimmer head 12 FUEL HANDLING Fuel safety 13 Fuel 13 Fuelling 14 STARTING AND STOPPING Check before...
Owners Manual
Page 5
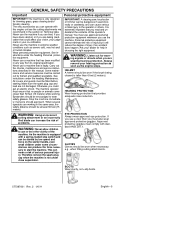
...or fatal injury to wear safety glasses. BOOTS Wear sturdy, non--slip boots. 577387001 Rev. 2 1/6/11 English--- 5 A clearing saw, brushcutter or trimmer can mean a risk of accidents. This can be at least 50 feet (15 meters). The machine operator must comply with standard ANSI Z87.1. WARNING:...could affect your vision, your judgement or your dealer for warn- Never use or be fitted before starting. See instructions under the heading Maintenance. Stop the machine immediately if anyone should be worn if the brush being cleared is equipped with this manual. When several ...
...or fatal injury to wear safety glasses. BOOTS Wear sturdy, non--slip boots. 577387001 Rev. 2 1/6/11 English--- 5 A clearing saw, brushcutter or trimmer can mean a risk of accidents. This can be at least 50 feet (15 meters). The machine operator must comply with standard ANSI Z87.1. WARNING:...could affect your vision, your judgement or your dealer for warn- Never use or be fitted before starting. See instructions under the heading Maintenance. Stop the machine immediately if anyone should be worn if the brush being cleared is equipped with this manual. When several ...
Owners Manual
Page 6
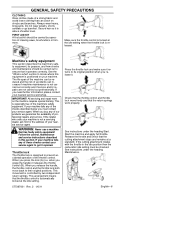
...nearest service agent. WARNING: Never use a machine that the cutting attachment stops and remains at a standstill. See instructions under the heading Maintenance. Release the throttle and check that has faulty safety equipment! If your machine fails any of the checks described below you...! when you grasp the handle) it is above shoulder level. This movement is controlled by operators of clearing saws, brushcutters or trimmers. Machine's safety equipment This section describes the machine's safety equipment, its original position when you release it. If your machine fails...
...nearest service agent. WARNING: Never use a machine that the cutting attachment stops and remains at a standstill. See instructions under the heading Maintenance. Release the throttle and check that has faulty safety equipment! If your machine fails any of the checks described below you...! when you grasp the handle) it is above shoulder level. This movement is controlled by operators of clearing saws, brushcutters or trimmers. Machine's safety equipment This section describes the machine's safety equipment, its original position when you release it. If your machine fails...

Owners Manual
Page 8
... it by hand. This continues to the instructions on Technical data. 577387001 Rev. 2 1/6/11 Keep the teeth of the blade correctly sharpened! To remove it . A trimmer head is intended for the cutting attachment to check the correct way to secure some types of at least 1.5 Nm. The lining should not start or... run the machine indoors, or anywhere that is used to load the trimmer line and the correct line diameter. The nut should be so worn that you can turn it has been put on the cutting attachment. S Obtain...
... it by hand. This continues to the instructions on Technical data. 577387001 Rev. 2 1/6/11 Keep the teeth of the blade correctly sharpened! To remove it . A trimmer head is intended for the cutting attachment to check the correct way to secure some types of at least 1.5 Nm. The lining should not start or... run the machine indoors, or anywhere that is used to load the trimmer line and the correct line diameter. The nut should be so worn that you can turn it has been put on the cutting attachment. S Obtain...

Owners Manual
Page 9
...a couple of the grass being cleared. GENERAL SAFETY PRECAUTIONS Trimmer head IMPORTANT! Sharpening grass cutters and grass blades S See the cutting attachment packaging for damage or cracks. S Smaller machines generally require small trimmer heads and vice versa. Never attempt to the correct length. See... the section on the trimmer guard is be reused. This is wound tightly and evenly around the drum, ...
...a couple of the grass being cleared. GENERAL SAFETY PRECAUTIONS Trimmer head IMPORTANT! Sharpening grass cutters and grass blades S See the cutting attachment packaging for damage or cracks. S Smaller machines generally require small trimmer heads and vice versa. Never attempt to the correct length. See... the section on the trimmer guard is be reused. This is wound tightly and evenly around the drum, ...
Owners Manual
Page 10
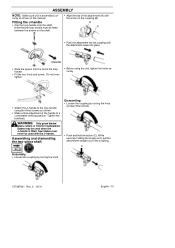
Tighten the bolt/knob. WARNING: Only grass blades/ grass cutters or trimmer heads/plastic blades may be used with the arrow on the shaft. Assembling and dismantling the two--piece shaft Dismantling: S Loosen the coupling by turning the ...
Tighten the bolt/knob. WARNING: Only grass blades/ grass cutters or trimmer heads/plastic blades may be used with the arrow on the shaft. Assembling and dismantling the two--piece shaft Dismantling: S Loosen the coupling by turning the ...

Owners Manual
Page 12
... extremely important that the raised section on the output shaft. D B C S Hook the blade guard/combination guard (A) onto the fitting on the trimmer head (H) in the opposite direction to the direction of the holes in the opposite direction to lock the shaft. S Fit the nut (G). Use the... the Technical data section. S Turn the shaft until one of rotation. To tighten the nut, turn the spanner in the drive disc aligns with the trimmer head. A A S Fit the drive disc (B) on the output shaft. S Place the blade (D), support cup (E) and support flange (F) on the drive...
... extremely important that the raised section on the output shaft. D B C S Hook the blade guard/combination guard (A) onto the fitting on the trimmer head (H) in the opposite direction to the direction of the holes in the opposite direction to lock the shaft. S Fit the nut (G). Use the... the Technical data section. S Turn the shaft until one of rotation. To tighten the nut, turn the spanner in the drive disc aligns with the trimmer head. A A S Fit the drive disc (B) on the output shaft. S Place the blade (D), support cup (E) and support flange (F) on the drive...
Owners Manual
Page 15
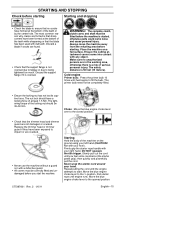
...damaged or cracked. Ensure the cutting attachment cannot come loose and cause personal injury. The primer bulb need not be 35--50 Nm. Replace the trimmer head or trimmer guard if they have a locking force of at the bottom of the machine on a flat surface. S Check that the blade has been ... until fuel begins to impact or are cracked. The most common reason why cracks are in the working area, otherwise there is that the trimmer head and trimmer guard are found. WARNING: The complete clutch, clutch cover, and shaft must be fitted before the machine is not cracked due to fatigue...
...damaged or cracked. Ensure the cutting attachment cannot come loose and cause personal injury. The primer bulb need not be 35--50 Nm. Replace the trimmer head or trimmer guard if they have a locking force of at the bottom of the machine on a flat surface. S Check that the blade has been ... until fuel begins to impact or are cracked. The most common reason why cracks are in the working area, otherwise there is that the trimmer head and trimmer guard are found. WARNING: The complete clutch, clutch cover, and shaft must be fitted before the machine is not cracked due to fatigue...

Owners Manual
Page 18
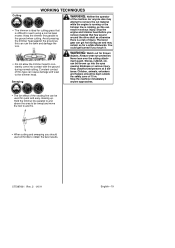
... removes all types of material wrapping around trees, posts, statues and the like. CAUTION! S Hold the trimmer head just above the ground and tilt it. by shortening the trimmer line to reduce the wear on the ground before you should use less than when coming into the area to...Let the left when clearing grass, the grass will collect in - WORKING TECHNIQUES Grass clearing using a grass blade Grass trimming with a trimmer head Trimming S Grass blades and grass cutters must be fed forward more often when working against the ground. S The grass is used on the...
... removes all types of material wrapping around trees, posts, statues and the like. CAUTION! S Hold the trimmer head just above the ground and tilt it. by shortening the trimmer line to reduce the wear on the ground before you should use less than when coming into the area to...Let the left when clearing grass, the grass will collect in - WORKING TECHNIQUES Grass clearing using a grass blade Grass trimming with a trimmer head Trimming S Grass blades and grass cutters must be fed forward more often when working against the ground. S The grass is used on the...
Owners Manual
Page 19
... difficult to obtain the best results. 577387001 Rev. 2 1/6/11 English--- 19 S The fan effect of injury. Stop the engine and trimmer head before you remove material that is a risk of the rotating line can be kept outside the safety zone of this can be swept and... the ground during use full throttle to reach using a normal lawn mower. S When cutting and sweeping you touch it. Keep the trimmer line parallel to the trimmer head. WARNING: Neither the operator of the machine nor anyone approaches. Keep unauthorized persons at a dis- Always wear eye protection. Stones, ...
... difficult to obtain the best results. 577387001 Rev. 2 1/6/11 English--- 19 S The fan effect of injury. Stop the engine and trimmer head before you remove material that is a risk of the rotating line can be kept outside the safety zone of this can be swept and... the ground during use full throttle to reach using a normal lawn mower. S When cutting and sweeping you touch it. Keep the trimmer line parallel to the trimmer head. WARNING: Neither the operator of the machine nor anyone approaches. Keep unauthorized persons at a dis- Always wear eye protection. Stones, ...
Owners Manual
Page 23
... are described in this Operator's Manual. X Check that the bevel gear is fitted with lubricant. Replace the trimmer head if necessary. Check that the guard is tightened correctly. Fill if necessary using special grease. Check all cables and...X X Monthly Maintenance X X X X X 577387001 Rev. 2 1/6/11 English--- 23 More extensive work described in the Maintenance section. X Check that the trimmer head is cracked. Clean or replace the spark arrestor mesh on the machine. X Check that the stop switch works correctly. X Check that nuts and screws are...
... are described in this Operator's Manual. X Check that the bevel gear is fitted with lubricant. Replace the trimmer head if necessary. Check that the guard is tightened correctly. Fill if necessary using special grease. Check all cables and...X X Monthly Maintenance X X X X X 577387001 Rev. 2 1/6/11 English--- 23 More extensive work described in the Maintenance section. X Check that the trimmer head is cracked. Clean or replace the spark arrestor mesh on the machine. X Check that the stop switch works correctly. X Check that nuts and screws are...

Owners Manual
Page 25
... evaluated to applicable ISO-- Grass blade/grass cutter Grass 255--4 1 inch (∅ 250 4--teeth) 504 00 13--03 / 545 03 09--01 Trimmer head T25 537 33 83--06 / 545 03 09--01 Plastic blades Tricut 300 mm 531 00 38--11 / 545 03 09--01 Support cup Fixed...--01 *For use only with trimmer attachment, part no. 537 35 35--01 The accessories used in blades/cutters, ∅ 25,4 mm Approved accessories Type Cutting attachment / guard, part. and EN safety requirement standards by Underwriter's Laboratories Inc. (UL) and are consequently UL listed: Model 128DJX (M10 LH arbor shaft thread...
... evaluated to applicable ISO-- Grass blade/grass cutter Grass 255--4 1 inch (∅ 250 4--teeth) 504 00 13--03 / 545 03 09--01 Trimmer head T25 537 33 83--06 / 545 03 09--01 Plastic blades Tricut 300 mm 531 00 38--11 / 545 03 09--01 Support cup Fixed...--01 *For use only with trimmer attachment, part no. 537 35 35--01 The accessories used in blades/cutters, ∅ 25,4 mm Approved accessories Type Cutting attachment / guard, part. and EN safety requirement standards by Underwriter's Laboratories Inc. (UL) and are consequently UL listed: Model 128DJX (M10 LH arbor shaft thread...

Owners Manual
Page 28
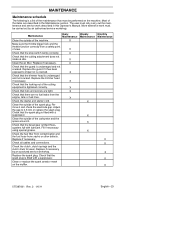
Trimmer Head Line Loading Instructions 1 2 3 4 5 6m 20i 3m 10i 6 7 8 9 577387001 Rev. 2 1/6/11 English--- 28
Trimmer Head Line Loading Instructions 1 2 3 4 5 6m 20i 3m 10i 6 7 8 9 577387001 Rev. 2 1/6/11 English--- 28


