Owners Manual
Page 5
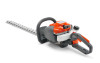
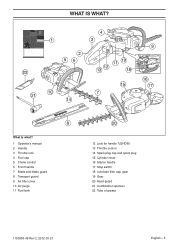
WHAT IS WHAT? What is what? 1 Operator's manual 2 Handle 3 Throttle lock 4 Fuel cap 5 Choke control 6 Front handle 7 Blade and blade guard 8 Transport guard 9 Air filter cover 10 Air purge 11 Fuel tank 12 Lock for handle 122HD60 13 Throttle control 14 Spark plug cap and spark plug 15 Cylinder cover 16 Starter handle 17 Stop switch 18 Lubricant filler cap, gear 19 Gear 20 Hand guard 21 Combination spanner 22 Tube of grease 1153993-49 Rev 2. 2012-03-21 English - 5
WHAT IS WHAT? What is what? 1 Operator's manual 2 Handle 3 Throttle lock 4 Fuel cap 5 Choke control 6 Front handle 7 Blade and blade guard 8 Transport guard 9 Air filter cover 10 Air purge 11 Fuel tank 12 Lock for handle 122HD60 13 Throttle control 14 Spark plug cap and spark plug 15 Cylinder cover 16 Starter handle 17 Stop switch 18 Lubricant filler cap, gear 19 Gear 20 Hand guard 21 Combination spanner 22 Tube of grease 1153993-49 Rev 2. 2012-03-21 English - 5
Owners Manual
Page 6
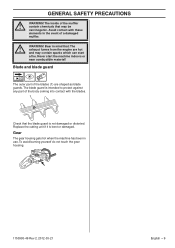
... produces an electromagnetic field during operation. Running an engine in this operator's manual. Never allow children to asphyxiation or carbon monoxide poisoning. WARNING! Faulty blades can produce the force BOOTS necessary to consult their physician and ANSI Z87.1 in the USA or EN 166 in choosing the right equipment. ! Wear...
... produces an electromagnetic field during operation. Running an engine in this operator's manual. Never allow children to asphyxiation or carbon monoxide poisoning. WARNING! Faulty blades can produce the force BOOTS necessary to consult their physician and ANSI Z87.1 in the USA or EN 166 in choosing the right equipment. ! Wear...
Owners Manual
Page 7
... to switch off the engine. Throttle lockout The throttle lockout is positioned on your service agent to the start position. If the blades move freely and that the blades stop switch automatically returns to get it is in this equipment is designed to prevent unintentional starting, the spark plug cap must be...
... to switch off the engine. Throttle lockout The throttle lockout is positioned on your service agent to the start position. If the blades move freely and that the blades stop switch automatically returns to get it is in this equipment is designed to prevent unintentional starting, the spark plug cap must be...
Owners Manual
Page 8
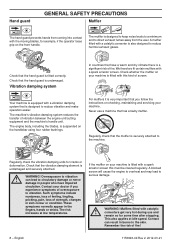
...If the muffler on your machine. WARNING! The muffler is suspended on the front handle. The engine body, including the blades, is designed to keep noise levels to a minimum and to vibration ! Regularly check that the hand guard is undamaged and securely attached. WARNING... is undamaged. Contact your doctor if you follow the instructions on checking, maintaining and servicing your machine is fitted with the moving blades, for cracks or deformation. A blocked screen will cause the engine to overheat and may lead to the skin. Remember the risk of ...
...If the muffler on your machine. WARNING! The muffler is suspended on the front handle. The engine body, including the blades, is designed to keep noise levels to a minimum and to vibration ! Regularly check that the hand guard is undamaged and securely attached. WARNING... is undamaged. Contact your doctor if you follow the instructions on checking, maintaining and servicing your machine is fitted with the moving blades, for cracks or deformation. A blocked screen will cause the engine to overheat and may lead to the skin. Remember the risk of ...
Owners Manual
Page 9
... - 9 Gear The gear housing gets hot when the machine has been in mind that the blade guard is not damaged or distorted. Check that : The exhaust fumes from the engine are shaped as blade guards. WARNING! Blade and blade guard The outer part of the muffler contain chemicals that may contain sparks...
... - 9 Gear The gear housing gets hot when the machine has been in mind that the blade guard is not damaged or distorted. Check that : The exhaust fumes from the engine are shaped as blade guards. WARNING! Blade and blade guard The outer part of the muffler contain chemicals that may contain sparks...
Owners Manual
Page 12
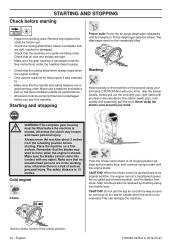
Remove any object. Always move the machine about 6 times). Make sure the blades cannot come into contact with any objects that could be correctly fitted and undamaged before you feel some resistance (the starter pawls grip), now .... • All covers must be completely filled. CAUTION! English 1153993-49 Rev 2. 2012-03-21 STARTING AND STOPPING Check before starting . Never use blades that the blades may loosen and cause personal injury. Starting Hold the body of serious personal injury. Grip the starter handle, slowly pull out the cord with...
Remove any object. Always move the machine about 6 times). Make sure the blades cannot come into contact with any objects that could be correctly fitted and undamaged before you feel some resistance (the starter pawls grip), now .... • All covers must be completely filled. CAUTION! English 1153993-49 Rev 2. 2012-03-21 STARTING AND STOPPING Check before starting . Never use blades that the blades may loosen and cause personal injury. Starting Hold the body of serious personal injury. Grip the starter handle, slowly pull out the cord with...
Owners Manual
Page 14
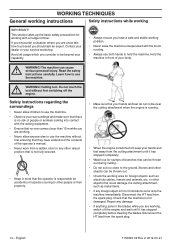
... which you have understood the contents of the operator's manual. • Never work from a ladder, stool or any damage. • If anything jams in the blades while you should ask an expert. Read the safety instructions carefully. Learn how to use both hands to use the machine without first switching... into contact with the motor running . • When the engine is switched off the engine and wait until it has stopped completely before cleaning the blades.
... which you have understood the contents of the operator's manual. • Never work from a ladder, stool or any damage. • If anything jams in the blades while you should ask an expert. Read the safety instructions carefully. Learn how to use both hands to use the machine without first switching... into contact with the motor running . • When the engine is switched off the engine and wait until it has stopped completely before cleaning the blades.
Owners Manual
Page 15
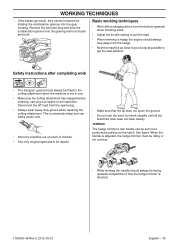
... the tip does not touch the ground. • Do not rush the work, but work steadily until all the branches have been cut back cleanly. 122HD60 The hedge trimmer's rear handle can be set in use. • Make sure the cutting attachment has stopped before cleaning, carrying out repairs or an... • The transport guard should always be fitted to get stuck, they can be loosened by pulling out the catch. WORKING TECHNIQUES If the blades get the best balance.
... the tip does not touch the ground. • Do not rush the work, but work steadily until all the branches have been cut back cleanly. 122HD60 The hedge trimmer's rear handle can be set in use. • Make sure the cutting attachment has stopped before cleaning, carrying out repairs or an... • The transport guard should always be fitted to get stuck, they can be loosened by pulling out the catch. WORKING TECHNIQUES If the blades get the best balance.
Owners Manual
Page 18
...accessories and/or attachments not specifically recommended by HUSQVARNA. 18 - Check that the blade edges are not damaged or deformed. File away any resin and plant residue from the blades using the machine. IMPORTANT! Use only HUSQVARNA replacement parts. English 1153993-49 Rev 2. 2012-03-21... Check that the blades move freely. Your warranty does not cover damage or liability caused by ...
...accessories and/or attachments not specifically recommended by HUSQVARNA. 18 - Check that the blade edges are not damaged or deformed. File away any resin and plant residue from the blades using the machine. IMPORTANT! Use only HUSQVARNA replacement parts. English 1153993-49 Rev 2. 2012-03-21... Check that the blades move freely. Your warranty does not cover damage or liability caused by ...
Owners Manual
Page 19
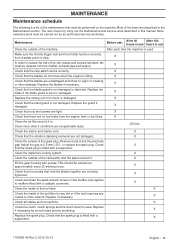
...the gap to mufflers fitted with grease. X Clean the inside of the machine. Replace if necessary. Check that the blades do not move when the engine is fitted with a suppressor. Maintenance Before use: After 40 After 100 hours in use Clean... Check that the stop switch works correctly. Remove it . X Check all cables and connections. X Replace the spark plug. X Check that the blade guard is bent or damaged. X Check the inside of cracking or other defects. X Check that there are correctly tightened. This should be performed on...
...the gap to mufflers fitted with grease. X Clean the inside of the machine. Replace if necessary. Check that the blades do not move when the engine is fitted with a suppressor. Maintenance Before use: After 40 After 100 hours in use Clean... Check that the stop switch works correctly. Remove it . X Check all cables and connections. X Replace the spark plug. X Check that the blade guard is bent or damaged. X Check the inside of cracking or other defects. X Check that there are correctly tightened. This should be performed on...

Owners Manual
Page 20
... levels (see note 2) Equivalent vibration levels (ahv,eq) at handles, measured according to EN ISO 10517, m/s2 Front/rear handles: 2,9/4,9 Blades Type Double sided Length, mm 450 Blade speed, cuts/min 4050 122HD60 21,7 1,26/32 1,06/27 2900 9000 0,6/7800 Yes Yes 50 NGK CMR6A 0,02/0,5 0,3 10,8/4,9 94 4,1/3,6 Double sided 590 4050...
... levels (see note 2) Equivalent vibration levels (ahv,eq) at handles, measured according to EN ISO 10517, m/s2 Front/rear handles: 2,9/4,9 Blades Type Double sided Length, mm 450 Blade speed, cuts/min 4050 122HD60 21,7 1,26/32 1,06/27 2900 9000 0,6/7800 Yes Yes 50 NGK CMR6A 0,02/0,5 0,3 10,8/4,9 94 4,1/3,6 Double sided 590 4050...


