
Owner's Manual
Page 1
SINCE ® 1 8 8 6 AUTO SAVER 550 5:22 3 72 OwnerÕs Manual Model 44550
SINCE ® 1 8 8 6 AUTO SAVER 550 5:22 3 72 OwnerÕs Manual Model 44550

Owner's Manual
Page 2
Ask Your Local Retailer for Other Quality Products from Hunter Fans Air Purifiers Humidifiers To locate your nearest Hunter Dealer, call 1-800-4HUNTER, or visit The Hunter Fan Company website: www.hunterfan.com
Ask Your Local Retailer for Other Quality Products from Hunter Fans Air Purifiers Humidifiers To locate your nearest Hunter Dealer, call 1-800-4HUNTER, or visit The Hunter Fan Company website: www.hunterfan.com
Owner's Manual
Page 3
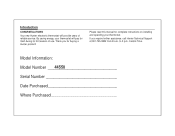
Model Information: Model Number ____4_4_5_5_0 Serial Number Date Purchased Where Purchased Introduction CONGRATULATIONS! By saving energy, your thermostat. If you for buying a Hunter product! to 5 p.m. Central Time. Thank you require further assistance, call Hunter Technical Support at 901-745-9222 from 8 a.m. Your new Hunter electronic thermostat will pay for complete instructions on installing and operating your thermostat will provide years of use. Please read this manual for itself during its first season of reliable service.
Model Information: Model Number ____4_4_5_5_0 Serial Number Date Purchased Where Purchased Introduction CONGRATULATIONS! By saving energy, your thermostat. If you for buying a Hunter product! to 5 p.m. Central Time. Thank you require further assistance, call Hunter Technical Support at 901-745-9222 from 8 a.m. Your new Hunter electronic thermostat will pay for complete instructions on installing and operating your thermostat will provide years of use. Please read this manual for itself during its first season of reliable service.
Owner's Manual
Page 4
Table of Contents INTRODUCTION INSTALLATION PROGRAMMING OPERATIONS Read This Before Installing Thermostat Features What You Need Remove Old Thermostat Wire Labeling Mount Wallplate and Thermostat Selector Switches Setting Time and Day Auto Programming Personal Program Schedule Manual Programming Weekday / Weekend Programming 7-Day Programming Reviewing Programs Reviewing the Current Temperature Setting System Selector Switch Fan Switch 4-5 6 8 10 10 11 12 14 16 17 18 19 19 21 22 23 24 24 (continued)
Table of Contents INTRODUCTION INSTALLATION PROGRAMMING OPERATIONS Read This Before Installing Thermostat Features What You Need Remove Old Thermostat Wire Labeling Mount Wallplate and Thermostat Selector Switches Setting Time and Day Auto Programming Personal Program Schedule Manual Programming Weekday / Weekend Programming 7-Day Programming Reviewing Programs Reviewing the Current Temperature Setting System Selector Switch Fan Switch 4-5 6 8 10 10 11 12 14 16 17 18 19 19 21 22 23 24 24 (continued)
Owner's Manual
Page 5
Table of Contents (continued) OPERATIONS (continued) Temporary Manual Override 24 Permanent Manual (Vacation) Override 25 Auto Season Changeover 26 Home Today 26 Energy Monitor 28 Filter Monitor 29 Auto Recovery 30 Keyboard Lock 31 Backlighting 31 SAFETY FEATURES Low Battery Warning 32 Error Mode 33 Auto Cut-Off 33 TROUBLESHOOTING Problems & Solutions 34 Technical Support 35 WIRING DIAGRAMS Heat / Cool Systems 36 Single-Stage Heat Pump Systems 37 Heat Only / Cool Only Systems 38
Table of Contents (continued) OPERATIONS (continued) Temporary Manual Override 24 Permanent Manual (Vacation) Override 25 Auto Season Changeover 26 Home Today 26 Energy Monitor 28 Filter Monitor 29 Auto Recovery 30 Keyboard Lock 31 Backlighting 31 SAFETY FEATURES Low Battery Warning 32 Error Mode 33 Auto Cut-Off 33 TROUBLESHOOTING Problems & Solutions 34 Technical Support 35 WIRING DIAGRAMS Heat / Cool Systems 36 Single-Stage Heat Pump Systems 37 Heat Only / Cool Only Systems 38
Owner's Manual
Page 6
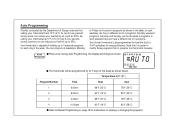
... conditioning, or space heating units in use in your favorite chair and is programmed at your thermostat. However, it can program your Hunter Thermostat. "Hi" will automatically change to the Heat mode if the temperature is designed to operate with all the functions of this ...be treated as a Permanent Manual Override. This can be done while you begin to the heating system control. Press Auto Program to your Hunter Thermostat. Note that do not have 24-volt or millivolt control systems and COMPRESSOR PROTECTION 5 The thermostat provides a 3.5 minute delay after ...
... conditioning, or space heating units in use in your favorite chair and is programmed at your thermostat. However, it can program your Hunter Thermostat. "Hi" will automatically change to the Heat mode if the temperature is designed to operate with all the functions of this ...be treated as a Permanent Manual Override. This can be done while you begin to the heating system control. Press Auto Program to your Hunter Thermostat. Note that do not have 24-volt or millivolt control systems and COMPRESSOR PROTECTION 5 The thermostat provides a 3.5 minute delay after ...
Owner's Manual
Page 7
Read This Before Installing Thermostat (continued) POWER FAILURE 7 Whenever the main power is shut down, and your system will no temperature control of service. When this condition, there is in low battery condition. In this message occurs, install 2 new AA batteries. Refer to your system on several minutes prior to the Selector Switches information on pages 14-15. CAUTION: Once the "BATT" only display occurs, the thermostat is interrupted or fails, the battery power retains the programs and current time. However, when the batteries become too low to leaving. AUTO ...
Read This Before Installing Thermostat (continued) POWER FAILURE 7 Whenever the main power is shut down, and your system will no temperature control of service. When this condition, there is in low battery condition. In this message occurs, install 2 new AA batteries. Refer to your system on several minutes prior to the Selector Switches information on pages 14-15. CAUTION: Once the "BATT" only display occurs, the thermostat is interrupted or fails, the battery power retains the programs and current time. However, when the batteries become too low to leaving. AUTO ...
Owner's Manual
Page 8
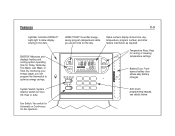
ENERGY: Measures and displays heating and cooling system operating time for Cool, Off, Heat or Auto. System Switch: System selector switch for Today, Yesterday, This Week, Last Week, or Total. Soft-touch programming keypad, see details below. Features 8-9 Light Bar: Activates INDIGLO® night-light to optimize energy savings. By monitoring your energy usage, you are at home for the day. Battery Door: Frontaccess battery door allows easy battery changes. Fan Switch: Fan switch for raising or lowering temperature settings. Alpha-numeric display shows time, day, temperature...
ENERGY: Measures and displays heating and cooling system operating time for Cool, Off, Heat or Auto. System Switch: System selector switch for Today, Yesterday, This Week, Last Week, or Total. Soft-touch programming keypad, see details below. Features 8-9 Light Bar: Activates INDIGLO® night-light to optimize energy savings. By monitoring your energy usage, you are at home for the day. Battery Door: Frontaccess battery door allows easy battery changes. Fan Switch: Fan switch for raising or lowering temperature settings. Alpha-numeric display shows time, day, temperature...

Owner's Manual
Page 9
... usage in ENERGY compliant program settings. Returns display to current program control from manual override or Home Today mode. As an ENERGY STAR® Partner, Hunter Fan Company has determined that this programmable thermostat meets the ENERGY STAR® guidelines for reviewing and changing weekday, weekend, or daily programs. Selects the...
... usage in ENERGY compliant program settings. Returns display to current program control from manual override or Home Today mode. As an ENERGY STAR® Partner, Hunter Fan Company has determined that this programmable thermostat meets the ENERGY STAR® guidelines for reviewing and changing weekday, weekend, or daily programs. Selects the...

Owner's Manual
Page 10
To install your thermostat, you should have doors that must first be connected to the back of the wallplate. s Slotted Screwdriver(s) s Phillips Screwdriver s Hammer s Electric drill and 3/16" bit s Two 1.5 V (AA) size alkaline batteries Remove Old Thermostat CAUTION: Do not remove any wiring from existing thermostat before reading the instructions carefully. If wires are not visible, they may be removed. TYPICAL HOME THERMOSTATS Figure 1 Wall Mounting Plate Thermostat Cover Wall Mounting Plate Thermostat Cover s Remove existing thermostat cover. Again, look for wires. s ...
To install your thermostat, you should have doors that must first be connected to the back of the wallplate. s Slotted Screwdriver(s) s Phillips Screwdriver s Hammer s Electric drill and 3/16" bit s Two 1.5 V (AA) size alkaline batteries Remove Old Thermostat CAUTION: Do not remove any wiring from existing thermostat before reading the instructions carefully. If wires are not visible, they may be removed. TYPICAL HOME THERMOSTATS Figure 1 Wall Mounting Plate Thermostat Cover Wall Mounting Plate Thermostat Cover s Remove existing thermostat cover. Again, look for wires. s ...
Owner's Manual
Page 11
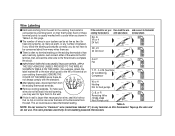
BEFORE DISCONNECTING ANY WIRES, APPLY THE SELF-ADHESIVE LABELS PROVIDED TO THE WIRE AS G or F Fan G G G SHOWN IN TABLE A ON THIS PAGE. (For example, attach the Y, Y1, C or M (See Note) label marked W to the wire which goes to the W or H terminal on your existing thermostat.) IGNORE THE COLOR OF THE WIRES since these existing thermostat is with the standard. To make sure RC W or H Heating Not for heat pumps W Y/Y1 Y/Y1 W W wires do not fall back into wall opening, you do not use. Tape up the wire and do not have to be as few as two (for wires, seal this hole so that ...
BEFORE DISCONNECTING ANY WIRES, APPLY THE SELF-ADHESIVE LABELS PROVIDED TO THE WIRE AS G or F Fan G G G SHOWN IN TABLE A ON THIS PAGE. (For example, attach the Y, Y1, C or M (See Note) label marked W to the wire which goes to the W or H terminal on your existing thermostat.) IGNORE THE COLOR OF THE WIRES since these existing thermostat is with the standard. To make sure RC W or H Heating Not for heat pumps W Y/Y1 Y/Y1 W W wires do not fall back into wall opening, you do not use. Tape up the wire and do not have to be as few as two (for wires, seal this hole so that ...

Owner's Manual
Page 12
... wall. Otherwise, if you have separate RH and RC wires (5-wire system), then remove the jumper wire between the RH and RC terminals on the Hunter wallplate. Insert mounting screws provided into the holes until flush with 3/16" bit and gently tap anchors into wall anchor and tighten. (See Figure 3.) OB...
... wall. Otherwise, if you have separate RH and RC wires (5-wire system), then remove the jumper wire between the RH and RC terminals on the Hunter wallplate. Insert mounting screws provided into the holes until flush with 3/16" bit and gently tap anchors into wall anchor and tighten. (See Figure 3.) OB...
Owner's Manual
Page 13
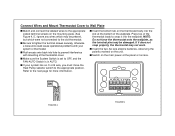
s Insert the bottom tab on the thermostat body into the slot at the panel or furnace. s Switch on the main power at the bottom of the wallplate. s If your system or thermostat. Refer to OFF, and the FAN-AUTO Switch is in AUTO. NOTE: Do not force the thermostat onto the wallplate, as the terminal pins may be damaged. Connect Wires and Mount Thermostat Cover to Wall Plate s Match and connect the labeled wires to the appropriate coded terminal screws on the mounting plate. (See Figure 4, 5.) Ignore any wires which may be present, but which were not connected to the old ...
s Insert the bottom tab on the thermostat body into the slot at the panel or furnace. s Switch on the main power at the bottom of the wallplate. s If your system or thermostat. Refer to OFF, and the FAN-AUTO Switch is in AUTO. NOTE: Do not force the thermostat onto the wallplate, as the terminal pins may be damaged. Connect Wires and Mount Thermostat Cover to Wall Plate s Match and connect the labeled wires to the appropriate coded terminal screws on the mounting plate. (See Figure 4, 5.) Ignore any wires which may be present, but which were not connected to the old ...
Owner's Manual
Page 14
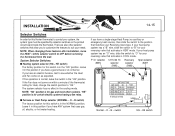
... 12 HOURS SW7 SPAN +2F/-1F +1F/-1F SW8 RECOV. B - Leave it in the NORMAL position. INSTALLATION 14-15 Selector Switches In order for this Hunter thermostat to control your system, the system type must be specified by selector switches on within a minute of the thermostat calling for Heat, change the...
... 12 HOURS SW7 SPAN +2F/-1F +1F/-1F SW8 RECOV. B - Leave it in the NORMAL position. INSTALLATION 14-15 Selector Switches In order for this Hunter thermostat to control your system, the system type must be specified by selector switches on within a minute of the thermostat calling for Heat, change the...
Owner's Manual
Page 15
Feature Selector Switches: s F° / C° selector (Fahrenheit / Centigrade) - Switch 5 Your thermostat is set for normal 12 hour (AM / PM) time format. Switch 6 Your thermostat is set for F° mode from the factory with the Auto Recovery Feature enabled, which complies with a paper clip. If you require slower temperature cycles in memory. Refer to the ALT position. Feature Selector Summary: Table B below summarizes the Feature Switches discussed above and below the set from the factory. NOTE: Unless the reset button is set temperature. Table B Switch ...
Feature Selector Switches: s F° / C° selector (Fahrenheit / Centigrade) - Switch 5 Your thermostat is set for normal 12 hour (AM / PM) time format. Switch 6 Your thermostat is set for F° mode from the factory with the Auto Recovery Feature enabled, which complies with a paper clip. If you require slower temperature cycles in memory. Refer to the ALT position. Feature Selector Summary: Table B below summarizes the Feature Switches discussed above and below the set from the factory. NOTE: Unless the reset button is set temperature. Table B Switch ...
Owner's Manual
Page 16
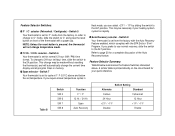
PROGRAMMING 16-17 Setting Time and Day Remove the mylar label covering the LCD display window before operating thermostat. 1 2 : 0 0 M T W Th F Sa Su SET TEMP s Initial display after the Reset button is pressed. Refer to the current minute. HOUR s Press and hold to rapid advance to Figure at a time. The PM H temperature will go blank. s During time and day setting mode, the temperature and program displays will update after a few seconds. 72 AUTO COOL HEAT TEMP °HC EXAMPLE: Set the thermostat to advance MIN one minute at right. Tap to the current time of ...
PROGRAMMING 16-17 Setting Time and Day Remove the mylar label covering the LCD display window before operating thermostat. 1 2 : 0 0 M T W Th F Sa Su SET TEMP s Initial display after the Reset button is pressed. Refer to the current minute. HOUR s Press and hold to rapid advance to Figure at a time. The PM H temperature will go blank. s During time and day setting mode, the temperature and program displays will update after a few seconds. 72 AUTO COOL HEAT TEMP °HC EXAMPLE: Set the thermostat to advance MIN one minute at right. Tap to the current time of ...
Owner's Manual
Page 17
...;F (28°C) s Refer to program the thermostat manually. A U : T O AUTO s Press once. Temperature in the table, or each weekday can have a different set of 4 programs. Your Hunter thermostat is capable of the week as shown below. During Auto Programming, the display will be programmed for each weekend day can have a different set...
...;F (28°C) s Refer to program the thermostat manually. A U : T O AUTO s Press once. Temperature in the table, or each weekday can have a different set of 4 programs. Your Hunter thermostat is capable of the week as shown below. During Auto Programming, the display will be programmed for each weekend day can have a different set...

Owner's Manual
Page 18
Time Temp Wed. Time Temp Thurs. Time Temp Sat. Time Temp Sun. Time Temp Fri. Time Temp Tues. Heating Cooling Day Program 1 Program 2 Program 3 Program 4 Program 1 Program 2 Program 3 Program 4 Mon. Time Temp Time Temp Time Temp Time Temp Time Temp Time Temp Time Temp Time Temp Time Temp Time Temp Time Temp Time Temp Time Temp Time Temp Time Temp Time Temp Time Temp Time Temp Time Temp Time Temp Time Temp Time Temp Time Temp Time Temp Time Temp Time Temp Time Temp Time Temp Time Temp Time Temp Time Temp Time Temp Time Temp Time Temp Time Temp Time Temp Time Temp Time...
Time Temp Wed. Time Temp Thurs. Time Temp Sat. Time Temp Sun. Time Temp Fri. Time Temp Tues. Heating Cooling Day Program 1 Program 2 Program 3 Program 4 Program 1 Program 2 Program 3 Program 4 Mon. Time Temp Time Temp Time Temp Time Temp Time Temp Time Temp Time Temp Time Temp Time Temp Time Temp Time Temp Time Temp Time Temp Time Temp Time Temp Time Temp Time Temp Time Temp Time Temp Time Temp Time Temp Time Temp Time Temp Time Temp Time Temp Time Temp Time Temp Time Temp Time Temp Time Temp Time Temp Time Temp Time Temp Time Temp Time Temp Time Temp Time Temp Time...
Owner's Manual
Page 19
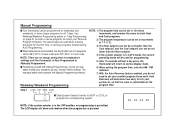
Use Weekday/Weekend Programming below demonstrates the Manual Programming method. Weekday/Weekend Programming NOTE: 1) The program time can be set in 10 minute increments, and remains the same for both Heat and Cool programs. 2) The program temperature can be set in increments of 1°F (1°C). 3) The Heat setpoint can not be set higher than the Heat setpoint. 4) If the system selector is in AUTO mode, the current operating mode will return to normal display mode. 6) When setting the program time, note the AM / PM indicator. 7) With the Auto Recovery feature enabled, you can...
Use Weekday/Weekend Programming below demonstrates the Manual Programming method. Weekday/Weekend Programming NOTE: 1) The program time can be set in 10 minute increments, and remains the same for both Heat and Cool programs. 2) The program temperature can be set in increments of 1°F (1°C). 3) The Heat setpoint can not be set higher than the Heat setpoint. 4) If the system selector is in AUTO mode, the current operating mode will return to normal display mode. 6) When setting the program time, note the AM / PM indicator. 7) With the Auto Recovery feature enabled, you can...
Owner's Manual
Page 20
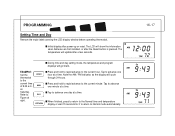
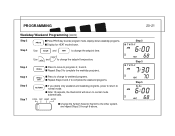
Use and to change the setpoint time. Step 2 1 6 : 0 0 M T W Th F Sa Su SET TEMP AM °C PM H 68 AUTO COOL HEAT TEMP °HC Step 3 8 7 : 3 0 M T W Th F Sa Su SET TEMP AM °C PM H 70 AUTO COOL HEAT TEMP °HC Step 5 1 6 : 0 0 M T W Th F Sa Su SET TEMP AM °C PM H 68 AUTO COOL HEAT TEMP °HC Step 4 Step 5 Step 6 Step 7 s Press to move to normal mode automatically. s After 15 seconds, the thermostat will return to programs 2, 3 and 4. Step 3 Use HOUR and MIN to enter program mode, display shows weekday programs. PROG s Display for...
Use and to change the setpoint time. Step 2 1 6 : 0 0 M T W Th F Sa Su SET TEMP AM °C PM H 68 AUTO COOL HEAT TEMP °HC Step 3 8 7 : 3 0 M T W Th F Sa Su SET TEMP AM °C PM H 70 AUTO COOL HEAT TEMP °HC Step 5 1 6 : 0 0 M T W Th F Sa Su SET TEMP AM °C PM H 68 AUTO COOL HEAT TEMP °HC Step 4 Step 5 Step 6 Step 7 s Press to move to normal mode automatically. s After 15 seconds, the thermostat will return to programs 2, 3 and 4. Step 3 Use HOUR and MIN to enter program mode, display shows weekday programs. PROG s Display for...