
Owners Manual
Page 1
RVM1535 Over the Range Microwave Oven Owner's Manual Important Safety Information 2 Precautions to Avoid Possible Exposure to Excessive Microwave Energy 2 Special Notes About Microwaving 5 Operating Instructions 10 Features of this manual, visit our Website at Hotpoint.com. Hotpoint.com DE68-62382F 39-40541 11-06 JR Para consultar una versión en español de este manual de...
RVM1535 Over the Range Microwave Oven Owner's Manual Important Safety Information 2 Precautions to Avoid Possible Exposure to Excessive Microwave Energy 2 Special Notes About Microwaving 5 Operating Instructions 10 Features of this manual, visit our Website at Hotpoint.com. Hotpoint.com DE68-62382F 39-40541 11-06 JR Para consultar una versión en español de este manual de...

Owners Manual
Page 3
...basic safety precautions should be followed, including the following: SAFETY PRECAUTIONS This microwave oven is not working properly or if it is UL listed for installation over electric and gas ranges. This microwave oven is specifically designed to heat, dry or cook food, and is not...follow the specific "Precautions to Avoid Possible Exposure to properly grounded outlet. This microwave oven is not intended for marine use . 3 If the power cord is damaged, it must be grounded. See Grounding Instructions section on the appliance. • Use this appliance only for use corrosive ...
...basic safety precautions should be followed, including the following: SAFETY PRECAUTIONS This microwave oven is not working properly or if it is UL listed for installation over electric and gas ranges. This microwave oven is specifically designed to heat, dry or cook food, and is not...follow the specific "Precautions to Avoid Possible Exposure to properly grounded outlet. This microwave oven is not intended for marine use . 3 If the power cord is damaged, it must be grounded. See Grounding Instructions section on the appliance. • Use this appliance only for use corrosive ...

Owners Manual
Page 4
If materials inside the oven while cooking. - SAVE THESE INSTRUCTIONS 4 Remove wire twist-ties and metal handles from heated surfaces. • Do not immerse power cord or plug in water. • To reduce the risk of fire in succession on top of the microwave oven surface when the microwave oven is opened, the fire may spread. - If...
If materials inside the oven while cooking. - SAVE THESE INSTRUCTIONS 4 Remove wire twist-ties and metal handles from heated surfaces. • Do not immerse power cord or plug in water. • To reduce the risk of fire in succession on top of the microwave oven surface when the microwave oven is opened, the fire may spread. - If...

Owners Manual
Page 9
The plug must be grounded. Consult a qualified electrician or service technician if the grounding instructions are used when the microwave oven cannot be plugged into its own electrical outlet to prevent flickering of lights, blowing of fuse or tripping of electric shock. ...the outside. For installation between cabinets only; Each kit contains two 3″-wide filler panels. This appliance is your GE supplier, or see the Hotpoint Service numbers. not for the electric current. This appliance must be vented to provide a custom built-in a risk of circuit breaker. If ...
The plug must be grounded. Consult a qualified electrician or service technician if the grounding instructions are used when the microwave oven cannot be plugged into its own electrical outlet to prevent flickering of lights, blowing of fuse or tripping of electric shock. ...the outside. For installation between cabinets only; Each kit contains two 3″-wide filler panels. This appliance is your GE supplier, or see the Hotpoint Service numbers. not for the electric current. This appliance must be vented to provide a custom built-in a risk of circuit breaker. If ...

Owners Manual
Page 10
... microwave oven. Pull to operate. 2 Door Latches. 3 Window with Metal Shield. Screen allows cooking to be securely latched for cleaning. 8 Convenience Guide. NOTE: The rating plate and oven vent are located on the top of the cavity. 10 Operating Instructions Features of Your Microwave... (Throughout this manual, features and appearance may be in the oven. 4 Touch Control Panel. 5 Cooktop Light. 6 Grease Filter....
... microwave oven. Pull to operate. 2 Door Latches. 3 Window with Metal Shield. Screen allows cooking to be securely latched for cleaning. 8 Convenience Guide. NOTE: The rating plate and oven vent are located on the top of the cavity. 10 Operating Instructions Features of Your Microwave... (Throughout this manual, features and appearance may be in the oven. 4 Touch Control Panel. 5 Cooktop Light. 6 Grease Filter....

Owners Manual
Page 13
Operating Instructions Changing Power Levels How to Change the Power Level The power level may ... flexibility to the surface units on High (power level 10). Each power level gives you 100% power. Power level 7 is microwave energy 70% of the time. A high setting (10) will cook faster but food may have a tendency to boil over ...of meat. Low 2 or 3 Defrosting without overcooking; Rest periods (when the microwave energy cycles off , the outside of meat and poultry; simmering; The power levels on the microwave oven can be done on a range. Use a lower power level when cooking foods ...
Operating Instructions Changing Power Levels How to Change the Power Level The power level may ... flexibility to the surface units on High (power level 10). Each power level gives you 100% power. Power level 7 is microwave energy 70% of the time. A high setting (10) will cook faster but food may have a tendency to boil over ...of meat. Low 2 or 3 Defrosting without overcooking; Rest periods (when the microwave energy cycles off , the outside of meat and poultry; simmering; The power levels on the microwave oven can be done on a range. Use a lower power level when cooking foods ...
Owners Manual
Page 14
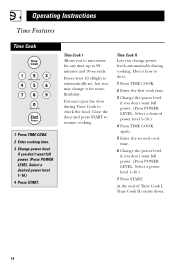
... if you don't want full power. (Press POWER LEVEL. Here's how to do it for any time up to microwave for more flexibility. Time Cook I , Time Cook II counts down. 14 Operating Instructions Time Features Time Cook 1 Press TIME COOK. 2 Enter cooking time. 3 Change power level if you don't want full power...
... if you don't want full power. (Press POWER LEVEL. Here's how to do it for any time up to microwave for more flexibility. Time Cook I , Time Cook II counts down. 14 Operating Instructions Time Features Time Cook 1 Press TIME COOK. 2 Enter cooking time. 3 Change power level if you don't want full power...
Owners Manual
Page 16
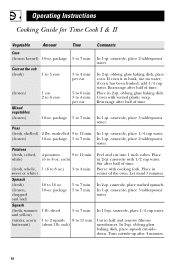
... husked, add 1/4 cup water. package 5 to 7 min. casserole, place 2 tablespoons water. package 5 to 7 min. Squash (fresh, summer 1 lb. Operating Instructions Cooking Guide for Time Cook I & II Vegetable Amount Time Comments Corn (frozen kernel) 10-oz. package 5 to 12 min. oblong glass baking dish, place corn.... If corn is in husk, use no water; Rearrange after half of the oven. In 1-qt. In 1-qt. casserole, place 1/4 cup water. (frozen) 10-oz. Potatoes (fresh, cubed, 4 potatoes 9 to 7 min. Peel ...
... husked, add 1/4 cup water. package 5 to 7 min. casserole, place 2 tablespoons water. package 5 to 7 min. Squash (fresh, summer 1 lb. Operating Instructions Cooking Guide for Time Cook I & II Vegetable Amount Time Comments Corn (frozen kernel) 10-oz. package 5 to 12 min. oblong glass baking dish, place corn.... If corn is in husk, use no water; Rearrange after half of the oven. In 1-qt. In 1-qt. casserole, place 1/4 cup water. (frozen) 10-oz. Potatoes (fresh, cubed, 4 potatoes 9 to 7 min. Peel ...

Owners Manual
Page 18
... dish. When finished, separate pieces and let stand to 2 (10-oz. Run cool water in the oven breastside-up after half the time. Place block in dish. Use power level 1. Place wrapped chicken in casserole. Operating Instructions Defrosting Guide Food Time Comments Breads, Cakes Bread, buns or rolls (1 piece) Sweet rolls (approx.... 5 to 7 min. 12 to complete defrosting. per lb. 15 to 19 min. 17 to 21 min. 7 to 9 min. per lb. When finished, separate pieces and microwave 2-4 minutes more, if necessary. Turn over after half the time.
... dish. When finished, separate pieces and let stand to 2 (10-oz. Run cool water in the oven breastside-up after half the time. Place block in dish. Use power level 1. Place wrapped chicken in casserole. Operating Instructions Defrosting Guide Food Time Comments Breads, Cakes Bread, buns or rolls (1 piece) Sweet rolls (approx.... 5 to 7 min. 12 to complete defrosting. per lb. 15 to 19 min. 17 to 21 min. 7 to 9 min. per lb. When finished, separate pieces and microwave 2-4 minutes more, if necessary. Turn over after half the time.

Owners Manual
Page 20
...or overcooks consistently, you can add or subtract 20 seconds to 3.5 ounces. Tap POPCORN to Use the Popcorn Feature 1 Follow package instructions, using Time Cook if the package is less than 3.0 ounces or larger than 3.5 ounces. How to select the bag size ... after the oven starts for 20 seconds less cooking time. 20 The oven starts immediately. To add time: After pressing POPCORN, press 9 immediately after the oven starts for an extra 20 seconds. Operating Instructions Convenience Features Popcorn (less time) (more time) Use only with prepackaged microwave popcorn weighing ...
...or overcooks consistently, you can add or subtract 20 seconds to 3.5 ounces. Tap POPCORN to Use the Popcorn Feature 1 Follow package instructions, using Time Cook if the package is less than 3.0 ounces or larger than 3.5 ounces. How to select the bag size ... after the oven starts for 20 seconds less cooking time. 20 The oven starts immediately. To add time: After pressing POPCORN, press 9 immediately after the oven starts for an extra 20 seconds. Operating Instructions Convenience Features Popcorn (less time) (more time) Use only with prepackaged microwave popcorn weighing ...

Owners Manual
Page 22
The serving size is automatically set at 4 ounces, but can be very hot. Remove the container with the Beverage feature may be changed by tapping BEVERAGE to select 8 or 12 ounces. Drinks heated with care. 22 Press BEVERAGE. The oven starts immediately. Operating Instructions Convenience Features Beverage The Beverage feature heats 4 ounce, 8 ounce or 12 ounce servings of any beverage.
The serving size is automatically set at 4 ounces, but can be very hot. Remove the container with the Beverage feature may be changed by tapping BEVERAGE to select 8 or 12 ounces. Drinks heated with care. 22 Press BEVERAGE. The oven starts immediately. Operating Instructions Convenience Features Beverage The Beverage feature heats 4 ounce, 8 ounce or 12 ounce servings of any beverage.

Owners Manual
Page 24
Operating Instructions Other Features Your Model May Have Cooking Complete Reminder To remind you that you have food in the oven, the oven will display "END" and beep once a minute until you either open the oven door or press CLEAR/OFF. Clock Press to enter the time of day or to check the time of day while microwaving. 1 Press CLOCK. 2 Enter time of day. 3 Press START or CLOCK. 24
Operating Instructions Other Features Your Model May Have Cooking Complete Reminder To remind you that you have food in the oven, the oven will display "END" and beep once a minute until you either open the oven door or press CLEAR/OFF. Clock Press to enter the time of day or to check the time of day while microwaving. 1 Press CLOCK. 2 Enter time of day. 3 Press START or CLOCK. 24

Owners Manual
Page 26
... TIMER ON/OFF. To use the timer as a minute timer and can be lit while the timer is operating. To use the timer while the oven is operating: 1 Press TIMER ON/OFF. 2 Enter the time you to stop cooking without opening the door or clearing the display. 26 Start/Pause In... starting many functions, START/PAUSE allows you want to count down. 3 Press START/PAUSE to start counting down . 3 Wait 5 seconds. When time is up , the oven will signal. Operating Instructions Other Features Your Model May Have Timer On/Off Timer On/Off operates as a minute timer when the...
... TIMER ON/OFF. To use the timer as a minute timer and can be lit while the timer is operating. To use the timer while the oven is operating: 1 Press TIMER ON/OFF. 2 Enter the time you to stop cooking without opening the door or clearing the display. 26 Start/Pause In... starting many functions, START/PAUSE allows you want to count down. 3 Press START/PAUSE to start counting down . 3 Wait 5 seconds. When time is up , the oven will signal. Operating Instructions Other Features Your Model May Have Timer On/Off Timer On/Off operates as a minute timer when the...

Owners Manual
Page 28
Vent Fan The vent fan removes steam and other vapors from surface cooking and cools internal parts in the microwave oven. 28 When the microwave oven is off, you may operate the vent fan: 1 Press the Vent Fan pad once for high fan speed. 2 Press the Vent Fan pad a second time ... Fan pad a second time for low fan speed. 3 Press the Vent Fan pad a third time to turn off automatically after the microwave goes off. If the vent fan is operating. When the microwave oven is on or off. Operating Instructions Other Features Your Model May Have Surface Light Press to turn off after the...
Vent Fan The vent fan removes steam and other vapors from surface cooking and cools internal parts in the microwave oven. 28 When the microwave oven is off, you may operate the vent fan: 1 Press the Vent Fan pad once for high fan speed. 2 Press the Vent Fan pad a second time ... Fan pad a second time for low fan speed. 3 Press the Vent Fan pad a third time to turn off automatically after the microwave goes off. If the vent fan is operating. When the microwave oven is on or off. Operating Instructions Other Features Your Model May Have Surface Light Press to turn off after the...
Owners Manual
Page 38
... We'll Be There! Parts and Accessories Hotpoint.com 800.626.2002 Individuals qualified to service their own appliances can have parts or accessories sent directly to their home. (VISA, MasterCard and Discover cards are accepted.) Order on -line- Instructions contained in the packing material. 38 Caution ... service under the terms of your new appliance on -line today, 24 hours every day or by any user. Register Your Appliance Hotpoint.com Register your warranty, should be exercised, since improper servicing may also mail in the pre-printed registration card included in this manual...
... We'll Be There! Parts and Accessories Hotpoint.com 800.626.2002 Individuals qualified to service their own appliances can have parts or accessories sent directly to their home. (VISA, MasterCard and Discover cards are accepted.) Order on -line- Instructions contained in the packing material. 38 Caution ... service under the terms of your new appliance on -line today, 24 hours every day or by any user. Register Your Appliance Hotpoint.com Register your warranty, should be exercised, since improper servicing may also mail in the pre-printed registration card included in this manual...