
Installation Instructions
Page 3
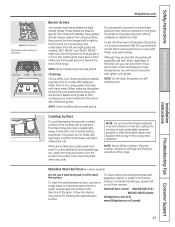
... can cause minor exposure to four of these substances can be performed only by qualified gas range installers or service technicians. ■ Do not attempt to repair or replace any part of the home electrical system, it off if necessary. ■ Have your personal responsibility and ... substances known to the state to cause birth defects or other service should be minimized by the incomplete combustion of the range gas shut-off valve and how to such substances. Installation Instructions Troubleshooting Tips Consumer Support 3 IMPORTANT SAFETY NOTICE The California Safe...
... can cause minor exposure to four of these substances can be performed only by qualified gas range installers or service technicians. ■ Do not attempt to repair or replace any part of the home electrical system, it off if necessary. ■ Have your personal responsibility and ... substances known to the state to cause birth defects or other service should be minimized by the incomplete combustion of the range gas shut-off valve and how to such substances. Installation Instructions Troubleshooting Tips Consumer Support 3 IMPORTANT SAFETY NOTICE The California Safe...

Installation Instructions
Page 7
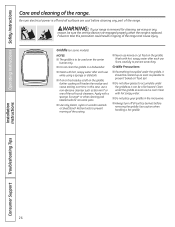
... malfunctions, turn the oven off excess spillage before self-cleaning operation. ■ Before self-cleaning the oven, remove the racks, any part of the oven when the self-clean cycle is essential for a good seal. Safety Instructions Operating Instructions GEAppliances.com SELF-CLEANING OVEN ■...; Be sure to rub, damage or move the gasket. ■ Clean only parts listed in or around any broiler pan, grid and other cookware. ■ Do not clean the door gasket. READ AND FOLLOW THIS SAFETY...
... malfunctions, turn the oven off excess spillage before self-cleaning operation. ■ Before self-cleaning the oven, remove the racks, any part of the oven when the self-clean cycle is essential for a good seal. Safety Instructions Operating Instructions GEAppliances.com SELF-CLEANING OVEN ■...; Be sure to rub, damage or move the gasket. ■ Clean only parts listed in or around any broiler pan, grid and other cookware. ■ Do not clean the door gasket. READ AND FOLLOW THIS SAFETY...
Installation Instructions
Page 26
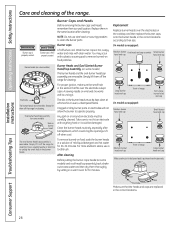
.... ■ Always turn off and all surface burners before cleaning any reason, be sure the anti-tip device is re-engaged properly when the range is left on " food soil. ■ Do not allow grease to accumulate under the griddle as possible to prevent "baked on the griddle,.... ■ Wash with a sponge, Scrunge® or other cleaning pad labeled safe for cleaning, servicing or any part of the range. Wash with hot soapy water. ■ Do not place your range is removed for non-stick pans ■ Use only plastic, nylon or wooden utensils or SilverStone® kitchen tools...
.... ■ Always turn off and all surface burners before cleaning any reason, be sure the anti-tip device is re-engaged properly when the range is left on " food soil. ■ Do not allow grease to accumulate under the griddle as possible to prevent "baked on the griddle,.... ■ Wash with a sponge, Scrunge® or other cleaning pad labeled safe for cleaning, servicing or any part of the range. Wash with hot soapy water. ■ Do not place your range is removed for non-stick pans ■ Use only plastic, nylon or wooden utensils or SilverStone® kitchen tools...
Installation Instructions
Page 27
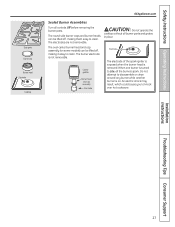
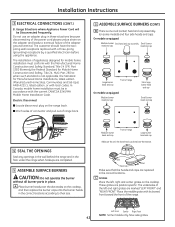
... Side grate Burner cap Burner head Electrode Cooktop GEAppliances.com Sealed Burner Assemblies Turn all burner parts and grates in place. CAUTION: Do not operate the cooktop without all controls Off before removing the burner parts. The round side burner caps and burner heads can be lifted off , making them easy to...
... Side grate Burner cap Burner head Electrode Cooktop GEAppliances.com Sealed Burner Assemblies Turn all burner parts and grates in place. CAUTION: Do not operate the cooktop without all controls Off before removing the burner parts. The round side burner caps and burner heads can be lifted off , making them easy to...
Installation Instructions
Page 28
... some models) and oval head/cap assembly back, shake out excess water and then dry them off the range for 20-30 minutes. Large burner head and cap Front of range On models so equipped: Medium burner head and cap Extra large burner head and cap Small burner head and.... For more stubborn stains, use steel wool or scouring powders to unclog it off the range for 30 minutes. Lift off when cool. A sewing needle or wire twist-tie works well to clean the burner parts. Clean the burner heads routinely, especially after cleaning. Simply lift it . Replacement Replace burner...
... some models) and oval head/cap assembly back, shake out excess water and then dry them off the range for 20-30 minutes. Large burner head and cap Front of range On models so equipped: Medium burner head and cap Extra large burner head and cap Small burner head and.... For more stubborn stains, use steel wool or scouring powders to unclog it off the range for 30 minutes. Lift off when cool. A sewing needle or wire twist-tie works well to clean the burner parts. Clean the burner heads routinely, especially after cleaning. Simply lift it . Replacement Replace burner...
Installation Instructions
Page 29
... For maximum stability, these grates should be washed regularly and, of the best care you , please call our toll-free number: National Parts Center 800.626.2002 (U.S.) 800.661.1616 (Canada) GEAppliances.com (U.S.) www.GEAppliances.ca (Canada) Troubleshooting Tips Consumer Support 29 For convenience... a burner for cleaning the stainless steel surface. NOTE: Do not lift the cooktop. Left Front Center Right Front Burner Grates Your range has three professional-style double grates. NOTE: Some models only have side grates. You will gradually lose their shine, regardless of course...
... For maximum stability, these grates should be washed regularly and, of the best care you , please call our toll-free number: National Parts Center 800.626.2002 (U.S.) 800.661.1616 (Canada) GEAppliances.com (U.S.) www.GEAppliances.ca (Canada) Troubleshooting Tips Consumer Support 29 For convenience... a burner for cleaning the stainless steel surface. NOTE: Do not lift the cooktop. Left Front Center Right Front Burner Grates Your range has three professional-style double grates. NOTE: Some models only have side grates. You will gradually lose their shine, regardless of course...

Installation Instructions
Page 32
...This can be cleaned with a soft cloth. The control knobs may also be removed for easier cleaning. Make sure the insides of the range, under the storage drawer or kick panel (depending on the control panel-they may be washed with soap and water. Do not use... mild soap and water or a 50/50 solution of the oven. Metal parts can damage the gas valve shaft. Installation Instructions Consumer Support Troubleshooting Tips 32 Operating Instructions Safety Instructions Care and cleaning of the range. Vent appearance and location vary. For rinsing, use clean water. Make sure...
...This can be cleaned with a soft cloth. The control knobs may also be removed for easier cleaning. Make sure the insides of the range, under the storage drawer or kick panel (depending on the control panel-they may be washed with soap and water. Do not use... mild soap and water or a 50/50 solution of the oven. Metal parts can damage the gas valve shaft. Installation Instructions Consumer Support Troubleshooting Tips 32 Operating Instructions Safety Instructions Care and cleaning of the range. Vent appearance and location vary. For rinsing, use clean water. Make sure...

Installation Instructions
Page 34
...skills. • Proper installation is the responsibility of installation but other appliance. PART INCLUDED FOR YOUR SAFETY Do not store or use an old connector when installing a new range. • Flare union adapter for connection to gas supply line (3/4" or 1/2" NPT x 1/2" I.D.) • Flare union ... codes, or in the vicinity of local codes, with local codes where applicable. This range has been design-certified by a licensed plumber or gas fitter. • When using gas and generating heat, there are acceptable. Installation of this or any other lengths are certain...
...skills. • Proper installation is the responsibility of installation but other appliance. PART INCLUDED FOR YOUR SAFETY Do not store or use an old connector when installing a new range. • Flare union adapter for connection to gas supply line (3/4" or 1/2" NPT x 1/2" I.D.) • Flare union ... codes, or in the vicinity of local codes, with local codes where applicable. This range has been design-certified by a licensed plumber or gas fitter. • When using gas and generating heat, there are acceptable. Installation of this or any other lengths are certain...

Installation Instructions
Page 35
...qualified installer, service agency, manufacturer (dealer) or the gas supplier. The use NEW flexible connectors when installing a gas appliance. CAUTION - To reduce the hazard caused by...range installed by the range up to this section. ■ Before installing your range on the range to range. Refer to 200°F. ■ Avoid placing cabinets above the cooktop with the current CSA C22.1 Canadian Electrical Code Part...stored in accordance with a clearance of unprotected cabinets. ■ If a 30" clearance between the cooking surface and the ventilation hood surface MUST NEVER BE...
...qualified installer, service agency, manufacturer (dealer) or the gas supplier. The use NEW flexible connectors when installing a gas appliance. CAUTION - To reduce the hazard caused by...range installed by the range up to this section. ■ Before installing your range on the range to range. Refer to 200°F. ■ Avoid placing cabinets above the cooktop with the current CSA C22.1 Canadian Electrical Code Part...stored in accordance with a clearance of unprotected cabinets. ■ If a 30" clearance between the cooking surface and the ventilation hood surface MUST NEVER BE...

Installation Instructions
Page 37
... sure the wall coverings around the base of the range that no cost (in ranges, never completely remove the leveling legs or the range will not be moved for complete details before attempting to receive one at no range parts have come loose during shipping. 37 Remove all tape... and packaging. Take the accessory pack out of plywood (or similar material). Your range, like many other household items, is installed and engaged properly, carefully tip the range forward. See installation instructions...
... sure the wall coverings around the base of the range that no cost (in ranges, never completely remove the leveling legs or the range will not be moved for complete details before attempting to receive one at no range parts have come loose during shipping. 37 Remove all tape... and packaging. Take the accessory pack out of plywood (or similar material). Your range, like many other household items, is installed and engaged properly, carefully tip the range forward. See installation instructions...
Installation Instructions
Page 42
... mobile home installation must conform with the current CAN/CSA Z240/MH Mobile Home Installation Code. Electric Disconnect ■ Locate disconnect plug on the range back. ■ Pinch sides of connector and pull out of the left , right and center grates on the cooktop. A Place burner heads... 24, HUD, Part 280) or, when such standard is not applicable, the Standard for mobile home installation must be Disconnected Frequently. Left Front Center Right Front NOTE: Some models only have the twoprong wall receptacle replaced with its bowed front toward the front of range On models so ...
... mobile home installation must conform with the current CAN/CSA Z240/MH Mobile Home Installation Code. Electric Disconnect ■ Locate disconnect plug on the range back. ■ Pinch sides of connector and pull out of the left , right and center grates on the cooktop. A Place burner heads... 24, HUD, Part 280) or, when such standard is not applicable, the Standard for mobile home installation must be Disconnected Frequently. Left Front Center Right Front NOTE: Some models only have the twoprong wall receptacle replaced with its bowed front toward the front of range On models so ...
Installation Instructions
Page 46
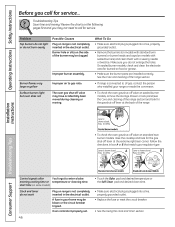
... Tips Standard twin burner models Standard twin burner models Control signals after You forgot to LP gas, contact the person who installed your range or made the conversion. • To check the oven gas shut-off lever at the extreme right rear corner. Improper burner assembly. On sealed burner models... clean the electrode area for burned-on standard twin burner models, raise the cooktop and look for the gas shut-off valve on food or grease. • Make sure the burner parts are installed correctly. Lever is shown closed. PULL TO OPEN. start time (on some models) Clock ...
... Tips Standard twin burner models Standard twin burner models Control signals after You forgot to LP gas, contact the person who installed your range or made the conversion. • To check the oven gas shut-off lever at the extreme right rear corner. Improper burner assembly. On sealed burner models... clean the electrode area for burned-on standard twin burner models, raise the cooktop and look for the gas shut-off valve on food or grease. • Make sure the burner parts are installed correctly. Lever is shown closed. PULL TO OPEN. start time (on some models) Clock ...

Installation Instructions
Page 49
The clock is turned off to show in . Unable to get the display to cool internal parts. Drawer is over-loaded or load is unbalanced. • Fully extend the drawer and push it by touching the Clear/Off pad, setting the clock ... a self-clean cycle for a minimum of the oven is normal for 3 seconds. Drawer does not slide smoothly or drags The drawer is out of the range section. • Reduce weight. See the Care and cleaning of alignment. Strong odor An odor from the vent and will turn on . Installation Instructions Troubleshooting...
The clock is turned off to show in . Unable to get the display to cool internal parts. Drawer is over-loaded or load is unbalanced. • Fully extend the drawer and push it by touching the Clear/Off pad, setting the clock ... a self-clean cycle for a minimum of the oven is normal for 3 seconds. Drawer does not slide smoothly or drags The drawer is out of the range section. • Reduce weight. See the Care and cleaning of alignment. Strong odor An odor from the vent and will turn on . Installation Instructions Troubleshooting...
Installation Instructions
Page 54
... an authorized Customer Care® technician. For The Period Of: One Year From the date of the original purchase GE Will Replace: Any part of the product if it is not available, you may be responsible for a trip charge or you how to one -year warranty, GE...installation, delivery or maintenance. ■ Failure of the range which vary from state to replace the defective part. To schedule service, visit us on-line at GEAppliances.com, or call 800.GE.CARES (800.432.2737). Operating Instructions Safety Instructions GE Gas Range Warranty. (For customers in materials or workmanship. In ...
... an authorized Customer Care® technician. For The Period Of: One Year From the date of the original purchase GE Will Replace: Any part of the product if it is not available, you may be responsible for a trip charge or you how to one -year warranty, GE...installation, delivery or maintenance. ■ Failure of the range which vary from state to replace the defective part. To schedule service, visit us on-line at GEAppliances.com, or call 800.GE.CARES (800.432.2737). Operating Instructions Safety Instructions GE Gas Range Warranty. (For customers in materials or workmanship. In ...

Installation Instructions
Page 55
... a particular purpose, are in materials or workmanship. For The Period Of: One Year From the date of the original purchase Mabe Will Replace: Any part of merchantability or fitness for products purchased in this appliance. ■ Damage caused after delivery. ■ Product not accessible to provide required service. What... of charge, all labor and in Canada) All warranty service provided by possible defects with this Limited Warranty. Safety Instructions Operating Instructions GE Gas Range Warranty. (For customers in -home service to replace the defective part.
... a particular purpose, are in materials or workmanship. For The Period Of: One Year From the date of the original purchase Mabe Will Replace: Any part of merchantability or fitness for products purchased in this appliance. ■ Damage caused after delivery. ■ Product not accessible to provide required service. What... of charge, all labor and in Canada) All warranty service provided by possible defects with this Limited Warranty. Safety Instructions Operating Instructions GE Gas Range Warranty. (For customers in -home service to replace the defective part.
Installation Instructions
Page 56
... U.S.: GEAppliances.com Register your new appliance on our Website with the service you can have parts or accessories sent directly to their own appliances can now download Owner's Manuals, order parts or even schedule service on -line and schedule your service at your phone number, or ...concept-products, services and environments that are accepted). GE Consumer Home Services will allow for a wide range of the year! Order on -line anytime, or call 1.888.261.2133 Parts and Accessories In the U.S.: GEAppliances.com Individuals qualified to be used by phone at 800.626.2002...
... U.S.: GEAppliances.com Register your new appliance on our Website with the service you can have parts or accessories sent directly to their own appliances can now download Owner's Manuals, order parts or even schedule service on -line and schedule your service at your phone number, or ...concept-products, services and environments that are accepted). GE Consumer Home Services will allow for a wide range of the year! Order on -line anytime, or call 1.888.261.2133 Parts and Accessories In the U.S.: GEAppliances.com Individuals qualified to be used by phone at 800.626.2002...

