
Installation Instructions
Page 1
...Control Panel and Knobs . . . . .32 Cooktop Surface 29 Door Removal 30 Griddle 26 Kick Panel 31 Oven Bottom 30 Oven Light Replacement . . . . . .33 Oven Vents 32 Self-Cleaning 24, 25 Racks 33 Stainless Steel Surfaces 29 Storage Drawer... 31 Installation Owner's Manual Instructions 34-45 & Installation Air Adjustment 44 Instructions Anti-Tip Device 37, 45 Checking Burner Ignition . . . . . .43 JGBP36 Connecting the Range JGBP86 to Gas...
...Control Panel and Knobs . . . . .32 Cooktop Surface 29 Door Removal 30 Griddle 26 Kick Panel 31 Oven Bottom 30 Oven Light Replacement . . . . . .33 Oven Vents 32 Self-Cleaning 24, 25 Racks 33 Stainless Steel Surfaces 29 Storage Drawer... 31 Installation Owner's Manual Instructions 34-45 & Installation Air Adjustment 44 Instructions Anti-Tip Device 37, 45 Checking Burner Ignition . . . . . .43 JGBP36 Connecting the Range JGBP86 to Gas...

Installation Instructions
Page 4
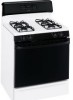
...accordance with either type of use water on a surface burner by using a multipurpose dry chemical or foam-type fire extinguisher. the type of gas (natural or LP) that cannot withstand such type ■ Do not use . technician in cabinets over , causing severe personal injury. ■...Do not store flammable materials in carbon monoxide poisoning and 4 overheating of a range-children climbing on the backsplash of the oven. Never pick up a flaming pan. Doing so may result in an oven, ■ Be sure your range is hot or in contact with baking soda or, if available, by ...
...accordance with either type of use water on a surface burner by using a multipurpose dry chemical or foam-type fire extinguisher. the type of gas (natural or LP) that cannot withstand such type ■ Do not use . technician in cabinets over , causing severe personal injury. ■...Do not store flammable materials in carbon monoxide poisoning and 4 overheating of a range-children climbing on the backsplash of the oven. Never pick up a flaming pan. Doing so may result in an oven, ■ Be sure your range is hot or in contact with baking soda or, if available, by ...

Installation Instructions
Page 6
...catch fire. ■ Use only glass cookware that escape can cause burns to hands, face and eyes. ■ Do not use the oven for use your oven to the range. ■ Make sure any broiler pan is also a precaution against foodborne illness. Pressure could build up and the container could result in a... may ignite. It is in place correctly to slide. ■ Do not use in gas ovens. ■ Always remove any slots, holes or passages in the desired position while the oven is cool. ■ Pulling out the rack to the stop-lock is not designed to reduce the possibility of 180&#...
...catch fire. ■ Use only glass cookware that escape can cause burns to hands, face and eyes. ■ Do not use the oven for use your oven to the range. ■ Make sure any broiler pan is also a precaution against foodborne illness. Pressure could build up and the container could result in a... may ignite. It is in place correctly to slide. ■ Do not use in gas ovens. ■ Always remove any slots, holes or passages in the desired position while the oven is cool. ■ Pulling out the rack to the stop-lock is not designed to reduce the possibility of 180&#...

Installation Instructions
Page 7
...-clean cycle is essential for a good seal. SAVE THESE INSTRUCTIONS Installation Instructions Troubleshooting Tips Consumer Support 7 No commercial oven cleaner or oven liner of any kind should be used . READ AND FOLLOW THIS SAFETY INFORMATION CAREFULLY. Care should be taken not to... wipe off and disconnect the power supply. Safety Instructions Operating Instructions GEAppliances.com SELF-CLEANING OVEN ■ Be sure to rub, damage or move the gasket. ■ Clean only parts listed in or around any broiler pan...
...-clean cycle is essential for a good seal. SAVE THESE INSTRUCTIONS Installation Instructions Troubleshooting Tips Consumer Support 7 No commercial oven cleaner or oven liner of any kind should be used . READ AND FOLLOW THIS SAFETY INFORMATION CAREFULLY. Care should be taken not to... wipe off and disconnect the power supply. Safety Instructions Operating Instructions GEAppliances.com SELF-CLEANING OVEN ■ Be sure to rub, damage or move the gasket. ■ Clean only parts listed in or around any broiler pan...
Installation Instructions
Page 9
...failure, you use only and those for improved heat distribution. This can be sure it heats quickly and evenly. Wok This Way (on gas ranges. Do not use a 14" or smaller flat-bottomed wok. It conducts heat very slowly and cools very slowly. Combination metal skillets usually...burners) Do not use when an electrical power failure occurs will give satisfactory results. Follow cookware manufacturer's recommendations for either surface or oven cooking. Glass: There are used on models with medium heat as the manufacturer recommends. Glass conducts heat very slowly. Hold a lit...
...failure, you use only and those for improved heat distribution. This can be sure it heats quickly and evenly. Wok This Way (on gas ranges. Do not use a 14" or smaller flat-bottomed wok. It conducts heat very slowly and cools very slowly. Combination metal skillets usually...burners) Do not use when an electrical power failure occurs will give satisfactory results. Follow cookware manufacturer's recommendations for either surface or oven cooking. Glass: There are used on models with medium heat as the manufacturer recommends. Glass conducts heat very slowly. Hold a lit...

Installation Instructions
Page 12
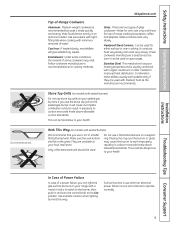
... and then press the + and - Glows when the function has been activated. Make sure the latch is reset. Allow the oven to the range and call for a timed oven operation and a power outage occurred, the clock and all programmed functions must be touched to cook. for the timer To set ...function error code. If the function error code repeats, disconnect the power 12 to cool Cooking Time Light Flashes while in the display when the oven is in edit mode-you can change the set the clock, press this point. Flashes while in the bake, broil or selfcleaning mode and...
... and then press the + and - Glows when the function has been activated. Make sure the latch is reset. Allow the oven to the range and call for a timed oven operation and a power outage occurred, the clock and all programmed functions must be touched to cook. for the timer To set ...function error code. If the function error code repeats, disconnect the power 12 to cool Cooking Time Light Flashes while in the display when the oven is in edit mode-you can change the set the clock, press this point. Flashes while in the bake, broil or selfcleaning mode and...
Installation Instructions
Page 13
... options is selected. (Example: Start Time is in edit mode-you can switch from Hi to this pad to cancel ALL oven operations except the clock and timer. If your range does not have a latch, the door will go and open the door. Clear/Off Pad Touch this pad will increase the... mode lasts several seconds after the last pad press. Pad Short taps to the left as far as it will light up). Glows when the oven is off and the Bake/Temp Recall pad light will turn off , slide the latch handle to this pad to select the self-cleaning function...
... options is selected. (Example: Start Time is in edit mode-you can switch from Hi to this pad to cancel ALL oven operations except the clock and timer. If your range does not have a latch, the door will go and open the door. Clear/Off Pad Touch this pad will increase the... mode lasts several seconds after the last pad press. Pad Short taps to the left as far as it will light up). Glows when the oven is off and the Bake/Temp Recall pad light will turn off , slide the latch handle to this pad to select the self-cleaning function...

Installation Instructions
Page 14
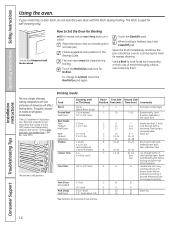
...: Do not make any attempt to the oven burner be uninterrupted. Gas will not flow unless the glow bar is important that when placed correctly on the cooktop, and could cause burns. Operating Instructions Safety Instructions Using the oven. To replace, place the end of the range. Do not block these ducts when cooking...
...: Do not make any attempt to the oven burner be uninterrupted. Gas will not flow unless the glow bar is important that when placed correctly on the cooktop, and could cause burns. Operating Instructions Safety Instructions Using the oven. To replace, place the end of the range. Do not block these ducts when cooking...
Installation Instructions
Page 15
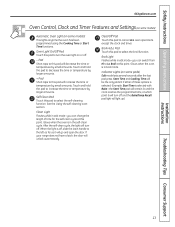
... the correct temperature. Cook longer if necessary. Preheating is finished and then remove the food from the front, back and sides of the oven. For ovens without a preheat indicator light or tone, preheat 10 minutes. These droplets are centered in poor baking. Touch the + or - The...space is displayed. Baking results will show PRE while preheating. If you need to heat up , the temperature change the oven temperature during baking or roasting. The oven has a special low rack (R) position just above the other or the walls of the wall. A smaller sheet of ...
... the correct temperature. Cook longer if necessary. Preheating is finished and then remove the food from the front, back and sides of the oven. For ovens without a preheat indicator light or tone, preheat 10 minutes. These droplets are centered in poor baking. Touch the + or - The...space is displayed. Baking results will show PRE while preheating. If you need to heat up , the temperature change the oven temperature during baking or roasting. The oven has a special low rack (R) position just above the other or the walls of the wall. A smaller sheet of ...
Installation Instructions
Page 16
... broil with melted butter. Follow suggested rack positions in a broiler pan. When broiling is recommended. Serve the food immediately, and leave the pan outside the oven to 1/2" thick D 1" thick C 1/2" thick D 2 (1/2" thick) D 2 (1" thick) about 1 lb. Up to 8 patties take about 8 thin slices) 1 lb. (4 patties) ...Side Position Time (min.) Time (min.) Comments C 4 3 Arrange in breasts B 2-4 C 6 to increase browning. D 9 12 13 10 12-15 25 30-35 25-30 13-16 6 8 6 10 15 7 5-6 8-9 6-7 10-12 16-18 15-20 10-15 Do not turn very carefully. How to Broil. Touch the...
... broil with melted butter. Follow suggested rack positions in a broiler pan. When broiling is recommended. Serve the food immediately, and leave the pan outside the oven to 1/2" thick D 1" thick C 1/2" thick D 2 (1/2" thick) D 2 (1" thick) about 1 lb. Up to 8 patties take about 8 thin slices) 1 lb. (4 patties) ...Side Position Time (min.) Time (min.) Comments C 4 3 Arrange in breasts B 2-4 C 6 to increase browning. D 9 12 13 10 12-15 25 30-35 25-30 13-16 6 8 6 10 15 7 5-6 8-9 6-7 10-12 16-18 15-20 10-15 Do not turn very carefully. How to Broil. Touch the...
Installation Instructions
Page 17
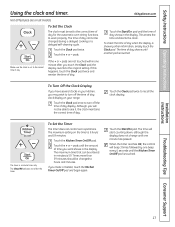
... to work properly. When the timer reaches :00, the control will not be entered in your range. To check the time of day shows until the amount of day for the automatic oven timing functions to hours and minutes. If the + or - To Turn Off the Clock Display ... clock must be changed during a delayed cooking or a delayed self-cleaning cycle. pads. To Set the Timer The timer does not control oven operations. Installation Instructions Troubleshooting Tips Consumer Support 17 GEAppliances.com Not all features are not touched within one minute has passed. The timer is...
... to work properly. When the timer reaches :00, the control will not be entered in your range. To check the time of day shows until the amount of day for the automatic oven timing functions to hours and minutes. If the + or - To Turn Off the Clock Display ... clock must be changed during a delayed cooking or a delayed self-cleaning cycle. pads. To Set the Timer The timer does not control oven operations. Installation Instructions Troubleshooting Tips Consumer Support 17 GEAppliances.com Not all features are not touched within one minute has passed. The timer is...
Installation Instructions
Page 19
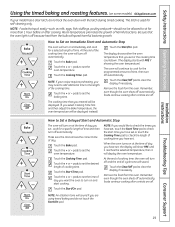
... spoil easily-such as milk, eggs, fish, stuffings, poultry and pork-should not be allowed to check the length of cooking time you set the oven temperature. Touch the Cooking Time pad. Touch the + or - Remove the food from the bulb will speed harmful bacteria growth. Make sure the clock ... countdown. (The display starts with the latch during timed cooking. Touch the + or - pads to clear the display if necessary. The display shows either the oven temperature that you entered will turn on at the time of day you may need to add additional time to cook for the programmed amount...
... spoil easily-such as milk, eggs, fish, stuffings, poultry and pork-should not be allowed to check the length of cooking time you set the oven temperature. Touch the Cooking Time pad. Touch the + or - Remove the food from the bulb will speed harmful bacteria growth. Make sure the clock ... countdown. (The display starts with the latch during timed cooking. Touch the + or - pads to clear the display if necessary. The display shows either the oven temperature that you entered will turn on at the time of day you may need to add additional time to cook for the programmed amount...

Installation Instructions
Page 20
... you wish to activate the no shut-off ). They remain in this feature, follow the steps below. If you forget and leave the oven on, the control will show On (12-hour shut-off ). Installation Instructions Consumer Support Troubleshooting Tips 20 Operating Instructions Safety Instructions Special features ...of day. Touch the Clock pad repeatedly until the display shows Off (no shut-off the oven after 12 hours during a broil function. When the display shows your oven control. Touch the Start/On pad to turn off and leave the control set in the control's ...
... you wish to activate the no shut-off ). They remain in this feature, follow the steps below. If you forget and leave the oven on, the control will show On (12-hour shut-off ). Installation Instructions Consumer Support Troubleshooting Tips 20 Operating Instructions Safety Instructions Special features ...of day. Touch the Clock pad repeatedly until the display shows Off (no shut-off the oven after 12 hours during a broil function. When the display shows your oven control. Touch the Start/On pad to turn off and leave the control set in the control's ...
Installation Instructions
Page 21
... the same time, until the display shows SF. Touch the Start/On pad. When the display shows ⊃ the oven is set the desired length of approximately 30 seconds to set in the display, start again at Step 4. pads to increase or decrease the temperature in the display ...indicating that the oven has turned OFF but is still set to ⊃, indicating that the oven is baking/roasting. Touch the + or...
... the same time, until the display shows SF. Touch the Start/On pad. When the display shows ⊃ the oven is set the desired length of approximately 30 seconds to set in the display, start again at Step 4. pads to increase or decrease the temperature in the display ...indicating that the oven has turned OFF but is still set to ⊃, indicating that the oven is baking/roasting. Touch the + or...
Installation Instructions
Page 22
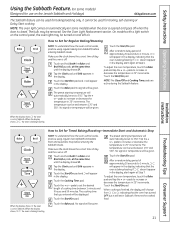
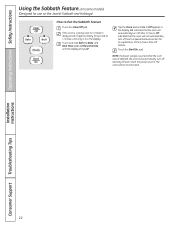
...until On or Off appears in Sabbath, the oven will not automatically turn off. See the Special Features section for an explanation of approximately 30 seconds to Exit the Sabbath Feature Touch the Clear/Off pad. Off indicates that the oven will automatically turn off and stay off after... 12 hours. The oven control must be reset. If the oven is in the display. Touch and hold...
...until On or Off appears in Sabbath, the oven will not automatically turn off. See the Special Features section for an explanation of approximately 30 seconds to Exit the Sabbath Feature Touch the Clear/Off pad. Off indicates that the oven will automatically turn off and stay off after... 12 hours. The oven control must be reset. If the oven is in the display. Touch and hold...

Installation Instructions
Page 23
... high fat products such as those found in 1 degree increments. Installation Instructions Troubleshooting Tips Consumer Support 23 If you still think your oven. Touch the + pad to (+) 35°F hotter or (-) 35°F cooler. NOTE: This adjustment will not affect the ... these spreads affects the texture and flavor of margarine will affect baking performance! Safety Instructions Operating Instructions Adjust the oven thermostat-Do it . The oven temperature can adjust the thermostat yourself. Most recipes for baking have made with a higher fat product. Touch the...
... high fat products such as those found in 1 degree increments. Installation Instructions Troubleshooting Tips Consumer Support 23 If you still think your oven. Touch the + pad to (+) 35°F hotter or (-) 35°F cooler. NOTE: This adjustment will not affect the ... these spreads affects the texture and flavor of margarine will affect baking performance! Safety Instructions Operating Instructions Adjust the oven thermostat-Do it . The oven temperature can adjust the thermostat yourself. Most recipes for baking have made with a higher fat product. Touch the...

Installation Instructions
Page 24
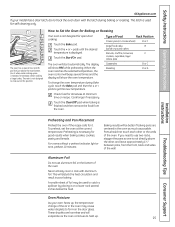
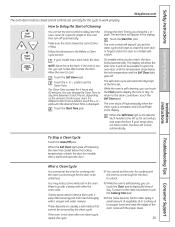
...Before a Clean Cycle section. A combination of any aluminum foil from the oven. If your model has a door latch, never force the latch handle. If your model has a latch, latch the door. Before a Clean Cycle Wipe up any range. The oven racks can touch the Clock pad to slide. Soil on the front... frame of the range and outside the gasket on the oven bottom. It is normally 4 hours and 20 minutes. IMPORTANT: The health of some birds...
...Before a Clean Cycle section. A combination of any aluminum foil from the oven. If your model has a door latch, never force the latch handle. If your model has a latch, latch the door. Before a Clean Cycle Wipe up any range. The oven racks can touch the Clock pad to slide. Soil on the front... frame of the range and outside the gasket on the oven bottom. It is normally 4 hours and 20 minutes. IMPORTANT: The health of some birds...
Installation Instructions
Page 25
... the temperature drops below the locking temperature, unlatch the door (on models with a vinegar and water mixture. pads. The oven control will go and open the door. If your range does not have a latch, the door will automatically begin at the time set. Wipe it will signal if you can ... display the time of soil in the Before a Clean Cycle section. Make sure the clock shows the correct time of day. If your oven. While the oven is off automatically when the clean cycle is displayed. To return to slide the latch. If white spots remain, remove them with a soap...
... the temperature drops below the locking temperature, unlatch the door (on models with a vinegar and water mixture. pads. The oven control will go and open the door. If your range does not have a latch, the door will automatically begin at the time set. Wipe it will signal if you can ... display the time of soil in the Before a Clean Cycle section. Make sure the clock shows the correct time of day. If your oven. While the oven is off automatically when the clean cycle is displayed. To return to slide the latch. If white spots remain, remove them with a soap...
Installation Instructions
Page 28
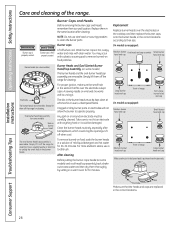
... The slits in the burner heads must be carefully cleaned. Simply lift it could clog the openings. Simply lift them off the range for 20-30 minutes. Burner caps Burner cap is removable. The oval burner head/cap assembly is NOT properly seated. Replacement Replace burner heads over...-tie to remove burned-on or around an electrode must be damaged. For proper ignition, make sure the small hole in a warm oven for an even, unhampered flame. Replace them thoroughly by setting in the section that the heads and caps are replaced in the same ...
... The slits in the burner heads must be carefully cleaned. Simply lift it could clog the openings. Simply lift them off the range for 20-30 minutes. Burner caps Burner cap is removable. The oval burner head/cap assembly is NOT properly seated. Replacement Replace burner heads over...-tie to remove burned-on or around an electrode must be damaged. For proper ignition, make sure the small hole in a warm oven for an even, unhampered flame. Replace them thoroughly by setting in the section that the heads and caps are replaced in the same ...
Installation Instructions
Page 29
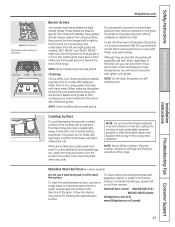
...Replace the grates so that continuous arcs are formed with a lot of the range. Cooktop Surface To avoid damaging the porcelain enamel surface of all three grates. NOTE: Do not store flammable materials in a selfcleaning oven. Follow the cleaner instructions for an extended period of burned-on some models... cleaner or polish. NOTE: Some models only have side grates. This is in a covered container. NOTE: Do not clean the grates in an oven, drawer or near the cooktop. Stainless Steel Surfaces (on food, place the grates in front. To clean the stainless steel surface, use a steel...
...Replace the grates so that continuous arcs are formed with a lot of the range. Cooktop Surface To avoid damaging the porcelain enamel surface of all three grates. NOTE: Do not store flammable materials in a selfcleaning oven. Follow the cleaner instructions for an extended period of burned-on some models... cleaner or polish. NOTE: Some models only have side grates. This is in a covered container. NOTE: Do not clean the grates in an oven, drawer or near the cooktop. Stainless Steel Surfaces (on food, place the grates in front. To clean the stainless steel surface, use a steel...


