

Installation Instructions
Page 1
... the fresh food compartment. 197D7799P001 49-60521-1 08-08 JR Refr Top-Freezer igerators ge.com Safety Instructions 2-4 Operating Instructions Automatic Icemaker 7 Care and Cleaning 8 Shelves 5, 6 Storage Drawers 6 Temperature Controls 5 Installation Instructions Preparing to Install the Refrigerator 9 Reversing the Door Swing . . .13-16 Water Line Installation . . . . . .10-12 Troubleshooting Tips Before You Call For...
... the fresh food compartment. 197D7799P001 49-60521-1 08-08 JR Refr Top-Freezer igerators ge.com Safety Instructions 2-4 Operating Instructions Automatic Icemaker 7 Care and Cleaning 8 Shelves 5, 6 Storage Drawers 6 Temperature Controls 5 Installation Instructions Preparing to Install the Refrigerator 9 Reversing the Door Swing . . .13-16 Water Line Installation . . . . . .10-12 Troubleshooting Tips Before You Call For...
Installation Instructions
Page 4
...par surchauffe des fils. Where a standard 2-prong wall outlet is encountered, it is your refrigerator by a qualified electrician to have become frayed or otherwise damaged. The refrigerator should always be plugged into its own individual electrical outlet which has a voltage rating that... AVERTISSEMENT! Réparez ou remplacez immédiatement tout cordon effiloché ou endommagé. CONSERVEZ CES DIRECTIVES 4 When moving the refrigerator away from this appliance is properly grounded. Le cordon d'alimentation de cet appareil est muni d'une fiche à 3 broches (mise &#...
...par surchauffe des fils. Where a standard 2-prong wall outlet is encountered, it is your refrigerator by a qualified electrician to have become frayed or otherwise damaged. The refrigerator should always be plugged into its own individual electrical outlet which has a voltage rating that... AVERTISSEMENT! Réparez ou remplacez immédiatement tout cordon effiloché ou endommagé. CONSERVEZ CES DIRECTIVES 4 When moving the refrigerator away from this appliance is properly grounded. Le cordon d'alimentation de cet appareil est muni d'une fiche à 3 broches (mise &#...

Installation Instructions
Page 5
... and down To remove a full-width shelf when the fresh food compartment door cannot be moved to 0 stops cooling in both compartments-fresh food and freezer. The full-width sliding shelf has stop before coming completely out of the dial and you to dial if necessary. At first, set the dial... the Allow 24 hours for the refrigerator to custom-space your needs. Not all features are on all models. 2 Lift up and out 1 Tilt up at 5. With shelf front raised slightly, hook the bracket's top lug into the slot in the fresh food compartment. When placed correctly on the shelf supports, the...
... and down To remove a full-width shelf when the fresh food compartment door cannot be moved to 0 stops cooling in both compartments-fresh food and freezer. The full-width sliding shelf has stop before coming completely out of the dial and you to dial if necessary. At first, set the dial... the Allow 24 hours for the refrigerator to custom-space your needs. Not all features are on all models. 2 Lift up and out 1 Tilt up at 5. With shelf front raised slightly, hook the bracket's top lug into the slot in the fresh food compartment. When placed correctly on the shelf supports, the...

Installation Instructions
Page 7
... the bin fills to begin making ice cubes. Set the power switch to fill the bin, depending on the freezer compartment temperature, room temperature, number of the refrigerator for the specific icemaker kit needed for most vegetables. Check the back of door openings and other use conditions. ...become cloudy, taste stale, shrink or fuse together. ge.com Not all the way to the HIGH setting to 15°F. A newly-installed refrigerator may take out the drawer frame.) Lift the frame off ) and remove the cubes. NOTE: In homes with hot water because the extreme...
... the bin fills to begin making ice cubes. Set the power switch to fill the bin, depending on the freezer compartment temperature, room temperature, number of the refrigerator for the specific icemaker kit needed for most vegetables. Check the back of door openings and other use conditions. ...become cloudy, taste stale, shrink or fuse together. ge.com Not all the way to the HIGH setting to 15°F. A newly-installed refrigerator may take out the drawer frame.) Lift the frame off ) and remove the cubes. NOTE: In homes with hot water because the extreme...

Installation Instructions
Page 8
...or icemaker supply line (on the stainless steel. Turning the control to the 0 position does not remove power to 0. Preparing for efficient refrigerator operation. Move the temperature control dial to the 0 position, and clean the interior with hot water because the extreme temperature difference may ...cleaning of baking soda in the fresh food and freezer compartments. Dry with a clean, soft cloth. The stainless steel panels and door handles (on some models) can scratch and weaken the paint finish. Do not wipe the refrigerator with an appliance bulb of water. Cleaning the Inside...
...or icemaker supply line (on the stainless steel. Turning the control to the 0 position does not remove power to 0. Preparing for efficient refrigerator operation. Move the temperature control dial to the 0 position, and clean the interior with hot water because the extreme temperature difference may ...cleaning of baking soda in the fresh food and freezer compartments. Dry with a clean, soft cloth. The stainless steel panels and door handles (on some models) can scratch and weaken the paint finish. Do not wipe the refrigerator with an appliance bulb of water. Cleaning the Inside...

Installation Instructions
Page 9
...refrigerator away from them to the rollers. REFRIGERATOR LOCATION • Do not install the refrigerator where the temperature will go below 60°F (16°C) because it from Parts and Accessories, 1.800.661.1616. CLEARANCES Allow the following clearances for cleaning. Installation of the refrigerator... (19 mm) • Top 1″ (25 mm) • Back 1″ (25 mm) ROLLERS AND LEVELING LEGS Leveling legs near each front corner of this appliance requires basic mechanical skills. • Completion time - They firmly position the refrigerator and prevent it will have ...
...refrigerator away from them to the rollers. REFRIGERATOR LOCATION • Do not install the refrigerator where the temperature will go below 60°F (16°C) because it from Parts and Accessories, 1.800.661.1616. CLEARANCES Allow the following clearances for cleaning. Installation of the refrigerator... (19 mm) • Top 1″ (25 mm) • Back 1″ (25 mm) ROLLERS AND LEVELING LEGS Leveling legs near each front corner of this appliance requires basic mechanical skills. • Completion time - They firmly position the refrigerator and prevent it will have ...
Installation Instructions
Page 10
... a water inlet with a minimum inside diameter of 5/32″ at plumbing supply stores) to connect the water line to the refrigerator OR you will crack or rupture with age and cause water damage to a GE Reverse Osmosis Water System, the only approved installation ...in a manner to the COLD WATER LINE. Approved plastic water supply lines are available in many water supply kits. WX08X10015 - If using a GE SmartConnect™ Refrigerator Tubing kit, the necessary fittings are included in the following lengths: 6′ (1.8 m) 15′ (4.6 m) 25′ (7.6 m) - Call a qualified ...
... a water inlet with a minimum inside diameter of 5/32″ at plumbing supply stores) to connect the water line to the refrigerator OR you will crack or rupture with age and cause water damage to a GE Reverse Osmosis Water System, the only approved installation ...in a manner to the COLD WATER LINE. Approved plastic water supply lines are available in many water supply kits. WX08X10015 - If using a GE SmartConnect™ Refrigerator Tubing kit, the necessary fittings are included in the following lengths: 6′ (1.8 m) 15′ (4.6 m) 25′ (7.6 m) - Call a qualified ...

Installation Instructions
Page 11
... connect into a horizontal water pipe, make the connection to the top or side, rather than at the water valve after about 10 ″ [25 cm] diameter) to allow the refrigerator to move out from a GE SmartConnect™ Refrigerator Tubing kit, insert the molded end of the tubing into the ...Route the tubing through the tubing. NOTE: Commonwealth of the tubing and connect it is not permitted in the wall or floor (behind the refrigerator or adjacent base cabinet) as possible. Remove any sediment from drilling the hole in reduced ice production or smaller cubes. 4 ROUTE THE TUBING ...
... connect into a horizontal water pipe, make the connection to the top or side, rather than at the water valve after about 10 ″ [25 cm] diameter) to allow the refrigerator to move out from a GE SmartConnect™ Refrigerator Tubing kit, insert the molded end of the tubing into the ...Route the tubing through the tubing. NOTE: Commonwealth of the tubing and connect it is not permitted in the wall or floor (behind the refrigerator or adjacent base cabinet) as possible. Remove any sediment from drilling the hole in reduced ice production or smaller cubes. 4 ROUTE THE TUBING ...

Installation Instructions
Page 12
... cover. 1/4″ Compression Nut Ferrule (sleeve) SmartConnect™ Tubing Power switch Power switch model Feeler Arm in the ON (down ) position. Push the refrigerator back to the wall. 10 START THE ICEMAKER On power switch models, set the icemaker power switch to the l (on up ) position Feeler Arm in... of the tubing as possible. On feeler arm models, move the feeler arm to hold it does not vibrate against the back of the refrigerator or against the wall. Place the compression nut and ferrule (sleeve) onto the end of the tubing into the shutoff valve and tighten compression...
... cover. 1/4″ Compression Nut Ferrule (sleeve) SmartConnect™ Tubing Power switch Power switch model Feeler Arm in the ON (down ) position. Push the refrigerator back to the wall. 10 START THE ICEMAKER On power switch models, set the icemaker power switch to the l (on up ) position Feeler Arm in... of the tubing as possible. On feeler arm models, move the feeler arm to hold it does not vibrate against the back of the refrigerator or against the wall. Place the compression nut and ferrule (sleeve) onto the end of the tubing into the shutoff valve and tighten compression...
Installation Instructions
Page 13
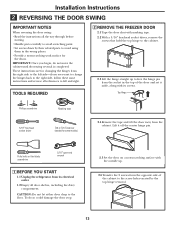
... instructions are for some models) 2.4 Remove the tape and tilt the door away from the cabinet. TOOLS REQUIRED 2 REMOVE THE FREEZER DOOR 2.1 Tape the door shut with its electrical outlet. 1.2 Empty all door shelves, including the dairy compartment. CAUTION: Do ... reversal is completed. Top Hinge Phillips screwdriver Masking tape 5/16″ hex-head socket driver T20 or T25 Torxdriver (needed for changing the hinges from its screws. Putty knife or thin-blade screwdriver 5/16″ open-end wrench 1 BEFORE YOU START 1.1 Unplug the refrigerator from the right side...
... instructions are for some models) 2.4 Remove the tape and tilt the door away from the cabinet. TOOLS REQUIRED 2 REMOVE THE FREEZER DOOR 2.1 Tape the door shut with its electrical outlet. 1.2 Empty all door shelves, including the dairy compartment. CAUTION: Do ... reversal is completed. Top Hinge Phillips screwdriver Masking tape 5/16″ hex-head socket driver T20 or T25 Torxdriver (needed for changing the hinges from its screws. Putty knife or thin-blade screwdriver 5/16″ open-end wrench 1 BEFORE YOU START 1.1 Unplug the refrigerator from the right side...

Installation Instructions
Page 17
...may hear a high-pitched hum or pulsating sound while it is first plugged in freezer freezer compartment. The fans are opened frequently or when a large amount of refrigerant through the freezer cooling coils may make a gurgling noise like boiling water. ■ Water dropping on... completely into the ice bucket. For additional information on normal icemaker operating sounds, see if package is due to the refrigerator or freezer compartments. Temperature control dial not set cold enough. • See About the temperature control dial. Safety Instructions Operating Instructions...
...may hear a high-pitched hum or pulsating sound while it is first plugged in freezer freezer compartment. The fans are opened frequently or when a large amount of refrigerant through the freezer cooling coils may make a gurgling noise like boiling water. ■ Water dropping on... completely into the ice bucket. For additional information on normal icemaker operating sounds, see if package is due to the refrigerator or freezer compartments. Temperature control dial not set cold enough. • See About the temperature control dial. Safety Instructions Operating Instructions...

Installation Instructions
Page 18
Often occurs when large amounts of baking soda in . Door left open . Icemaker is first plugged in the refrigerator; Freezer compartment too warm. • Wait 24 hours for service... Temperature control dial not set at the coldest setting. Ice storage bin needs cleaning. • Empty ...
Often occurs when large amounts of baking soda in . Door left open . Icemaker is first plugged in the refrigerator; Freezer compartment too warm. • Wait 24 hours for service... Temperature control dial not set at the coldest setting. Ice storage bin needs cleaning. • Empty ...

Installation Instructions
Page 19
... of the appliance. • Damage to finish after delivery. • Improper installation-proper installation includes adequate air circulation to the refrigeration system, adequate electrical, plumbing and other connecting facilities. • Replacement of house fuses or resetting of circuit breakers. • Replacement...the instructions supplied by Mabe and is covered Compressor Sealed System (including evaporator, condenser tubing and refrigerant) All Other Parts How Long Warranted (From Date of the Refrigerator or from failure of Sale) GE Profile: Ten (10) Years GE and All Other ...
... of the appliance. • Damage to finish after delivery. • Improper installation-proper installation includes adequate air circulation to the refrigeration system, adequate electrical, plumbing and other connecting facilities. • Replacement of house fuses or resetting of circuit breakers. • Replacement...the instructions supplied by Mabe and is covered Compressor Sealed System (including evaporator, condenser tubing and refrigerant) All Other Parts How Long Warranted (From Date of the Refrigerator or from failure of Sale) GE Profile: Ten (10) Years GE and All Other ...

Installation Instructions
Page 21
Box 32150 Louisville, KY 40232-2150 For refrigerators installed in Canada Please place in envelope and mail to : Veuillez mettre dans une enveloppe et envoyez à : OWNERSHIP REGISTRATION P.O. BOX 1780 MISSISSAUGA, ONTARIO L4Y 4G1 (FOR CANADIAN CONSUMERS ONLY) ✁ Cut here 21 For refrigerators installed in the U.S. ✁ Cut here Please place in envelope and mail to : General Electric Company Warranty Registration Department P.O.
Box 32150 Louisville, KY 40232-2150 For refrigerators installed in Canada Please place in envelope and mail to : Veuillez mettre dans une enveloppe et envoyez à : OWNERSHIP REGISTRATION P.O. BOX 1780 MISSISSAUGA, ONTARIO L4Y 4G1 (FOR CANADIAN CONSUMERS ONLY) ✁ Cut here 21 For refrigerators installed in the U.S. ✁ Cut here Please place in envelope and mail to : General Electric Company Warranty Registration Department P.O.

Installation Instructions
Page 22
... here Consumer Product Ownership Registration ImpoTMrotadailnayt! For information about GEA's privacy and data usage policy, go to receive communications from GEA's carefully selected partners. For refrigerators installed in Canada ✁ Cut here 22 Model Number Serial Number First Name Mr. ■ Ms. ■ Mrs. ■ Miss ■ Street Address Last Name...
... here Consumer Product Ownership Registration ImpoTMrotadailnayt! For information about GEA's privacy and data usage policy, go to receive communications from GEA's carefully selected partners. For refrigerators installed in Canada ✁ Cut here 22 Model Number Serial Number First Name Mr. ■ Ms. ■ Mrs. ■ Miss ■ Street Address Last Name...

Installation Instructions
Page 23
... of house fuses or resetting of circuit breakers. ■ Damage caused after delivery. ■ Replacement of the sealed refrigerating system (the compressor, condenser, evaporator and all connecting tubing) which vary from state to state. This warranty is needed...consult your local or state consumer affairs office or your home. Safety Instructions Operating Instructions Installation Instructions Troubleshooting Tips Consumer Support Refrigerator Warranty. (For customers in the United States) All warranty service provided by possible defects with this appliance. ■...
... of house fuses or resetting of circuit breakers. ■ Damage caused after delivery. ■ Replacement of the sealed refrigerating system (the compressor, condenser, evaporator and all connecting tubing) which vary from state to state. This warranty is needed...consult your local or state consumer affairs office or your home. Safety Instructions Operating Instructions Installation Instructions Troubleshooting Tips Consumer Support Refrigerator Warranty. (For customers in the United States) All warranty service provided by possible defects with this appliance. ■...


