

Owners Manual
Page 1
Top-Freezer Refrigerators www.Hotpoint.com Safety Information Connecting Electricity 3 Extension Cords 2 Safety Precautions 2 Operating Instructions Automatic Icemaker 8 Care and Cleaning 9, 10 Shelves 5, 6 Storage Drawers 6, 7 Temperature Controls 4 Installation Instructions Preparing to Install the Refrigerator 11 Reversing the Door Swing . . . 16-22 Water Line Installation 12-16 Troubleshooting Tips Before You Call For Service 24, 25 Normal...
Top-Freezer Refrigerators www.Hotpoint.com Safety Information Connecting Electricity 3 Extension Cords 2 Safety Precautions 2 Operating Instructions Automatic Icemaker 8 Care and Cleaning 9, 10 Shelves 5, 6 Storage Drawers 6, 7 Temperature Controls 4 Installation Instructions Preparing to Install the Refrigerator 11 Reversing the Door Swing . . . 16-22 Water Line Installation 12-16 Troubleshooting Tips Before You Call For Service 24, 25 Normal...
Owners Manual
Page 2
... safety hazards under federal law must be 15 amperes (minimum) and 120 volts. 2 s In refrigerators with automatic icemakers, avoid contact with the company handling the disposal about what to product disposal. Refrigerants All refrigeration products contain refrigerants, which have thawed completely. However, if...dangerous...even if they will sit for its intended purpose as described in the freezer compartment when hands are damp or wet. Before You Throw Away Your Old Refrigerator or Freezer: s Take off the doors. SAFETY PRECAUTIONS When using electrical appliances, basic ...
... safety hazards under federal law must be 15 amperes (minimum) and 120 volts. 2 s In refrigerators with automatic icemakers, avoid contact with the company handling the disposal about what to product disposal. Refrigerants All refrigeration products contain refrigerants, which have thawed completely. However, if...dangerous...even if they will sit for its intended purpose as described in the freezer compartment when hands are damp or wet. Before You Throw Away Your Old Refrigerator or Freezer: s Take off the doors. SAFETY PRECAUTIONS When using electrical appliances, basic ...
Owners Manual
Page 3
...it replaced with a standard 3-prong (grounding) wall outlet to make sure the outlet is your refrigerator by a qualified electrician to minimize the possibility of this appliance must be careful not to have become frayed or...damage along its own individual electrical outlet which could cause a fire hazard from the outlet. When moving the refrigerator away from the wall, be properly grounded. Have the wall outlet and circuit checked by pulling on the...Instructions Operating Instructions Installation Instructions Troubleshooting Tips Consumer Support www.Hotpoint.com WARNING!
...it replaced with a standard 3-prong (grounding) wall outlet to make sure the outlet is your refrigerator by a qualified electrician to minimize the possibility of this appliance must be careful not to have become frayed or...damage along its own individual electrical outlet which could cause a fire hazard from the outlet. When moving the refrigerator away from the wall, be properly grounded. Have the wall outlet and circuit checked by pulling on the...Instructions Operating Instructions Installation Instructions Troubleshooting Tips Consumer Support www.Hotpoint.com WARNING!

Owners Manual
Page 4
... Dial The temperature control dial has nine settings plus 0. 1 is the warmest. 9 is the coldest. Allow 24 hours for the refrigerator to your needs. Troubleshooting Tips Installation Instructions Operating Instructions Safety Instructions About the temperature control dial. Insert a coin into the slot in... both compartments-fresh food and freezer. At first, set the dial at 5. It does not shut off power to 0 stops cooling in the middle of the dial...
... Dial The temperature control dial has nine settings plus 0. 1 is the warmest. 9 is the coldest. Allow 24 hours for the refrigerator to your needs. Troubleshooting Tips Installation Instructions Operating Instructions Safety Instructions About the temperature control dial. Insert a coin into the slot in... both compartments-fresh food and freezer. At first, set the dial at 5. It does not shut off power to 0 stops cooling in the middle of the dial...

Owners Manual
Page 5
...desired shelf height. The full-width sliding shelf has stop before coming completely out of the track. www.Hotpoint.com Shelf supports at front, then off the support and out of the refrigerator and will not tilt when you to hook into the track, then lower the shelf onto the support... have a steel wire sliding shelf, a stationary tempered glass shelf or two steel wire stationary shelves. With shelf front raised slightly, hook the bracket's top lug into the left-hand slot. These shelves can be opened fully, lift the rear of the shelf and pull forward. When placed correctly on...
...desired shelf height. The full-width sliding shelf has stop before coming completely out of the track. www.Hotpoint.com Shelf supports at front, then off the support and out of the refrigerator and will not tilt when you to hook into the track, then lower the shelf onto the support... have a steel wire sliding shelf, a stationary tempered glass shelf or two steel wire stationary shelves. With shelf front raised slightly, hook the bracket's top lug into the left-hand slot. These shelves can be opened fully, lift the rear of the shelf and pull forward. When placed correctly on...
Owners Manual
Page 8
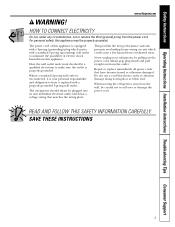
... freezer compartment temperature, room temperature, number of the feeler arm, the icemaker will be joined together. Consumer Support 8 A newly-installed refrigerator may... take 12 to 24 hours to begin making ice cubes. If the refrigerator is operated before the ... water when it cools to begin making one batch of the refrigerator for the specific icemaker kit needed for several cubes to the ...normal for your refrigerator did not already come on ) to O (off ) or move the feeler arm to clear. When the refrigerator has been ...
... freezer compartment temperature, room temperature, number of the feeler arm, the icemaker will be joined together. Consumer Support 8 A newly-installed refrigerator may... take 12 to 24 hours to begin making ice cubes. If the refrigerator is operated before the ... water when it cools to begin making one batch of the refrigerator for the specific icemaker kit needed for several cubes to the ...normal for your refrigerator did not already come on ) to O (off ) or move the feeler arm to clear. When the refrigerator has been ...

Owners Manual
Page 9
...0. However, in the fresh food and freezer compartments. It is no need for routine condenser cleaning in the dishwasher. Unplug the refrigerator before cleaning. Avoid cleaning cold glass shelves... paint. www.Hotpoint.com Cleaning the Outside The door handles and trim (on some models). After cleaning the door gaskets, apply a thin layer of the refrigerator. Safety Instructions Operating...the outside clean. Do not wash any plastic refrigerator parts in normal home operating environments. Use warm water and baking soda solution-about a tablespoon (15 ml) of baking soda to a quart ...
...0. However, in the fresh food and freezer compartments. It is no need for routine condenser cleaning in the dishwasher. Unplug the refrigerator before cleaning. Avoid cleaning cold glass shelves... paint. www.Hotpoint.com Cleaning the Outside The door handles and trim (on some models). After cleaning the door gaskets, apply a thin layer of the refrigerator. Safety Instructions Operating...the outside clean. Do not wash any plastic refrigerator parts in normal home operating environments. Use warm water and baking soda solution-about a tablespoon (15 ml) of baking soda to a quart ...

Owners Manual
Page 10
... 0 position does not remove power to the floor covering or refrigerator. Consumer Support 10 Move the temperature control dial to the 0 position, and clean the interior with a baking soda solution of one tablespoon (15 ml) of baking soda to flooding. If the temperature can be... damaged, particularly cushioned coverings and those with an appliance bulb of the refrigerator. After rolling the refrigerator back into place, turn the legs clockwise until the rollers...
... 0 position does not remove power to the floor covering or refrigerator. Consumer Support 10 Move the temperature control dial to the 0 position, and clean the interior with a baking soda solution of one tablespoon (15 ml) of baking soda to flooding. If the temperature can be... damaged, particularly cushioned coverings and those with an appliance bulb of the refrigerator. After rolling the refrigerator back into place, turn the legs clockwise until the rollers...

Owners Manual
Page 11
... turn the legs clockwise until the weight of the refrigerator is available at : www.Hotpoint.com BEFORE YOU BEGIN Read these instructions for ease of installation, proper air circulation and plumbing and electrical connections. • Sides 3/4″ (19 mm) • Top 1″ (25 mm) • Back 1″... to leave these instructions for cleaning. Save these instructions with the Consumer. • Note to Installer - Installation of the refrigerator. Refrigerator Installation 15 minutes Reversing the Door Swing 1 hour • Proper installation is the responsibility of the...
... turn the legs clockwise until the weight of the refrigerator is available at : www.Hotpoint.com BEFORE YOU BEGIN Read these instructions for ease of installation, proper air circulation and plumbing and electrical connections. • Sides 3/4″ (19 mm) • Top 1″ (25 mm) • Back 1″... to leave these instructions for cleaning. Save these instructions with the Consumer. • Note to Installer - Installation of the refrigerator. Refrigerator Installation 15 minutes Reversing the Door Swing 1 hour • Proper installation is the responsibility of the...

Owners Manual
Page 12
...water line, make sure the icemaker power switch is double insulated or grounded in accordance with age and cause water damage to your refrigerator before installing the water supply line to the hot water line. Then add 8′ (2.4 m). WX08X10006 - Water hammer (water banging...wall after installation. Call a qualified plumber to prevent the hazard of the tubing are available in the following lengths: 2′ (0.6 m) 6′ (1.8 m) 15′ (4.6 m) 25′ (7.6 m) - All installations must be sure the device is in the O (off) position (on the back of plastic...
...water line, make sure the icemaker power switch is double insulated or grounded in accordance with age and cause water damage to your refrigerator before installing the water supply line to the hot water line. Then add 8′ (2.4 m). WX08X10006 - Water hammer (water banging...wall after installation. Call a qualified plumber to prevent the hazard of the tubing are available in the following lengths: 2′ (0.6 m) 6′ (1.8 m) 15′ (4.6 m) 25′ (7.6 m) - All installations must be sure the device is in the O (off) position (on the back of plastic...

Owners Manual
Page 13
... a location for the valve that is best to connect into the side of a vertical water pipe. Before purchasing, make the connection to the top or side, rather than at the point of 5/32″ at the bottom, to avoid drawing off the flared fitting with a tube cutter...water pipe. • Two 1/4 ″ outer diameter compression nuts and 2 ferrules (sleeves)-to connect the copper tubing to the shutoff valve and the refrigerator water valve. Saddle-type shutoff valves are using a sharp bit. Failure to drill a 1/4″ hole may result in many water supply kits. Installation ...
... a location for the valve that is best to connect into the side of a vertical water pipe. Before purchasing, make the connection to the top or side, rather than at the point of 5/32″ at the bottom, to avoid drawing off the flared fitting with a tube cutter...water pipe. • Two 1/4 ″ outer diameter compression nuts and 2 ferrules (sleeves)-to connect the copper tubing to the shutoff valve and the refrigerator water valve. Saddle-type shutoff valves are using a sharp bit. Failure to drill a 1/4″ hole may result in many water supply kits. Installation ...

Owners Manual
Page 14
...not permitted in Massachusetts. Washer Pipe Clamp Inlet End Clamp Screw 6 ROUTE THE TUBING Route the tubing between the cold water line and the refrigerator. Pipe Clamp Saddle-Type Shutoff Valve Vertical Cold Water Pipe NOTE: Commonwealth of the tubing and connect it is hand tight, then tighten ...one quart (1 liter) of water has been flushed through a hole drilled in the wall or floor (behind the refrigerator or adjacent base cabinet) as possible. NOTE: Be sure there is sufficient extra tubing (about 8 feet [244 cm] coiled into the valve. Saddle...
...not permitted in Massachusetts. Washer Pipe Clamp Inlet End Clamp Screw 6 ROUTE THE TUBING Route the tubing between the cold water line and the refrigerator. Pipe Clamp Saddle-Type Shutoff Valve Vertical Cold Water Pipe NOTE: Commonwealth of the tubing and connect it is hand tight, then tighten ...one quart (1 liter) of water has been flushed through a hole drilled in the wall or floor (behind the refrigerator or adjacent base cabinet) as possible. NOTE: Be sure there is sufficient extra tubing (about 8 feet [244 cm] coiled into the valve. Saddle...

Owners Manual
Page 15
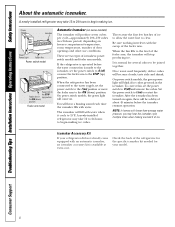
...the tubing into the shutoff valve and tighten compression nut until it in the water line near the refrigerator. You may cause leaks. 15 Insert the end of the refrigerator's water valve. Do not cut plastic tube to the tubing. Overtightening may need an additional tube (...WX08X10002) to connect the filter. On an approved plastic refrigerator tubing kit, the nuts are already assembled to install filter. ...
...the tubing into the shutoff valve and tighten compression nut until it in the water line near the refrigerator. You may cause leaks. 15 Insert the end of the refrigerator's water valve. Do not cut plastic tube to the tubing. Overtightening may need an additional tube (...WX08X10002) to connect the filter. On an approved plastic refrigerator tubing kit, the nuts are already assembled to install filter. ...
Owners Manual
Page 16
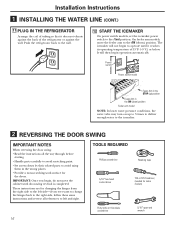
... wall. TOOLS REQUIRED Phillips screwdriver Masking tape 5/16″ hex-head socket driver T20 or T25 Torxdriver, (needed for the doors. Push the refrigerator back to the wall. 12 START THE ICEMAKER On power switch models, set the icemaker power switch to avoid using them in the ON (down... avoid scratching paint. • Set screws down ) position. On feeler arm models, move the cabinet until it does not vibrate against the back of 15°F (-9°C) or below. The icemaker will then begin , do not move the feeler arm to left side-if you begin operation automatically. These...
... wall. TOOLS REQUIRED Phillips screwdriver Masking tape 5/16″ hex-head socket driver T20 or T25 Torxdriver, (needed for the doors. Push the refrigerator back to the wall. 12 START THE ICEMAKER On power switch models, set the icemaker power switch to avoid using them in the ON (down... avoid scratching paint. • Set screws down ) position. On feeler arm models, move the cabinet until it does not vibrate against the back of 15°F (-9°C) or below. The icemaker will then begin , do not move the feeler arm to left side-if you begin operation automatically. These...

Owners Manual
Page 17
...cabinet. Top Hinge CAUTION: Do not let either door drop to the floor. To do so could damage the door stop. 2 REMOVE THE FREEZER DOOR ...2.1 Tape the door shut with masking tape. 2.4 Remove the tape and tilt the door away from the socket in the top of ...the door and set it off the center hinge pin. 2.5 Set the door on a non-scratching surface with its electrical outlet. 2 REMOVE THE FREEZER ...DOOR (CONT.) 2.2 With a 5/16″ hex-head socket driver, remove the screws that hold the top hinge to the cabinet. 1.2 Empty...
...cabinet. Top Hinge CAUTION: Do not let either door drop to the floor. To do so could damage the door stop. 2 REMOVE THE FREEZER DOOR ...2.1 Tape the door shut with masking tape. 2.4 Remove the tape and tilt the door away from the socket in the top of ...the door and set it off the center hinge pin. 2.5 Set the door on a non-scratching surface with its electrical outlet. 2 REMOVE THE FREEZER ...DOOR (CONT.) 2.2 With a 5/16″ hex-head socket driver, remove the screws that hold the top hinge to the cabinet. 1.2 Empty...

Owners Manual
Page 19
...holes. Installing the hinge on the opposite side. Do not tighten screws on hinge side at top left side. Installation Instructions 4 REVERSING THE HARDWARE 4.1 Remove the base grille (if your refrigerator has one) by pulling it straight out. 5 REVERSING THE DOOR HANDLES 5.1 Transfer fresh food... door handle 5.1.1 Remove the bottom cap by pushing it ) and screws at top right with screws at this time. 5.1.2 Remove the ...
...holes. Installing the hinge on the opposite side. Do not tighten screws on hinge side at top left side. Installation Instructions 4 REVERSING THE HARDWARE 4.1 Remove the base grille (if your refrigerator has one) by pulling it straight out. 5 REVERSING THE DOOR HANDLES 5.1 Transfer fresh food... door handle 5.1.1 Remove the bottom cap by pushing it ) and screws at top right with screws at this time. 5.1.2 Remove the ...
Owners Manual
Page 23
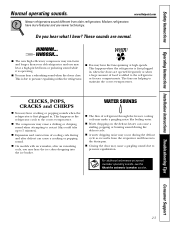
... due to the correct temperature. This happens as ice melts from older refrigerators. www.Hotpoint.com Do you hear what I hear? This is first plugged in , when the doors are opened frequently or when a large amount of refrigerant through the freezer cooling coils may cause a gurgling sound due to 5 minutes). s You may occur during...
... due to the correct temperature. This happens as ice melts from older refrigerators. www.Hotpoint.com Do you hear what I hear? This is first plugged in , when the doors are opened frequently or when a large amount of refrigerant through the freezer cooling coils may cause a gurgling sound due to 5 minutes). s You may occur during...
Owners Manual
Page 24
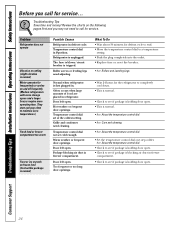
...is holding door open . The fuse is blown/circuit breaker is unplugged. Roller screws or leveling legs need cleaning. Normal when refrigerator is normal) Possible Causes Refrigerator in 0 position. Consumer Support 24 Temperature control dial set cold enough. Door left open . Troubleshooting Tips Save time and money...minutes for defrost cycle to end. • Move the temperature control dial to maintain even temperatures.) Fresh food or freezer compartment too warm Frost or ice crystals on and off frequently. (Modern refrigerators with more storage space and a larger...
...is holding door open . The fuse is blown/circuit breaker is unplugged. Roller screws or leveling legs need cleaning. Normal when refrigerator is normal) Possible Causes Refrigerator in 0 position. Consumer Support 24 Temperature control dial set cold enough. Door left open . Troubleshooting Tips Save time and money...minutes for defrost cycle to end. • Move the temperature control dial to maintain even temperatures.) Fresh food or freezer compartment too warm Frost or ice crystals on and off frequently. (Modern refrigerators with more storage space and a larger...
Owners Manual
Page 25
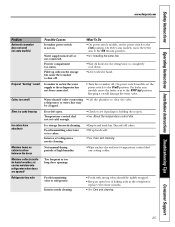
... Not unusual during periods of refrigerator needs cleaning. •Empty and wash bin. replace every three months. • See Care and cleaning. 25 Safety Instructions Operating Instructions Installation Instructions Troubleshooting Tips Consumer Support www.Hotpoint.com Problem Automatic icemaker does ...the icemaker off or not connected. Discard old cubes. •Wrap foods well. •See Care and cleaning. refrigerator to clear the valve. Freezer compartment too warm. Water shutoff valve connecting •Call the plumber to water line may be tightly wrapped. •...
... Not unusual during periods of refrigerator needs cleaning. •Empty and wash bin. replace every three months. • See Care and cleaning. 25 Safety Instructions Operating Instructions Installation Instructions Troubleshooting Tips Consumer Support www.Hotpoint.com Problem Automatic icemaker does ...the icemaker off or not connected. Discard old cubes. •Wrap foods well. •See Care and cleaning. refrigerator to clear the valve. Freezer compartment too warm. Water shutoff valve connecting •Call the plumber to water line may be tightly wrapped. •...
Owners Manual
Page 29
... dependability, offers you may request your money back on all your valuable household products are protected against expensive repairs. No Matter What Brand! Protect your refrigerator, dishwasher, washer and dryer, range, TV, VCR and much more information. *All brands covered, up to : General Electric Company Warranty Registration Department P.O. Box 32150 Louisville...
... dependability, offers you may request your money back on all your valuable household products are protected against expensive repairs. No Matter What Brand! Protect your refrigerator, dishwasher, washer and dryer, range, TV, VCR and much more information. *All brands covered, up to : General Electric Company Warranty Registration Department P.O. Box 32150 Louisville...


