
Manual
Page 2
.... 2 CODE Tip: Attach your HOOVER® product. Contents Important Safety Instructions 3 Product Assembly...6 Carton Contents...6 Attach Handle...6 Cord Storage...6 How To Use...7 Steamer Description 7 Before You Begin Cleaning 7 Filling Clean Water Tank 7 Attaching the Microfiber Pad 8 Filling Solution Tank 8 Steam Cleaning Hard Floors 9 Using On Carpet...10 After Steamer Use / Using Cooling Base 10...
.... 2 CODE Tip: Attach your HOOVER® product. Contents Important Safety Instructions 3 Product Assembly...6 Carton Contents...6 Attach Handle...6 Cord Storage...6 How To Use...7 Steamer Description 7 Before You Begin Cleaning 7 Filling Clean Water Tank 7 Attaching the Microfiber Pad 8 Filling Solution Tank 8 Steam Cleaning Hard Floors 9 Using On Carpet...10 After Steamer Use / Using Cooling Base 10...

Manual
Page 6
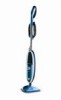
Hard Floor Microfiber Pad E. Hard Water Filter (Pre-assembled in steamer, remove front tank to cord. 1.3 6 Carpet Glider F. Attach the plug end to expose filter) H. Steam Mop Body (Clean Water Tank and Solution Tank attached) C. 1 Product Assembly Carton contents A. Multi-Surface Microfiber Pad (x2) D. Cooling Base I. 8 oz Hoover® Multi-Purpose Disinfectant „„...
Hard Floor Microfiber Pad E. Hard Water Filter (Pre-assembled in steamer, remove front tank to cord. 1.3 6 Carpet Glider F. Attach the plug end to expose filter) H. Steam Mop Body (Clean Water Tank and Solution Tank attached) C. 1 Product Assembly Carton contents A. Multi-Surface Microfiber Pad (x2) D. Cooling Base I. 8 oz Hoover® Multi-Purpose Disinfectant „„...

Manual
Page 7
...Floor Head 8. Multi-Surface Microfiber Pad (2) 11 6 12 14. Cooling Base Back 8 2 3 9 16 17 18 TECHNICAL SPECIFICATION Model Number: WH20200 Input Power: AC 120V / 60Hz / 12A Accessories Before you begin cleaning filling clean water tank ! Using the measuring cup provided, fill twice to Use Steamer...Tank 10. Power Indicator Light Blue Light = Unit On 12. Hard Floor Microfiber Pad 15. Replace the water cap and twist clockwise until tightly secure. „„ Ensure hard water filter is in steamer, remove front tank to remove (2.3). 2.4 „„ Fill the ...
...Floor Head 8. Multi-Surface Microfiber Pad (2) 11 6 12 14. Cooling Base Back 8 2 3 9 16 17 18 TECHNICAL SPECIFICATION Model Number: WH20200 Input Power: AC 120V / 60Hz / 12A Accessories Before you begin cleaning filling clean water tank ! Using the measuring cup provided, fill twice to Use Steamer...Tank 10. Power Indicator Light Blue Light = Unit On 12. Hard Floor Microfiber Pad 15. Replace the water cap and twist clockwise until tightly secure. „„ Ensure hard water filter is in steamer, remove front tank to remove (2.3). 2.4 „„ Fill the ...

Manual
Page 8
...For General Cleaning „„ Use the "Multi-Surface Microfiber Pad" (2.7). „„ Place the "Multi-Surface Microfiber Pad" on the floor (white side up ). „„ Place the product on the bottom of the mop head will hold the pad in place. Hook and...counter-clockwise to remove (2.9) „„ DO NOT MIX HOOVER® MULTI-PURPOSE DISINFECTANT OR HOOVER® MULTIPURPOSE CLEANER WITH ANY OTHER CLEANING SOLUTION. 2.8 2.10 2.9 2.11 „„ Fill the tank with 300ml of personal injury, unplug the steamer when assembling the accessories. 2.6 2.7 IMPORTANT Never use the...
...For General Cleaning „„ Use the "Multi-Surface Microfiber Pad" (2.7). „„ Place the "Multi-Surface Microfiber Pad" on the floor (white side up ). „„ Place the product on the bottom of the mop head will hold the pad in place. Hook and...counter-clockwise to remove (2.9) „„ DO NOT MIX HOOVER® MULTI-PURPOSE DISINFECTANT OR HOOVER® MULTIPURPOSE CLEANER WITH ANY OTHER CLEANING SOLUTION. 2.8 2.10 2.9 2.11 „„ Fill the tank with 300ml of personal injury, unplug the steamer when assembling the accessories. 2.6 2.7 IMPORTANT Never use the...
Manual
Page 9
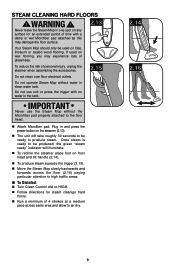
...and press the power button on the steamer (2.13). „„ The unit will illuminate. „„ To recline the steamer place foot on any surface for steam cleanign hard floors. „„ Run a minimum of personal injury, unplug the steamer when assembling the accessories. 2.15 ...Do not clean over floor electrical outlets. Do not operate Steam Mop without the...
...and press the power button on the steamer (2.13). „„ The unit will illuminate. „„ To recline the steamer place foot on any surface for steam cleanign hard floors. „„ Run a minimum of personal injury, unplug the steamer when assembling the accessories. 2.15 ...Do not clean over floor electrical outlets. Do not operate Steam Mop without the...

Manual
Page 10
... roughly 30 seconds to be produced, the green "steam ready" indicator will illuminate. „„ Place the steamer into the carpet glider (2.17). „„ To recline the steamer place foot on floor head and tilt handle (2.18). „„ To produce steam squeeze the trigger (2.19). „„ ...to high traffic areas. 2.17 2.19 2.18 2.20 After STEAMER USE / Using cooling Base „„ After using on page 11 to your floors, unplug and place Steam Mop in the tank. Once steamer is ready to be ready to the floor head. „„ Attach Multi-Surface Microfiber Pad. USING...
... roughly 30 seconds to be produced, the green "steam ready" indicator will illuminate. „„ Place the steamer into the carpet glider (2.17). „„ To recline the steamer place foot on floor head and tilt handle (2.18). „„ To produce steam squeeze the trigger (2.19). „„ ...to high traffic areas. 2.17 2.19 2.18 2.20 After STEAMER USE / Using cooling Base „„ After using on page 11 to your floors, unplug and place Steam Mop in the tank. Once steamer is ready to be ready to the floor head. „„ Attach Multi-Surface Microfiber Pad. USING...

Manual
Page 12
...be done by an authorized service representative. 4 Storage „„ Unplug the power cord and disconnect the power supply. „„ Place steamer in cooling base and allow to cool. All servicing should be working properly, check the fuse or breaker, or consult an electrician. 2. ... tank may be attached correctly. 1. page 7. 2. Unplug unit and allow to cool down if trying to operate unit before servicing and allow to floor and store in upright position. „„ Leaving unused solution in securely. 2. Ensure the plug is illuminated. 5. refer to the "Filling Clean...
...be done by an authorized service representative. 4 Storage „„ Unplug the power cord and disconnect the power supply. „„ Place steamer in cooling base and allow to cool. All servicing should be working properly, check the fuse or breaker, or consult an electrician. 2. ... tank may be attached correctly. 1. page 7. 2. Unplug unit and allow to cool down if trying to operate unit before servicing and allow to floor and store in upright position. „„ Leaving unused solution in securely. 2. Ensure the plug is illuminated. 5. refer to the "Filling Clean...


