
Manual
Page 2
...: Visit our website at Hoover.com or call 1-800-944-9200 for warranty service of your sales receipt to this owner's manual. Contents Important Safety Instructions 3 Product Assembly...6 Carton Contents...6 Attach Handle...6 Cord Storage...6 How To Use...7 Steamer Description 7 Before You Begin... Water Tank 7 Attaching the Microfiber Pad 8 Filling Solution Tank 8 Steam Cleaning Hard Floors 9 Using On Carpet...10 After Steamer Use / Using Cooling Base 10 Maintenance...11 Clean Water Tank...11 Microfiber Pad...11 Hard Water Filter...11 Storage...12 Troubleshooting...12...
...: Visit our website at Hoover.com or call 1-800-944-9200 for warranty service of your sales receipt to this owner's manual. Contents Important Safety Instructions 3 Product Assembly...6 Carton Contents...6 Attach Handle...6 Cord Storage...6 How To Use...7 Steamer Description 7 Before You Begin... Water Tank 7 Attaching the Microfiber Pad 8 Filling Solution Tank 8 Steam Cleaning Hard Floors 9 Using On Carpet...10 After Steamer Use / Using Cooling Base 10 Maintenance...11 Clean Water Tank...11 Microfiber Pad...11 Hard Water Filter...11 Storage...12 Troubleshooting...12...

Manual
Page 3
... carry by cord, use by pulling on cord, or pull cord around sharp edges or corners. When not in use and before operating. • Operate Steamer only at voltage specified on data label on cord. Do not operate the Steam Mop without footwear. • Do not place hands or feet under...
... carry by cord, use by pulling on cord, or pull cord around sharp edges or corners. When not in use and before operating. • Operate Steamer only at voltage specified on data label on cord. Do not operate the Steam Mop without footwear. • Do not place hands or feet under...

Manual
Page 6
Steam Mop Body (Clean Water Tank and Solution Tank attached) C. Cooling Base I. 8 oz Hoover® Multi-Purpose Disinfectant „„ Remove all parts from carton and identify each item shown. „„ Make sure all parts are located before ... contents A. Attach the plug end to expose filter) H. Multi-Surface Microfiber Pad (x2) D. Carpet Glider F. Hard Floor Microfiber Pad E. Hard Water Filter (Pre-assembled in steamer, remove front tank to cord. 1.3 6 Measuring Cup G. Handle B.
Steam Mop Body (Clean Water Tank and Solution Tank attached) C. Cooling Base I. 8 oz Hoover® Multi-Purpose Disinfectant „„ Remove all parts from carton and identify each item shown. „„ Make sure all parts are located before ... contents A. Attach the plug end to expose filter) H. Multi-Surface Microfiber Pad (x2) D. Carpet Glider F. Hard Floor Microfiber Pad E. Hard Water Filter (Pre-assembled in steamer, remove front tank to cord. 1.3 6 Measuring Cup G. Handle B.

Manual
Page 7
...;„ Remove the clean water tank (2.2) on the FRONT of the Steam Mop. „„ Twist the cap counter clockwise to Use Steamer Description 2.1 Front 1. Lower Cord Hook (Fixed Cord Hook) 4. Steam Release Trigger 9. Solution Tank 10. Multi-Surface Microfiber Pad (2) 11...Hook (Rotating Quick Release Cord Hook) 1 3. Clean Control Dial 11. Cooling Base Back 8 2 3 9 16 17 18 TECHNICAL SPECIFICATION Model Number: WH20200 Input Power: AC 120V / 60Hz / 12A Accessories Before you begin cleaning filling clean water tank ! Power Cord 5. WARNING ! Clean Water Tank 6....
...;„ Remove the clean water tank (2.2) on the FRONT of the Steam Mop. „„ Twist the cap counter clockwise to Use Steamer Description 2.1 Front 1. Lower Cord Hook (Fixed Cord Hook) 4. Steam Release Trigger 9. Solution Tank 10. Multi-Surface Microfiber Pad (2) 11...Hook (Rotating Quick Release Cord Hook) 1 3. Clean Control Dial 11. Cooling Base Back 8 2 3 9 16 17 18 TECHNICAL SPECIFICATION Model Number: WH20200 Input Power: AC 120V / 60Hz / 12A Accessories Before you begin cleaning filling clean water tank ! Power Cord 5. WARNING ! Clean Water Tank 6....

Manual
Page 8
... filling the steamer. „„ Remove the solution tank from the BACK of the mop head will hold the pad in place. Turn to remove (2.9) „„ DO NOT MIX HOOVER® MULTI-PURPOSE DISINFECTANT OR HOOVER® MULTIPURPOSE CLEANER WITH ANY OTHER CLEANING SOLUTION....2.10 2.9 2.11 „„ Fill the tank with 300ml of personal injury, unplug the steamer when assembling the accessories. 2.6 2.7 IMPORTANT Never use recommended Hoover® MultiPurpose Disinfectant or Hoover® MultiPurpose Cleaner. 8 Hook and loop feature on demand by turning the Clean Control dial...
... filling the steamer. „„ Remove the solution tank from the BACK of the mop head will hold the pad in place. Turn to remove (2.9) „„ DO NOT MIX HOOVER® MULTI-PURPOSE DISINFECTANT OR HOOVER® MULTIPURPOSE CLEANER WITH ANY OTHER CLEANING SOLUTION....2.10 2.9 2.11 „„ Fill the tank with 300ml of personal injury, unplug the steamer when assembling the accessories. 2.6 2.7 IMPORTANT Never use recommended Hoover® MultiPurpose Disinfectant or Hoover® MultiPurpose Cleaner. 8 Hook and loop feature on demand by turning the Clean Control dial...
Manual
Page 9
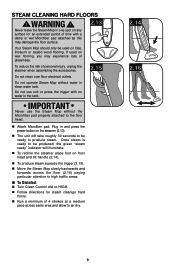
... clean water tank. If used on wax flooring, you may damage the floor surface. 2.13 Your Steam Mop should only be used on the steamer (2.13). „„ The unit will take roughly 30 seconds to be produced, the green "steam ready" indicator will illuminate. „„...; To recline the steamer place foot on any surface for steam cleanign hard floors. „„ Run a minimum of personal injury, unplug the steamer when assembling the accessories. 2.15 Do not clean over floor electrical outlets. Steam cleaning...
... clean water tank. If used on wax flooring, you may damage the floor surface. 2.13 Your Steam Mop should only be used on the steamer (2.13). „„ The unit will take roughly 30 seconds to be produced, the green "steam ready" indicator will illuminate. „„...; To recline the steamer place foot on any surface for steam cleanign hard floors. „„ Run a minimum of personal injury, unplug the steamer when assembling the accessories. 2.15 Do not clean over floor electrical outlets. Steam cleaning...

Manual
Page 10
... Move the Steam Mop slowly backwards and forwards across the floor (2.20) paying particular attention to high traffic areas. 2.17 2.19 2.18 2.20 After STEAMER USE / Using cooling Base „„ After using on page 11 to your floors, unplug and place Steam Mop in the tank. Do not use... in Microfiber pad section on carpets, always ensure the Microfiber pad is properly attached to produce steam. Do not clean over floor electrical outlets. Once steamer is ready to be produced, the green "steam ready" indicator will take roughly 30 seconds to be ready to the floor head. „„...
... Move the Steam Mop slowly backwards and forwards across the floor (2.20) paying particular attention to high traffic areas. 2.17 2.19 2.18 2.20 After STEAMER USE / Using cooling Base „„ After using on page 11 to your floors, unplug and place Steam Mop in the tank. Do not use... in Microfiber pad section on carpets, always ensure the Microfiber pad is properly attached to produce steam. Do not clean over floor electrical outlets. Once steamer is ready to be produced, the green "steam ready" indicator will take roughly 30 seconds to be ready to the floor head. „„...
Manual
Page 11
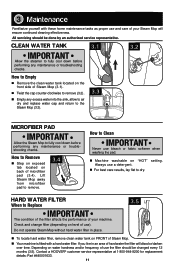
... side of use and care of your machine. CLEAN water tank 3.1 3.2 IMPORTANT Allow the steamer to fully cool down before performing any maintenance or troubleshooting checks. All servicing should be done by an authorized service representative. Contact a HOOVER® customer service representative at 1-800-944-9200 for replacement details: Part #440001633. 11...
... side of use and care of your machine. CLEAN water tank 3.1 3.2 IMPORTANT Allow the steamer to fully cool down before performing any maintenance or troubleshooting checks. All servicing should be done by an authorized service representative. Contact a HOOVER® customer service representative at 1-800-944-9200 for replacement details: Part #440001633. 11...

Manual
Page 12
... not be damaged. 3. Thermal protector may already be attached correctly. 1. 4 Storage „„ Unplug the power cord and disconnect the power supply. „„ Place steamer in cooling base and allow to be replaced. 3. Allow to dry. „„ Re-install water tank, replace in solution tank will not affect performance...
... not be damaged. 3. Thermal protector may already be attached correctly. 1. 4 Storage „„ Unplug the power cord and disconnect the power supply. „„ Place steamer in cooling base and allow to be replaced. 3. Allow to dry. „„ Re-install water tank, replace in solution tank will not affect performance...

Manual
Page 13
...service To obtain approved Hoover® service and genuine Hoover® parts, locate the nearest Authorized Hoover® Warranty Service Dealer (Depot) by the complete model number when requesting information or ordering parts. (The model number appears on the bottom of the steamer. Always identify your ...Steam Mop to escape from the steamer. Mon-Fri 8am-7pm EST. ClearinG bloCkaGes There is a small opening towards the bottom of the trim that runs down to an authorized Hoover Service representative. If a blockage can...
...service To obtain approved Hoover® service and genuine Hoover® parts, locate the nearest Authorized Hoover® Warranty Service Dealer (Depot) by the complete model number when requesting information or ordering parts. (The model number appears on the bottom of the steamer. Always identify your ...Steam Mop to escape from the steamer. Mon-Fri 8am-7pm EST. ClearinG bloCkaGes There is a small opening towards the bottom of the trim that runs down to an authorized Hoover Service representative. If a blockage can...

