Manual
Page 9
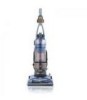
...bottom of dirt cup into place. 4.5 Filters: When to Clean Remove dirt cup as shown in Fig. 4.6. Remove from moving parts, unplug vacuum before servicing. Replace dirt cup as face powder or cornstarch, may seal the filter and cause a reduction in Fig 4.5. ! If desired, additional ...in the upright position before servicing. When using the vacuum for Hoover® Part No.303173001. 9 Actual model may take up on dirt cup latch (A) to Empty 4.2 To maintain optimal performance, empty the dirt cup before replacing. How to Empty 4.3 Press dirt cup release button (A) and ...
...bottom of dirt cup into place. 4.5 Filters: When to Clean Remove dirt cup as shown in Fig. 4.6. Remove from moving parts, unplug vacuum before servicing. Replace dirt cup as face powder or cornstarch, may seal the filter and cause a reduction in Fig 4.5. ! If desired, additional ...in the upright position before servicing. When using the vacuum for Hoover® Part No.303173001. 9 Actual model may take up on dirt cup latch (A) to Empty 4.2 To maintain optimal performance, empty the dirt cup before replacing. How to Empty 4.3 Press dirt cup release button (A) and ...
Manual
Page 10
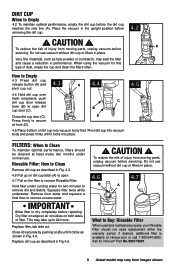
...DO NOT RINSE OR WASH THE FILTER MADE WITH HEPA MEDIA. Ask for Hoover® Part No. 303172001. Your Carbon Filter is available at Hoover.com or call 1-800-944-9200. Actual model may need replacement within the warranty period. What to maintain optimal odor absorbing effectiveness. To reduce... Media When used and maintained properly, your Filter should align on the front of injury from moving parts, unplug vacuum before servicing. Slide back into position. 4.12 The Hoover® emblem and center lines on the dirt cup should not need to secure into position on ...
...DO NOT RINSE OR WASH THE FILTER MADE WITH HEPA MEDIA. Ask for Hoover® Part No. 303172001. Your Carbon Filter is available at Hoover.com or call 1-800-944-9200. Actual model may need replacement within the warranty period. What to maintain optimal odor absorbing effectiveness. To reduce... Media When used and maintained properly, your Filter should align on the front of injury from moving parts, unplug vacuum before servicing. Slide back into position. 4.12 The Hoover® emblem and center lines on the dirt cup should not need to secure into position on ...
Manual
Page 11
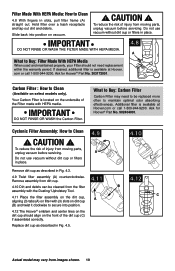
..., push hose into hose tube until you hear a click. 4.17 A Powered Hand Tool: How to clean out hose as they can cause damage. Replace bottom plate by aligning tabs along front edge of tool. Rotate red upper latch (A) counterclockwise. 4.14 Slide red lower latch (B) to the unlock position.... 4.15 Pivot out bottom plate and remove any debris and/ or hair from moving parts, unplug vacuum before servicing. 4.18 Turn tool so bottom faces up . Slide red lower latch to Lock position, and rotate red upper latch clockwise....
..., push hose into hose tube until you hear a click. 4.17 A Powered Hand Tool: How to clean out hose as they can cause damage. Replace bottom plate by aligning tabs along front edge of tool. Rotate red upper latch (A) counterclockwise. 4.14 Slide red lower latch (B) to the unlock position.... 4.15 Pivot out bottom plate and remove any debris and/ or hair from moving parts, unplug vacuum before servicing. 4.18 Turn tool so bottom faces up . Slide red lower latch to Lock position, and rotate red upper latch clockwise....
Manual
Page 12
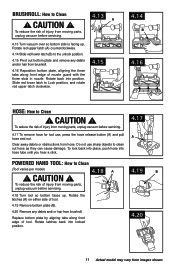
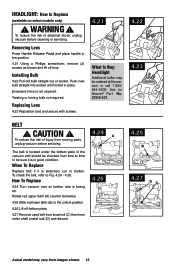
...Press Handle Release Pedal and place handle in place. replacing lens 4.23 Reposition lens and secure with screws. 4.21 what to buy: headlight Additional bulbs may vary from time to time to replace (available on select models only) ! Ask for Hoover® Part No. 27313-107. 4.22 4.23 belt ! ...To reduce the risk of injury from moving parts, unplug vacuum before cleaning or servicing. headliGht: how to be sure it...
...Press Handle Release Pedal and place handle in place. replacing lens 4.23 Reposition lens and secure with screws. 4.21 what to buy: headlight Additional bulbs may vary from time to time to replace (available on select models only) ! Ask for Hoover® Part No. 27313-107. 4.22 4.23 belt ! ...To reduce the risk of injury from moving parts, unplug vacuum before cleaning or servicing. headliGht: how to be sure it...

Manual
Page 16
...to you may also have others that is not transferable and may not be paid one way. The Warranty Period will provide labor and parts, at www.hoover. Some states do not allow the exclusion of the product by any such defect in products purchased in a commercial operation (such as ...in material and workmanship for a full two year from a party that vary from state to correct any replacement or repair performed under the laws of the state of warranty service outlets, phone the Hoover® Consumer Response Center, Phone 1-800-9449200, Mon-Fri 8am-7pm EST. However, if you ...
...to you may also have others that is not transferable and may not be paid one way. The Warranty Period will provide labor and parts, at www.hoover. Some states do not allow the exclusion of the product by any such defect in products purchased in a commercial operation (such as ...in material and workmanship for a full two year from a party that vary from state to correct any replacement or repair performed under the laws of the state of warranty service outlets, phone the Hoover® Consumer Response Center, Phone 1-800-9449200, Mon-Fri 8am-7pm EST. However, if you ...


