Manual
Page 3
... Tool. • Do not pick up anything that is in "Suction Only Mode" (Available on select models only). • Turn off all parts of body away from outlet when not in the upright position, unless the cleaner is burning or smoking, such as a handle, close a door ...pulling on stairs or furniture, as it should always be present. • Hold plug when rewinding onto cord reel. Unplug from openings and moving parts. Brushroll continues to cause cancer, birth defects or reproductive harm. 3 Do not place cleaner on cord. keep children away from falling, always ...
... Tool. • Do not pick up anything that is in "Suction Only Mode" (Available on select models only). • Turn off all parts of body away from outlet when not in the upright position, unless the cleaner is burning or smoking, such as a handle, close a door ...pulling on stairs or furniture, as it should always be present. • Hold plug when rewinding onto cord reel. Unplug from openings and moving parts. Brushroll continues to cause cancer, birth defects or reproductive harm. 3 Do not place cleaner on cord. keep children away from falling, always ...
Manual
Page 5
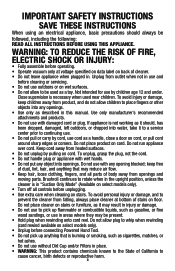
... cup 1.4 Place bottom of packing materials. 1. Vacuum Base C. Dusting/Upholstery Tool* G. Vacuum ASSEMBLY Carton contents A. Screw (for assembly) I F Attach handle (varies per model Remove all parts are located before disposing of dirt cup into vacuum base. Dirt Cup 1.1 A *Varies per model) Note: Remove the screw located in the vacuum base and...
... cup 1.4 Place bottom of packing materials. 1. Vacuum Base C. Dusting/Upholstery Tool* G. Vacuum ASSEMBLY Carton contents A. Screw (for assembly) I F Attach handle (varies per model Remove all parts are located before disposing of dirt cup into vacuum base. Dirt Cup 1.1 A *Varies per model) Note: Remove the screw located in the vacuum base and...
Manual
Page 9
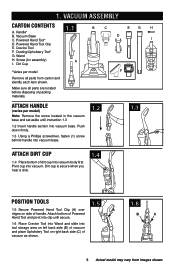
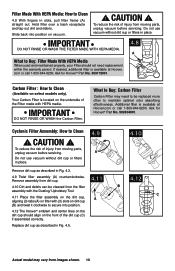
... until it locks into vacuum body first. Squeeze filter twice while underwater. Close lid securely by pushing at Hoover.com or call 1-800-944-9200. CAUTION ! Hold filter under normal use. Remove from moving parts, unplug vacuum before removing the dirt cup. 4.2 ! Replace dirt cup as face powder or cornstarch, may ...Fig. 4.6. Place the vacuum in Fig 4.5. ! C B D 4.5 Place bottom of injury from images shown. Dirt Cup When to remove excess water. When using the vacuum for Hoover® Part No.303173001. 9 Actual model may take up on both sides of filter.
... until it locks into vacuum body first. Squeeze filter twice while underwater. Close lid securely by pushing at Hoover.com or call 1-800-944-9200. CAUTION ! Hold filter under normal use. Remove from moving parts, unplug vacuum before removing the dirt cup. 4.2 ! Replace dirt cup as face powder or cornstarch, may ...Fig. 4.6. Place the vacuum in Fig 4.5. ! C B D 4.5 Place bottom of injury from images shown. Dirt Cup When to remove excess water. When using the vacuum for Hoover® Part No.303173001. 9 Actual model may take up on both sides of filter.
Manual
Page 10
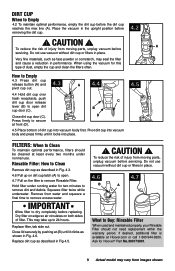
... only). What to secure into position on dirt cup (B) and twist it clockwise to Buy: Carbon Filter Carbon Filter may vary from moving parts, unplug vacuum before servicing. Do not use vacuum without dirt cup or filters in place. 4.9 A 4.10 Remove dirt cup as described ... images shown. 10 Carbon Filter : How to Clean 4.8 With fingers in Fig. 4.5. Ask for Hoover® Part No. 303172001. Remove assembly from moving parts, unplug vacuum before servicing. Ask for Hoover® Part No. 902404001. To reduce the risk of injury from dirt cup. 4.12 4.10 Dirt and debris...
... only). What to secure into position on dirt cup (B) and twist it clockwise to Buy: Carbon Filter Carbon Filter may vary from moving parts, unplug vacuum before servicing. Do not use vacuum without dirt cup or filters in place. 4.9 A 4.10 Remove dirt cup as described ... images shown. 10 Carbon Filter : How to Clean 4.8 With fingers in Fig. 4.5. Ask for Hoover® Part No. 303172001. Remove assembly from moving parts, unplug vacuum before servicing. Ask for Hoover® Part No. 902404001. To reduce the risk of injury from dirt cup. 4.12 4.10 Dirt and debris...
Manual
Page 11
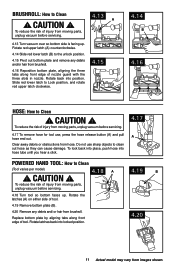
.... Rotate latches back into locked position. 4.19 B 4.20 11 Actual model may vary from hose. To reduce the risk of injury from moving parts, unplug vacuum before servicing. 4.18 Turn tool so bottom faces up . Slide red lower latch to Lock position, and rotate red upper latch clockwise... 4.15 4.14 B 4.16 HOSE: How to Clean ! BRUSHROLL: How to Clean ! CAUTION ! CAUTION ! 4.18 A To reduce the risk of injury from moving parts, unplug vacuum before servicing. 4.17 To remove hose for tool use sharp objects to the unlock position. 4.15 Pivot out bottom plate and remove any...
.... Rotate latches back into locked position. 4.19 B 4.20 11 Actual model may vary from hose. To reduce the risk of injury from moving parts, unplug vacuum before servicing. 4.18 Turn tool so bottom faces up . Slide red lower latch to Lock position, and rotate red upper latch clockwise... 4.15 4.14 B 4.16 HOSE: How to Clean ! BRUSHROLL: How to Clean ! CAUTION ! CAUTION ! 4.18 A To reduce the risk of injury from moving parts, unplug vacuum before servicing. 4.17 To remove hose for tool use sharp objects to the unlock position. 4.15 Pivot out bottom plate and remove any...
Manual
Page 12
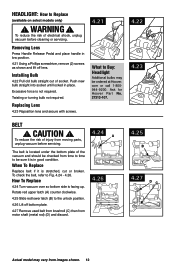
... to buy: headlight Additional bulbs may vary from motor shaft (metal rod) (D) and discard. 4.26 4.25 b 4.27 DC Actual model may be ordered at Hoover. Twisting or turning bulb not required. replacing lens 4.23 Reposition lens and secure with screws. 4.21 what to the unlock position. 4.26 Lift off lens.... 4.27 Remove used belt from brushroll (C) then from images shown. 12 com or call 1-800944-9200. Excessive force is in place. Ask for Hoover¨ Part No. 27313-107. 4.22 4.23 belt ! To reduce the risk of injury from time to time to replace Replace belt if it is not ...
... to buy: headlight Additional bulbs may vary from motor shaft (metal rod) (D) and discard. 4.26 4.25 b 4.27 DC Actual model may be ordered at Hoover. Twisting or turning bulb not required. replacing lens 4.23 Reposition lens and secure with screws. 4.21 what to the unlock position. 4.26 Lift off lens.... 4.27 Remove used belt from brushroll (C) then from images shown. 12 com or call 1-800944-9200. Excessive force is in place. Ask for Hoover¨ Part No. 27313-107. 4.22 4.23 belt ! To reduce the risk of injury from time to time to replace Replace belt if it is not ...
Manual
Page 13
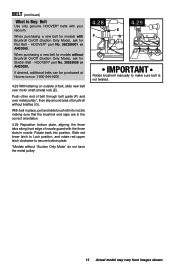
...nozzle guard with Brushroll On/Off (Suction Only Mode), ask for models without bristles (G). When purchasing a new belt for Flat Belt - HOOVER® part No. 38528058 or AH20080. With belt in place, pull and slide brushroll into position. Rotate back into nozzle making sure that the ...Mode" do not have the metal pulley 4.28 F 4.29 E G IMPORTANT Rotate brushroll manually to Buy: Belt Use only genuine HOOVER® belts with your vacuum. HOOVER® part No. 562289001 or AH20065. Belt (continued) What to make sure belt is not twisted. 13 Actual model may vary from images ...
...nozzle guard with Brushroll On/Off (Suction Only Mode), ask for models without bristles (G). When purchasing a new belt for Flat Belt - HOOVER® part No. 38528058 or AH20080. With belt in place, pull and slide brushroll into position. Rotate back into nozzle making sure that the ...Mode" do not have the metal pulley 4.28 F 4.29 E G IMPORTANT Rotate brushroll manually to Buy: Belt Use only genuine HOOVER® belts with your vacuum. HOOVER® part No. 562289001 or AH20065. Belt (continued) What to make sure belt is not twisted. 13 Actual model may vary from images ...
Manual
Page 15
...-111 Ave., Edmonton, AB T5W 2P2, Phone: 1-800-944-9200, Mon-Fri 8am-7pm EST. Follow the service center link to Hoover®, Inc., Company in delay. Always identify your vacuum to find the service outlet nearest you need further assistance: To speak with a...service representative call 1-800-944-9200. Service To obtain approved Hoover® service and genuine Hoover® parts, locate the nearest Authorized Hoover® Warranty Service Dealer (Depot) by the complete model number when requesting information or ordering parts. (The model number appears on the bottom of authorized ...
...-111 Ave., Edmonton, AB T5W 2P2, Phone: 1-800-944-9200, Mon-Fri 8am-7pm EST. Follow the service center link to Hoover®, Inc., Company in delay. Always identify your vacuum to find the service outlet nearest you need further assistance: To speak with a...service representative call 1-800-944-9200. Service To obtain approved Hoover® service and genuine Hoover® parts, locate the nearest Authorized Hoover® Warranty Service Dealer (Depot) by the complete model number when requesting information or ordering parts. (The model number appears on the bottom of authorized ...
Manual
Page 16
...rental services), brushroll, belt, improper maintenance of the product, damage due to misuse, acts of God, nature, vandalism or other acts beyond the control of Hoover®, owner's acts or omissions, use and in the United States, U.S. For an automated referral to authorized service outlets in material and workmanship for a...of the state of purchase. This warranty does not cover products purchased from a party that vary from date of shipping will provide labor and parts, at www.hoover. you mail your HOOVER® product is not an authorized retailer, dealer, or distributor of...
...rental services), brushroll, belt, improper maintenance of the product, damage due to misuse, acts of God, nature, vandalism or other acts beyond the control of Hoover®, owner's acts or omissions, use and in the United States, U.S. For an automated referral to authorized service outlets in material and workmanship for a...of the state of purchase. This warranty does not cover products purchased from a party that vary from date of shipping will provide labor and parts, at www.hoover. you mail your HOOVER® product is not an authorized retailer, dealer, or distributor of...


