Manual
Page 9
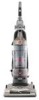
...on both sides of dust, empty the cup and clean the filters often. Replace dirt cup as shown in place. 4.6 4.7 B A What to Buy: Rinsable Filter When used and maintained properly, your Rinsable Filter should be cleaned at (B) until it locks into vacuum body first. Do not use ..., unplug vacuum before the dirt cup reaches the max line (A). Remove from images shown. IMPORTANT Allow filter to dry completely before servicing. Ask for Hoover® Part No.303173001. 9 Actual model may take up on the filter to remove Rinsable Filter. How to Empty 4.3 Press dirt cup release ...
...on both sides of dust, empty the cup and clean the filters often. Replace dirt cup as shown in place. 4.6 4.7 B A What to Buy: Rinsable Filter When used and maintained properly, your Rinsable Filter should be cleaned at (B) until it locks into vacuum body first. Do not use ..., unplug vacuum before the dirt cup reaches the max line (A). Remove from images shown. IMPORTANT Allow filter to dry completely before servicing. Ask for Hoover® Part No.303173001. 9 Actual model may take up on the filter to remove Rinsable Filter. How to Empty 4.3 Press dirt cup release ...
Manual
Page 10
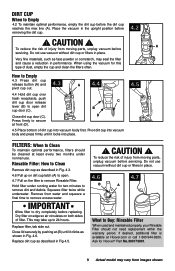
Filter Made With HEPA Media: How to Buy: Filter Made With HEPA Media When used and maintained properly, your Filter should align on the underside of injury from moving parts, unplug vacuum before servicing. A What to Clean 4.8 With fingers in place. Ask for Hoover® Part No. 902404001. Carbon Filter : How to Clean...
Filter Made With HEPA Media: How to Buy: Filter Made With HEPA Media When used and maintained properly, your Filter should align on the underside of injury from moving parts, unplug vacuum before servicing. A What to Clean 4.8 With fingers in place. Ask for Hoover® Part No. 902404001. Carbon Filter : How to Clean...
Manual
Page 12
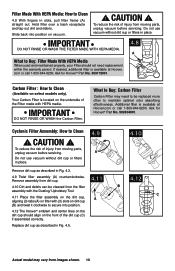
... lens 4.23 Reposition lens and secure with screws. 4.21 what to be sure it is stretched, cut or broken. Ask for Hoover¨ Part No. 27313-107. 4.22 4.23 belt ! To check the belt, refer to replace Replace belt if it is in good condition. removing lens ... used belt from brushroll (C) then from motor shaft (metal rod) (D) and discard. 4.26 4.25 b 4.27 DC Actual model may vary from time to time to buy: headlight Additional bulbs may be checked from images shown. 12 CAUTION ! To reduce the risk of socket. headliGht: how to replace 4.24 Turn vacuum over...
... lens 4.23 Reposition lens and secure with screws. 4.21 what to be sure it is stretched, cut or broken. Ask for Hoover¨ Part No. 27313-107. 4.22 4.23 belt ! To check the belt, refer to replace Replace belt if it is in good condition. removing lens ... used belt from brushroll (C) then from motor shaft (metal rod) (D) and discard. 4.26 4.25 b 4.27 DC Actual model may vary from time to time to buy: headlight Additional bulbs may be checked from images shown. 12 CAUTION ! To reduce the risk of socket. headliGht: how to replace 4.24 Turn vacuum over...
Manual
Page 13
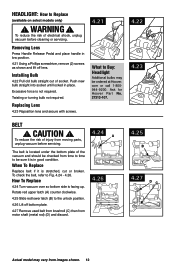
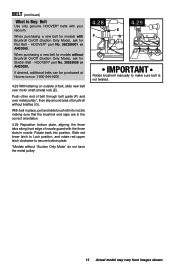
Belt (continued) What to Buy: Belt Use only genuine HOOVER® belts with Brushroll On/Off (Suction Only Mode), ask for Flat Belt - When purchasing a new belt for models without "Suction Only Mode" do not ... belt guide (F) and over motor shaft (metal rod) (E). When purchasing a new belt for Stretch Belt - With belt in place, pull and slide brushroll into position. HOOVER® part No. 38528058 or AH20080. Slide red lower latch to Lock position, and rotate red upper latch clockwise to make sure belt is not...
Belt (continued) What to Buy: Belt Use only genuine HOOVER® belts with Brushroll On/Off (Suction Only Mode), ask for Flat Belt - When purchasing a new belt for models without "Suction Only Mode" do not ... belt guide (F) and over motor shaft (metal rod) (E). When purchasing a new belt for Stretch Belt - With belt in place, pull and slide brushroll into position. HOOVER® part No. 38528058 or AH20080. Slide red lower latch to Lock position, and rotate red upper latch clockwise to make sure belt is not...


