
Manual
Page 2
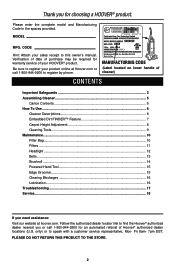
... to register your product online at hoover.com. Model 1-800-944-9200 MFG. only) or to the store. 2 Please do not return this owner's manual. Made in the spaces provided. Mon- Verification of date of purchase may be required for choosing a HOOVER® product. Fri 8am- 7pm... to speak with a customer service representative; Thank you for warranty service of your HOOVER® product. CODE Hint: Attach your sales receipt to register by phone. Please enter the complete model and Manufacturing Code in China Manufacturing code (Label located on lower handle of cleaner)...
... to register your product online at hoover.com. Model 1-800-944-9200 MFG. only) or to the store. 2 Please do not return this owner's manual. Made in the spaces provided. Mon- Verification of date of purchase may be required for choosing a HOOVER® product. Fri 8am- 7pm... to speak with a customer service representative; Thank you for warranty service of your HOOVER® product. CODE Hint: Attach your sales receipt to register by phone. Please enter the complete model and Manufacturing Code in China Manufacturing code (Label located on lower handle of cleaner)...
Manual
Page 4
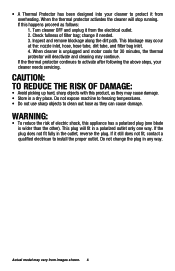
.... 4 If the thermal protector continues to protect it from the electrical outlet. 2. Check fullness of electric shock, this appliance has a polarized plug (one way. Actual model may occur at the: nozzle inlet, hose, hose tube, dirt tube, and filter bag inlet. 4. If this product, as they can cause damage. change the...
.... 4 If the thermal protector continues to protect it from the electrical outlet. 2. Check fullness of electric shock, this appliance has a polarized plug (one way. Actual model may occur at the: nozzle inlet, hose, hose tube, dirt tube, and filter bag inlet. 4. If this product, as they can cause damage. change the...
Manual
Page 5
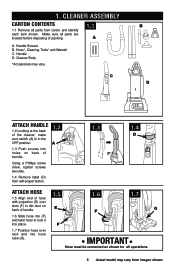
Cleaner ASSEMBLY Carton contents 1.1 Remove all operations. 5 Actual model may vary. Handle Screws B. Handle D. C B D Attach handle 1.2 Looking at the back of the cleaner, make sure switch (A) is in the OFF position. 1.3 Push screws into ...
Cleaner ASSEMBLY Carton contents 1.1 Remove all operations. 5 Actual model may vary. Handle Screws B. Handle D. C B D Attach handle 1.2 Looking at the back of the cleaner, make sure switch (A) is in the OFF position. 1.3 Push screws into ...
Manual
Page 6
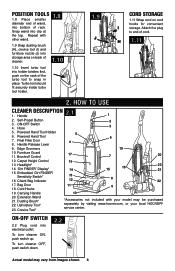
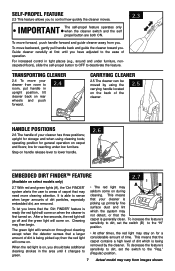
... 10 20. Extension Wand 21. Upholstery Tool* 23. To turn cleaner OFF, push switch down. 2.2 Actual model may be purchased separately by visiting www.hoover.com, or your model may vary from images shown. 6 Turbo tool should fit securely inside turbo tool holder. 1.9 J Cord Storage... with other wand. 1.8 1.9 Snap dusting brush (H), crevice tool (I storage. To turn cleaner ON, push switch up. Repeat with your local HOOVER® service center. ON-OFF Switch 4. Handle Release Lever 9. Carpet Height Control 16 13. Cord Hooks 19. Snap wand into electrical outlet....
... 10 20. Extension Wand 21. Upholstery Tool* 23. To turn cleaner OFF, push switch down. 2.2 Actual model may be purchased separately by visiting www.hoover.com, or your model may vary from images shown. 6 Turbo tool should fit securely inside turbo tool holder. 1.9 J Cord Storage... with other wand. 1.8 1.9 Snap dusting brush (H), crevice tool (I storage. To turn cleaner ON, push switch up. Repeat with your local HOOVER® service center. ON-OFF Switch 4. Handle Release Lever 9. Carpet Height Control 16 13. Cord Hooks 19. Snap wand into electrical outlet....
Manual
Page 7
Step on handle release lever to lower handle. 2.6 Embedded Dirt FINDERTM feature 2.7 (Available on select models only) 2.7 With red and green lights (A), the 'Dirt FINDER' • The red light may A B system alerts the user to areas of dirt particles, especially that ... off and the green light will come on carpet and floors; Guide cleaner carefully at first until it changes to the "Reg." (Regular) position. 7 Actual model may not detect, or that the carpet is generally clean. It is embedded dirt, are both ON. The green light will come on the back...
Step on handle release lever to lower handle. 2.6 Embedded Dirt FINDERTM feature 2.7 (Available on select models only) 2.7 With red and green lights (A), the 'Dirt FINDER' • The red light may A B system alerts the user to areas of dirt particles, especially that ... off and the green light will come on carpet and floors; Guide cleaner carefully at first until it changes to the "Reg." (Regular) position. 7 Actual model may not detect, or that the carpet is generally clean. It is embedded dirt, are both ON. The green light will come on the back...
Manual
Page 8
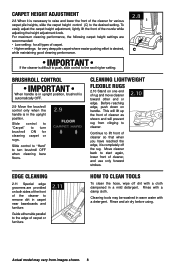
... necessary to raise and lower the front of carpet or furniture. 2.11 How to clean tools To clean the hose, wipe off the rug. Actual model may be washed in carpet near baseboards and furniture. IMPORTANT If the cleaner is difficult to push, slide control to the next higher setting. 2.8 C Brushroll...
... necessary to raise and lower the front of carpet or furniture. 2.11 How to clean tools To clean the hose, wipe off the rug. Actual model may be washed in carpet near baseboards and furniture. IMPORTANT If the cleaner is difficult to push, slide control to the next higher setting. 2.8 C Brushroll...
Manual
Page 9
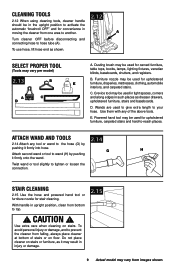
...to give extra length to another. Crevice tool may be used in tight spaces, corners and along edges in injury or damage. 9 Actual model may be used for upholstered furniture, carpeted stairs and hard-to the hose (G) by pushing it firmly into hose. Use extra care when... places as shown. To avoid personal injury or damage, and to prevent the cleaner from one area to your hose. Dusting brush may vary per model) 2.13 B E DA C A. A Turn cleaner OFF before disconnecting and connecting hose to tighten or loosen the connection. B. Twist wand or tool slightly to...
...to give extra length to another. Crevice tool may be used in tight spaces, corners and along edges in injury or damage. 9 Actual model may be used for upholstered furniture, carpeted stairs and hard-to the hose (G) by pushing it firmly into hose. Use extra care when... places as shown. To avoid personal injury or damage, and to prevent the cleaner from one area to your hose. Dusting brush may vary per model) 2.13 B E DA C A. A Turn cleaner OFF before disconnecting and connecting hose to tighten or loosen the connection. B. Twist wand or tool slightly to...
Manual
Page 10
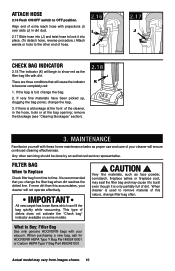
... this accumulates, your cleaner will begin to the other servicing should be done by an authorized service representative. When purchasing a new bag, ask for HOOVER® HEPA Type Y Bag Part #902419001 or Carbon HEPA Type Y Bag Part #902481001. If there is recommended that will ensure continued cleaning effectiveness...This type of the cleaner, in dirt duct. 2.17 Slide hose into (J) and twist hose to lock it to become completely red: 1. Actual model may cause it into place. (To detach hose, reverse procedure.) Attach wands or tools to show red as proper use and care of hose. ...
... this accumulates, your cleaner will begin to the other servicing should be done by an authorized service representative. When purchasing a new bag, ask for HOOVER® HEPA Type Y Bag Part #902419001 or Carbon HEPA Type Y Bag Part #902481001. If there is recommended that will ensure continued cleaning effectiveness...This type of the cleaner, in dirt duct. 2.17 Slide hose into (J) and twist hose to lock it to become completely red: 1. Actual model may cause it into place. (To detach hose, reverse procedure.) Attach wands or tools to show red as proper use and care of hose. ...
Manual
Page 11
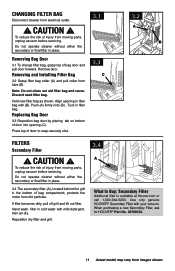
... final filter in place. 3.4 The secondary filter (A), located behind the grill in the bottom of door to Buy: Secondary Filter Additional filter is available at Hoover.com or call 1-800-944-9200. Reposition dry filter and grill. 3.4 A What to snap securely shut. 3.1 3.3 C 3.2 A B filters Secondary ...door by placing tab on bottom of bag door and pull door forward. When purchasing a new Secondary Filter, ask for Hoover® Part No. 38765023. 11 Actual model may vary from moving parts, unplug vacuum before servicing. Tuck in place. Removing Bag Door 3.1 To change filter bag...
... final filter in place. 3.4 The secondary filter (A), located behind the grill in the bottom of door to Buy: Secondary Filter Additional filter is available at Hoover.com or call 1-800-944-9200. Reposition dry filter and grill. 3.4 A What to snap securely shut. 3.1 3.3 C 3.2 A B filters Secondary ...door by placing tab on bottom of bag door and pull door forward. When purchasing a new Secondary Filter, ask for Hoover® Part No. 38765023. 11 Actual model may vary from moving parts, unplug vacuum before servicing. Tuck in place. Removing Bag Door 3.1 To change filter bag...
Manual
Page 12
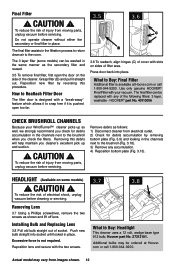
The 3 layer filter (some models) ! Reposition new filter by removing bottom plate (Fig. 3.9) and looking in the channels next to Buy: Headlight This cleaner uses a 12 volt, wedge base type 912 bulb, Hoover part No. 27313101. Press door back into socket until locked in the same manner as the... old bulb straight out of the cleaner. Reposition lens and secure with slots on sides of injury from images shown. 12 Actual model may be ordered at Hoover.com or call 1-800-944-9200. The final filter assists in place. The final filter can be replaced with your WindTunnel™...
The 3 layer filter (some models) ! Reposition new filter by removing bottom plate (Fig. 3.9) and looking in the channels next to Buy: Headlight This cleaner uses a 12 volt, wedge base type 912 bulb, Hoover part No. 27313101. Press door back into socket until locked in the same manner as the... old bulb straight out of the cleaner. Reposition lens and secure with slots on sides of injury from images shown. 12 Actual model may be ordered at Hoover.com or call 1-800-944-9200. The final filter assists in place. The final filter can be replaced with your WindTunnel™...
Manual
Page 13
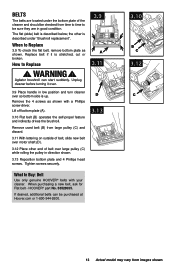
... or 1-800-944-9200. 3.10 B C 3.12 C 13 Actual model may vary from time to time to Buy: Belt Use only genuine HOOVER® belts with a Phillips screw driver. HOOVER® part No. 38528035. Remove the 4 screws as shown. How to Replace 3.9 To check the flat belt, remove bottom plate as shown with your...
... or 1-800-944-9200. 3.10 B C 3.12 C 13 Actual model may vary from time to time to Buy: Belt Use only genuine HOOVER® belts with a Phillips screw driver. HOOVER® part No. 38528035. Remove the 4 screws as shown. How to Replace 3.9 To check the flat belt, remove bottom plate as shown with your...
Manual
Page 14
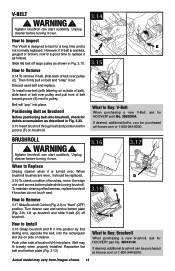
... of brushroll (H) into place. Belt will "pop" into the rectangular slot (G) on brushroll. 3.14 E C 3.15 F What to last for HOOVER® part No. 38528034. Unplug cleaner before turning it as shown in groove (F) on side of a card across bottom plate while turning brushroll. ... remove bottom plate (Fig. 3.9). If desired, additional brushroll can be purchased at Hoover.com or 1-800-944-9200. Actual model may fit loosely when properly installed. If desired, additional belts can be purchased at Hoover.com or 1-800-944-9200. WARNING ! When brushroll brushes are worn, it ...
... of brushroll (H) into place. Belt will "pop" into the rectangular slot (G) on brushroll. 3.14 E C 3.15 F What to last for HOOVER® part No. 38528034. Unplug cleaner before turning it as shown in groove (F) on side of a card across bottom plate while turning brushroll. ... remove bottom plate (Fig. 3.9). If desired, additional brushroll can be purchased at Hoover.com or 1-800-944-9200. Actual model may fit loosely when properly installed. If desired, additional belts can be purchased at Hoover.com or 1-800-944-9200. WARNING ! When brushroll brushes are worn, it ...
Manual
Page 15
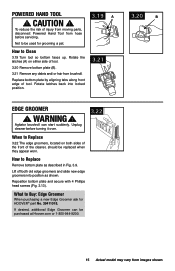
Not to be purchased at Hoover.com or 1-800-944-9200. 15 Actual model may vary from images shown. Replace bottom plate by aligning tabs along front edge of injury from moving parts, disconnect Powered Hand Tool from brushroll. ...WARNING ! If desired, additional Edge Groomer can start suddenly. Agitator brushroll can be used for HOOVER® part No. 39411018. Reposition...
Not to be purchased at Hoover.com or 1-800-944-9200. 15 Actual model may vary from images shown. Replace bottom plate by aligning tabs along front edge of injury from moving parts, disconnect Powered Hand Tool from brushroll. ...WARNING ! If desired, additional Edge Groomer can start suddenly. Agitator brushroll can be used for HOOVER® part No. 39411018. Reposition...
Manual
Page 16
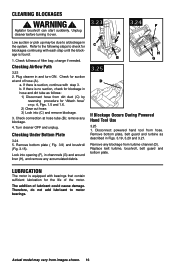
... in Figs. 3.19, 3.20 and 3.21. b. Remove bottom plate ( Fig. 3.9) and brushroll (Fig. 3.15). C H B G 3.25 D If Blockage Occurs During Powered Hand Tool Use 3.25 1. Actual model may be due to motor bearings. Refer to the following steps to check for blockages continuing with step 3. remove any blockage from dirt duct (C) by...
... in Figs. 3.19, 3.20 and 3.21. b. Remove bottom plate ( Fig. 3.9) and brushroll (Fig. 3.15). C H B G 3.25 D If Blockage Occurs During Powered Hand Tool Use 3.25 1. Actual model may be due to motor bearings. Refer to the following steps to check for blockages continuing with step 3. remove any blockage from dirt duct (C) by...

Manual
Page 18
...RETURN THIS PRODUCT TO THE STORE. 18 This will only result in Glenwillow for service. In Canada, contact Hoover® Canada, Toronto: 755 Progress Ave., Scarborough, ON M1H 2W7 OR Hoover® Canada, Edmonton: 18129-111 Ave., Edmonton, AB T5W 2P2, Phone: 1-800-944-9200, ...Mon-Fri 8am-7pm EST. Service To obtain approved Hoover® service and genuine Hoover® parts, locate the nearest Authorized Hoover® Warranty Service Dealer (Depot) by the complete model number when requesting information or ordering parts. (Label located on lower handle of authorized...
...RETURN THIS PRODUCT TO THE STORE. 18 This will only result in Glenwillow for service. In Canada, contact Hoover® Canada, Toronto: 755 Progress Ave., Scarborough, ON M1H 2W7 OR Hoover® Canada, Edmonton: 18129-111 Ave., Edmonton, AB T5W 2P2, Phone: 1-800-944-9200, ...Mon-Fri 8am-7pm EST. Service To obtain approved Hoover® service and genuine Hoover® parts, locate the nearest Authorized Hoover® Warranty Service Dealer (Depot) by the complete model number when requesting information or ordering parts. (Label located on lower handle of authorized...

