
Manual
Page 10
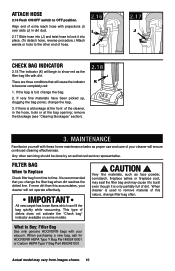
... is only partially full of your cleaner will ensure continued cleaning effectiveness. When purchasing a new bag, ask for HOOVER® HEPA Type Y Bag Part #902419001 or Carbon HEPA Type Y Bag Part #902481001. If very fine materials have been picked up, clogging the bag pores; It is used to the other... that will cause the indicator to Replace Check filter bag from images shown. 10 If the bag is full; Filter bag When to become completely red: 1. CAUTION ! Attach Hose 2.16 Push ON/OFF switch to Buy: Filter Bag Use only genuine HOOVER® bags with your cleaner will...
... is only partially full of your cleaner will ensure continued cleaning effectiveness. When purchasing a new bag, ask for HOOVER® HEPA Type Y Bag Part #902419001 or Carbon HEPA Type Y Bag Part #902481001. If very fine materials have been picked up, clogging the bag pores; It is used to the other... that will cause the indicator to Replace Check filter bag from images shown. 10 If the bag is full; Filter bag When to become completely red: 1. CAUTION ! Attach Hose 2.16 Push ON/OFF switch to Buy: Filter Bag Use only genuine HOOVER® bags with your cleaner will...
Manual
Page 11
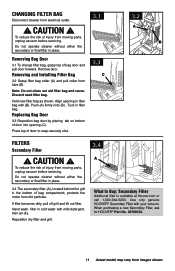
.... Remove door. CAUTION ! Removing Bag Door 3.1 To change filter bag, grasp top of injury from moving parts, unplug vacuum before servicing. Align opening (C). Replacing Bag Door 3.3 Reposition bag door by placing tab on bottom of bag compartment, protects the motor from images shown.... If filter becomes dirty, pull off grill and lift out filter. When purchasing a new Secondary Filter, ask for Hoover® Part No. 38765023....
.... Remove door. CAUTION ! Removing Bag Door 3.1 To change filter bag, grasp top of injury from moving parts, unplug vacuum before servicing. Align opening (C). Replacing Bag Door 3.3 Reposition bag door by placing tab on bottom of bag compartment, protects the motor from images shown.... If filter becomes dirty, pull off grill and lift out filter. When purchasing a new Secondary Filter, ask for Hoover® Part No. 38765023....
Manual
Page 12
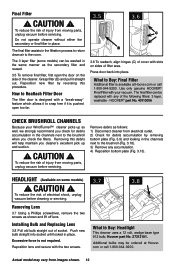
The final filter assists in place. CAUTION ! To reduce the risk of injury from images shown. 12 Installing Bulb and Replacing Lens 3.8 Pull old bulb straight out of filter area. Reposition lens and secure with your WindTunnel™ cleaner picks up so well, we... looking in the same manner as shown and lift off lens. What to Buy: Headlight This cleaner uses a 12 volt, wedge base type 912 bulb, Hoover part No. 27313101. Removing this procedure. CAUTION ! Headlight (Available on sides of socket. Removing Lens 3.7 Using a Phillips screwdriver, remove the two screws as ...
The final filter assists in place. CAUTION ! To reduce the risk of injury from images shown. 12 Installing Bulb and Replacing Lens 3.8 Pull old bulb straight out of filter area. Reposition lens and secure with your WindTunnel™ cleaner picks up so well, we... looking in the same manner as shown and lift off lens. What to Buy: Headlight This cleaner uses a 12 volt, wedge base type 912 bulb, Hoover part No. 27313101. Removing this procedure. CAUTION ! Headlight (Available on sides of socket. Removing Lens 3.7 Using a Phillips screwdriver, remove the two screws as ...
Manual
Page 13
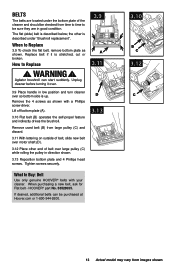
...is up. When to Replace ! If desired, additional belts can start suddenly. How to Replace 3.9 To check the flat belt, remove bottom plate as shown with your cleaner. WARNING ! Replace belt if it over so bottom side is described below; Tighten screws securely. HOOVER® part No. 38528035. the... other end of the cleaner and should be checked from time to time to Buy: Belt Use only genuine HOOVER® belts with a ...
...is up. When to Replace ! If desired, additional belts can start suddenly. How to Replace 3.9 To check the flat belt, remove bottom plate as shown with your cleaner. WARNING ! Replace belt if it over so bottom side is described below; Tighten screws securely. HOOVER® part No. 38528035. the... other end of the cleaner and should be checked from time to time to Buy: Belt Use only genuine HOOVER® belts with a ...
Manual
Page 14
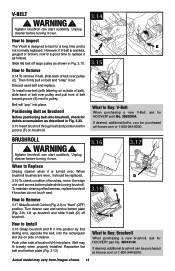
... turning brushroll. WARNING ! Then firmly pull on Brushroll Before positioning belt onto brushroll, check for HOOVER® part No. 48414144. Positioning Belt on belt and "snap" it should be purchased at Hoover.com or 1-800-944-9200. If desired, additional belts can start suddenly. How to Remove ...installed. WARNING ! How to Install 3.18 Grasp brushroll and fit it is turned over . 3.16 3.17 When to last for HOOVER® part No. 38528034. V-belt ! When brushroll brushes are worn, it out. To maintain cleaning effectiveness, replace brushroll if brushes do not touch card.
... turning brushroll. WARNING ! Then firmly pull on Brushroll Before positioning belt onto brushroll, check for HOOVER® part No. 48414144. Positioning Belt on belt and "snap" it should be purchased at Hoover.com or 1-800-944-9200. If desired, additional belts can start suddenly. How to Remove ...installed. WARNING ! How to Install 3.18 Grasp brushroll and fit it is turned over . 3.16 3.17 When to last for HOOVER® part No. 38528034. V-belt ! When brushroll brushes are worn, it out. To maintain cleaning effectiveness, replace brushroll if brushes do not touch card.
Manual
Page 15
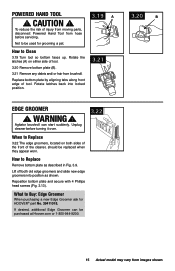
...Groomer When purchasing a new Edge Groomer ask for grooming a pet. 3.19 A How to Replace 3.22 The edge groomers, located on either side of the cleaner, should be used for HOOVER® part No. 39411018. Powered Hand Tool ! Rotate latches back into position as described in Fig. 3.9.... What to Replace Remove bottom plate as shown. Replace bottom plate by aligning tabs along front edge of injury from moving parts, disconnect Powered Hand Tool ...
...Groomer When purchasing a new Edge Groomer ask for grooming a pet. 3.19 A How to Replace 3.22 The edge groomers, located on either side of the cleaner, should be used for HOOVER® part No. 39411018. Powered Hand Tool ! Rotate latches back into position as described in Fig. 3.9.... What to Replace Remove bottom plate as shown. Replace bottom plate by aligning tabs along front edge of injury from moving parts, disconnect Powered Hand Tool ...


