
Manual
Page 4
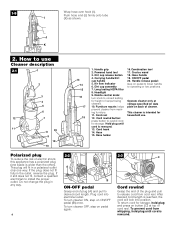
... reel. Air flow indicator 6. Dirt cup assembly 7. Furniture nozzle: helps prevent cleaner from whipping, hold plug and press on button (C) at voltage specified on data plate on ON/OFF pedal (B) once. Hold plug until cord is rewound. 13. Handle release pedal: step on pedal again. 2-3 C AC TAB LE C O R D SYSTEM C TAB LE...
... reel. Air flow indicator 6. Dirt cup assembly 7. Furniture nozzle: helps prevent cleaner from whipping, hold plug and press on button (C) at voltage specified on data plate on ON/OFF pedal (B) once. Hold plug until cord is rewound. 13. Handle release pedal: step on pedal again. 2-3 C AC TAB LE C O R D SYSTEM C TAB LE...
Manual
Page 8
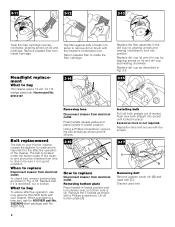
...3-16. Lift off lens. 3-16 A How to rotate and is important for HOOVER part No. 38528040 (belt package part No. 40201190). To check belt, remove bottom plate as shown with your Hoover cleaner causes the agitator to replace Disconnect cleaner from electrical outlet. Replace belt if ... for the effective operation of trash container to buy To assure effective operation, use only genuine HOOVER belts with a Phillips screwdriver. Discard used belt (C). The belt is located under the bottom plate of socket. Excessive force is up. What to buy This cleaner uses a 13 volt, ...
...3-16. Lift off lens. 3-16 A How to rotate and is important for HOOVER part No. 38528040 (belt package part No. 40201190). To check belt, remove bottom plate as shown with your Hoover cleaner causes the agitator to replace Disconnect cleaner from electrical outlet. Replace belt if ... for the effective operation of trash container to buy To assure effective operation, use only genuine HOOVER belts with a Phillips screwdriver. Discard used belt (C). The belt is located under the bottom plate of socket. Excessive force is up. What to buy This cleaner uses a 13 volt, ...
Manual
Page 9
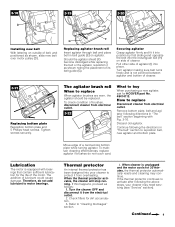
...purchasing a new agitator, ask for dirt accumulation. 3. The addition of cleaner. 3-21 Replacing bottom plate Reposition bottom plate and 5 Phillips head screws. When the thermal protector activates, the cleaner will stop running. Pull other side... proceed as shown, slide new belt over motor pulley (D). Refer to reposition belt, new agitator and bottom plate. Should the agitator shield (F) become dislodged while replacing the belt or the agitator, reposition it into position by... brushes are worn, the agitator should be replaced. Check filters for HOOVER part No. 48414113.
...purchasing a new agitator, ask for dirt accumulation. 3. The addition of cleaner. 3-21 Replacing bottom plate Reposition bottom plate and 5 Phillips head screws. When the thermal protector activates, the cleaner will stop running. Pull other side... proceed as shown, slide new belt over motor pulley (D). Refer to reposition belt, new agitator and bottom plate. Should the agitator shield (F) become dislodged while replacing the belt or the agitator, reposition it into position by... brushes are worn, the agitator should be replaced. Check filters for HOOVER part No. 48414113.
Manual
Page 10
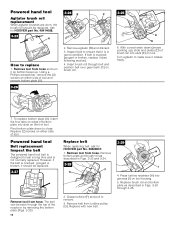
... HOOVER part No. 38528037. 1. Replace (2) screws on front of tool. However, if the belt is not normally replaced. Inspect belt to ensure that it is cracked, gouged or broken, replace it so bottom faces up ), slide end plates (D) of brush roll into slots on either side of bottom plate ...and turn it (see following section). 4. Grasp turbine (F) and pull to close. Replace with new belt. Remove tool from hose. Pivot bottom plate down (arrows pointing up . Powered hand tool Belt replacement Inspect the belt The powered hand tool belt is designed to last a long time ...
... HOOVER part No. 38528037. 1. Replace (2) screws on front of tool. However, if the belt is not normally replaced. Inspect belt to ensure that it is cracked, gouged or broken, replace it so bottom faces up ), slide end plates (D) of brush roll into slots on either side of bottom plate ...and turn it (see following section). 4. Grasp turbine (F) and pull to close. Replace with new belt. Remove tool from hose. Pivot bottom plate down (arrows pointing up . Powered hand tool Belt replacement Inspect the belt The powered hand tool belt is designed to last a long time ...
Manual
Page 12
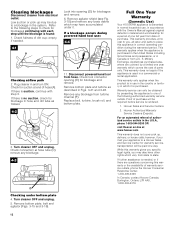
...will be required before service is needed . 4-1 A Checking airflow path 2. Hoover Authorized Warranty Service Dealers (Depots). While this warranty gives you specific legal rights, you may also have accumulated under bottom plate 4. empty if needed , or if there are covered by presenting the appliance... labor and parts to a blockage in which vary from a U. Remove bottom plate, belt and agitator (Figs. 3-15 and 3-16). Disconnect powered hand tool from turbine channel (F). This warranty provides, at www.hoover.com This warranty does not cover pick up may have other rights which it...
...will be required before service is needed . 4-1 A Checking airflow path 2. Hoover Authorized Warranty Service Dealers (Depots). While this warranty gives you specific legal rights, you may also have accumulated under bottom plate 4. empty if needed , or if there are covered by presenting the appliance... labor and parts to a blockage in which vary from a U. Remove bottom plate, belt and agitator (Figs. 3-15 and 3-16). Disconnect powered hand tool from turbine channel (F). This warranty provides, at www.hoover.com This warranty does not cover pick up may have other rights which it...

