
Product Manual
Page 1
pag F1 www.hoover.com Please visit Hoover.com for video instructions for this product to the store. Distributed by Royal Appliance Mfg. Questions or concerns? IF USED COMMERCIALLY WARRANTY IS VOID. © 2015 Techtronic Floor Care ...-Fri 8am-7pm EST before returning this cleaner. THIS PRODUCT IS INTENDED FOR HOUSEHOLD USE ONLY. página E1 / Frances - OWNER'S MANUAL Operating and Servicing Instructions Español - Co.
pag F1 www.hoover.com Please visit Hoover.com for video instructions for this product to the store. Distributed by Royal Appliance Mfg. Questions or concerns? IF USED COMMERCIALLY WARRANTY IS VOID. © 2015 Techtronic Floor Care ...-Fri 8am-7pm EST before returning this cleaner. THIS PRODUCT IS INTENDED FOR HOUSEHOLD USE ONLY. página E1 / Frances - OWNER'S MANUAL Operating and Servicing Instructions Español - Co.
Product Manual
Page 3
Be sure to register your product online at hoover.com for more information or for an automated referral of Hoover® authorized dealer locations (U.S. Thank you for warranty service of your HOOVER® product. Verification of date of cleaner) CONTENTS Important Safeguards 3 Carton Contents...5 How ...Warranty...20 If you or call 1-800-944-9200 to find the Hoover® authorized dealer nearest you need assistance: Visit our website at Hoover.com or call 1-800944-9200 for video instruction fot this owner's manual. Follow the authorized dealer locator link to ...
Be sure to register your product online at hoover.com for more information or for an automated referral of Hoover® authorized dealer locations (U.S. Thank you for warranty service of your HOOVER® product. Verification of date of cleaner) CONTENTS Important Safeguards 3 Carton Contents...5 How ...Warranty...20 If you or call 1-800-944-9200 to find the Hoover® authorized dealer nearest you need assistance: Visit our website at Hoover.com or call 1-800944-9200 for video instruction fot this owner's manual. Follow the authorized dealer locator link to ...
Product Manual
Page 6
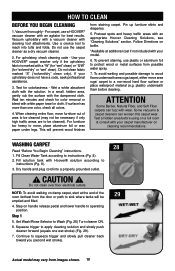
... and products. • Do not use with any object into water, take it may be followed, including the following: READ ALL INSTRUCTIONS BEFORE USING THIS APPLIANCE. Do not use by pulling on carpet moistened by cord, use in place. • Do not clean over...8226; Do not pull or carry by cleaning process. • Use only HOOVER® cleaning products intended for use with damaged cord or plug. Do not place cleaner on stairs. IMPORTANT SAFETY INSTRUCTIONS SAVE THESE INSTRUCTIONS When using an electrical appliance, basic precautions should , has been dropped, damaged...
... and products. • Do not use with any object into water, take it may be followed, including the following: READ ALL INSTRUCTIONS BEFORE USING THIS APPLIANCE. Do not use by pulling on carpet moistened by cord, use in place. • Do not clean over...8226; Do not pull or carry by cleaning process. • Use only HOOVER® cleaning products intended for use with damaged cord or plug. Do not place cleaner on stairs. IMPORTANT SAFETY INSTRUCTIONS SAVE THESE INSTRUCTIONS When using an electrical appliance, basic precautions should , has been dropped, damaged...
Product Manual
Page 7
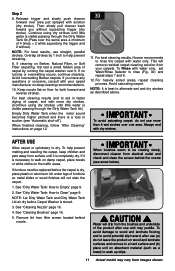
... avoid potential slip hazard, after use on hard floors without proper attachment may puddle. Using this product, as a properly grounded outlet box cover (Fig. 2). GROUNDING INSTRUCTIONS This appliance must be used , it will drip from carpets until they can be certain the area is not available (Fig. 2). Do not modify the...
... avoid potential slip hazard, after use on hard floors without proper attachment may puddle. Using this product, as a properly grounded outlet box cover (Fig. 2). GROUNDING INSTRUCTIONS This appliance must be used , it will drip from carpets until they can be certain the area is not available (Fig. 2). Do not modify the...
Product Manual
Page 19
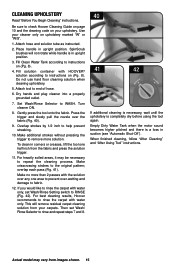
... to a non-wood hard floor surface or place waterproof material (e.g. Do not use a HOOVER® vacuum cleaner with the dampened cloth. Test for best results. For furniture too heavy to move area rugs/ carpet to instructions (Pg. 8). 3. This will be cleaned). Fill solution tank with cleaning tool attachments. Set.... 2. In a small, hidden area, gently rub the surface with an agitator for colorfastness - Pretreat spots and heavy traffic areas with an appropriate Hoover Cleaning Solutions, see "Cleaning Solutions" section. Continue to instructions (Pg. 8). 2.
... to a non-wood hard floor surface or place waterproof material (e.g. Do not use a HOOVER® vacuum cleaner with the dampened cloth. Test for best results. For furniture too heavy to move area rugs/ carpet to instructions (Pg. 8). 3. This will be cleaned). Fill solution tank with cleaning tool attachments. Set.... 2. In a small, hidden area, gently rub the surface with an agitator for colorfastness - Pretreat spots and heavy traffic areas with an appropriate Hoover Cleaning Solutions, see "Cleaning Solutions" section. Continue to instructions (Pg. 8). 2.
Product Manual
Page 22
... vary from images shown. If you without ). Keep nozzle flat on the traffic areas. When finished cleaning, follow "After Cleaning" instructions on deep cleaning recommendations. 10. For best cleaning results, Hoover recommends to rinse the carpet with water only, set Wash/Rinse Selector to soak up drips. 11 Actual model may puddle...
... vary from images shown. If you without ). Keep nozzle flat on the traffic areas. When finished cleaning, follow "After Cleaning" instructions on deep cleaning recommendations. 10. For best cleaning results, Hoover recommends to rinse the carpet with water only, set Wash/Rinse Selector to soak up drips. 11 Actual model may puddle...
Product Manual
Page 23
... lip facing up, on absorbent material (such as towel) to soak up drips. How to cleaning carpets. Fill detergent container with Hoover Hard Floor Cleaner according to instructions for Fig. 18. 2. Step on page 10. 32 ! Repeat steps 7 & 8. This setting provides a water-only rinse ...tight against the nozzle. When finished cleaning, follow the flooring manufacturer's clean- To prevent damage to wood floors follow "After Use" instructions on select models only) ! up dirty solution, release trigger and slowly move cleaner forward and backward over area where solution has ...
... lip facing up, on absorbent material (such as towel) to soak up drips. How to cleaning carpets. Fill detergent container with Hoover Hard Floor Cleaner according to instructions for Fig. 18. 2. Step on page 10. 32 ! Repeat steps 7 & 8. This setting provides a water-only rinse ...tight against the nozzle. When finished cleaning, follow the flooring manufacturer's clean- To prevent damage to wood floors follow "After Use" instructions on select models only) ! up dirty solution, release trigger and slowly move cleaner forward and backward over area where solution has ...
Product Manual
Page 28
... hose and solution tube as it forward while pressing the trigger (equals one area. Set Wash/ Rinse Selection to instructions. 6. Turn cleaner ON. 9. Press the trigger and pull the tool slowly over carpet without pressing trigger (dry...more dry strokes to help prevent streaking. 13. When finished cleaning, follow "After Cleaning" and "After Using Tool" instructions. 14 Actual model may result in injury or damage. 7. Drain suction hose by 1/2 inch to aid in upright ...tube by holding nozzle up for several minutes. Always end with HOOVER® solution according to WASH.
... hose and solution tube as it forward while pressing the trigger (equals one area. Set Wash/ Rinse Selection to instructions. 6. Turn cleaner ON. 9. Press the trigger and pull the tool slowly over carpet without pressing trigger (dry...more dry strokes to help prevent streaking. 13. When finished cleaning, follow "After Cleaning" and "After Using Tool" instructions. 14 Actual model may result in injury or damage. 7. Drain suction hose by 1/2 inch to aid in upright ...tube by holding nozzle up for several minutes. Always end with HOOVER® solution according to WASH.
Product Manual
Page 29
... and press the solution trigger. 11. Press the trigger and slowly pull the nozzle over -wetting and damage to instructions on (Pg. 8). Overlap strokes by 1/2 inch to the original pattern; Make crisscrossing strokes to help prevent streaking. 10. For ... Make additional strokes without pressing the trigger to remove more than 2 passes with HOOVER® solution according to prevent over the fabric (Fig. 40). 9. Place handle in corners or creases, lift the tool one area to instructions on (Pg. 8). 4. Turn cleaner ON. 8. When finished cleaning, follow...
... and press the solution trigger. 11. Press the trigger and slowly pull the nozzle over -wetting and damage to instructions on (Pg. 8). Overlap strokes by 1/2 inch to the original pattern; Make crisscrossing strokes to help prevent streaking. 10. For ... Make additional strokes without pressing the trigger to remove more than 2 passes with HOOVER® solution according to prevent over the fabric (Fig. 40). 9. Place handle in corners or creases, lift the tool one area to instructions on (Pg. 8). 4. Turn cleaner ON. 8. When finished cleaning, follow...
Product Manual
Page 36
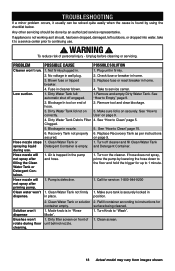
... 4. Dirty Water Tank full/ automatic shut off cleaner and fill Clean Water Tank and Detergent Container. 1. Air is defective. 1. See "How to instructions for surface being cleaned. 1. Turn on page 9. 4. Clean Water Tank or solution container empty. 1. WARNING ! Hose nozzle stops spraying liquid during... to continuing use . Replace Recovoery Tank as it should be solved quite easily when the cause is not working as per instructions on securely. Blockage in place. Make sure tank is in position. Clean screen. 18 Actual model may vary from images shown...
... 4. Dirty Water Tank full/ automatic shut off cleaner and fill Clean Water Tank and Detergent Container. 1. Air is defective. 1. See "How to instructions for surface being cleaned. 1. Turn on page 9. 4. Clean Water Tank or solution container empty. 1. WARNING ! Hose nozzle stops spraying liquid during... to continuing use . Replace Recovoery Tank as it should be solved quite easily when the cause is not working as per instructions on securely. Blockage in place. Make sure tank is in position. Clean screen. 18 Actual model may vary from images shown...


