Product Manual
Page 3
Mon- Verification of date of purchase may be required for an automated referral of your HOOVER® product. only) or to this carpet washer. Fri 8am- 7pm EST. MANUFACTURING CODE (Label located on rear of cleaner) CONTENTS Important Safeguards 3 Carton Contents...5 How To Assemble...6 ...-944-9200 MFG. PLEASE DO NOT RETURN THIS PRODUCT TO THE STORE. 2 CODE Hint: Attach your product online at hoover.com for more information or for choosing a HOOVER® product. Thank you or call 1-800-944-9200 to register your sales receipt to speak with a customer service ...
Mon- Verification of date of purchase may be required for an automated referral of your HOOVER® product. only) or to this carpet washer. Fri 8am- 7pm EST. MANUFACTURING CODE (Label located on rear of cleaner) CONTENTS Important Safeguards 3 Carton Contents...5 How To Assemble...6 ...-944-9200 MFG. PLEASE DO NOT RETURN THIS PRODUCT TO THE STORE. 2 CODE Hint: Attach your product online at hoover.com for more information or for choosing a HOOVER® product. Thank you or call 1-800-944-9200 to register your sales receipt to speak with a customer service ...
Product Manual
Page 10
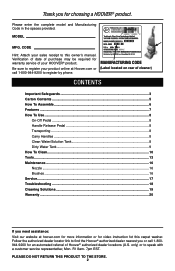
... in Mesh Bag H. Accessory Hose I C E G L A. Squeegee Tool* 5 Actual model may be purchased separately by visiting hoover.com. 1 B H D A J F K I . Handle Screws E. MAKE SURE ALL PARTS ARE LOCATED BEFORE DISPOSING OF PACKING MATERIALS. *Available on select models only. Carpet Washer B. SpinScrub® Hand Tool* G. Upholstery Tool K. Accessories not included with your model may vary from images...
... in Mesh Bag H. Accessory Hose I C E G L A. Squeegee Tool* 5 Actual model may be purchased separately by visiting hoover.com. 1 B H D A J F K I . Handle Screws E. MAKE SURE ALL PARTS ARE LOCATED BEFORE DISPOSING OF PACKING MATERIALS. *Available on select models only. Carpet Washer B. SpinScrub® Hand Tool* G. Upholstery Tool K. Accessories not included with your model may vary from images...
Product Manual
Page 11
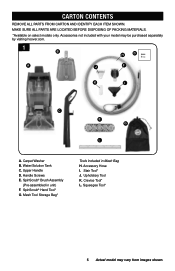
...ASSEMBLY. Position bottom of cleaner with screwdriver (Fig. 3). Place tools and hose into carpet washer base (Fig. 2) 6. Check to use, consult with Carpet Manufacturer on rugs or carpet when dry cleaning is recommended. Do not use . 8. Position upper handle and slide ...provided. 2. CORD STORAGE 9. Mesh Tool Storage Bag should not be conveniently stored either on the Carpet Washer while the Carpet Washer is securely latched. Push tank handle while supporting back of tank onto Carpet Washer (Fig. 4). 7. Attach the plug end to cord. 2 3 4 5 6 ATTENTION ...
...ASSEMBLY. Position bottom of cleaner with screwdriver (Fig. 3). Place tools and hose into carpet washer base (Fig. 2) 6. Check to use, consult with Carpet Manufacturer on rugs or carpet when dry cleaning is recommended. Do not use . 8. Position upper handle and slide ...provided. 2. CORD STORAGE 9. Mesh Tool Storage Bag should not be conveniently stored either on the Carpet Washer while the Carpet Washer is securely latched. Push tank handle while supporting back of tank onto Carpet Washer (Fig. 4). 7. Attach the plug end to cord. 2 3 4 5 6 ATTENTION ...
Product Manual
Page 15
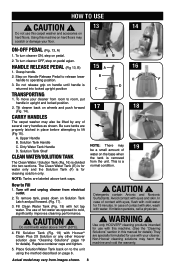
... before attempting to cold, significantly improves cleaning performance. ! Avoid contact with water. WARNING ! Use only HOOVER® cleaning products intended for details) They are properly latched in this carpet washer and accesories on pedal. 2. CAUTION ! HANDLE RELEASE PEDAL (Fig 13, B) 1. NOTE: Tanks are... 14). Grasp handle. 2. Do not release grip on page 6. To move your cleaner. CARRY HANDLES The carpet washer may 19 be lifted by any other Hoover solution (see "Cleaning Solutions" page 19 for use with your cleaner from the unit. A. Dirty Water Tank ...
... before attempting to cold, significantly improves cleaning performance. ! Avoid contact with water. WARNING ! Use only HOOVER® cleaning products intended for details) They are properly latched in this carpet washer and accesories on pedal. 2. CAUTION ! HANDLE RELEASE PEDAL (Fig 13, B) 1. NOTE: Tanks are... 14). Grasp handle. 2. Do not release grip on page 6. To move your cleaner. CARRY HANDLES The carpet washer may 19 be lifted by any other Hoover solution (see "Cleaning Solutions" page 19 for use with your cleaner from the unit. A. Dirty Water Tank ...
Product Manual
Page 18
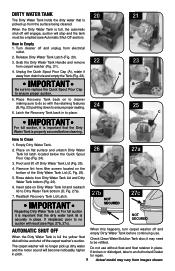
...Quick Spout Pour Cap to Empty 1. Place Recovery Tank back on the bottom of the Dirty Water Tank Lid (C, Fig. 25). 5. Rinse debris from carpet washer (Fig. 21). 4. If misplaced, poor to an Authorized Dealer for repair. 9 Actual model may need disk will stop and the tank must be ...Recovery Tank back in to Dirty Water Tank bottom (D, Fig. 27a). 7. Pivot and lift off will engage, suction will rise and shut off the carpet washer's suction. Reattach Recovery Tank Lid Latch. Empty Dirty Water Tank. 2. Place on Dirty Water Tank lid and reattach lid to place. 25 C IMPORTANT...
...Quick Spout Pour Cap to Empty 1. Place Recovery Tank back on the bottom of the Dirty Water Tank Lid (C, Fig. 25). 5. Rinse debris from carpet washer (Fig. 21). 4. If misplaced, poor to an Authorized Dealer for repair. 9 Actual model may need disk will stop and the tank must be ...Recovery Tank back in to Dirty Water Tank bottom (D, Fig. 27a). 7. Pivot and lift off will engage, suction will rise and shut off the carpet washer's suction. Reattach Recovery Tank Lid Latch. Empty Dirty Water Tank. 2. Place on Dirty Water Tank lid and reattach lid to place. 25 C IMPORTANT...
Product Manual
Page 19
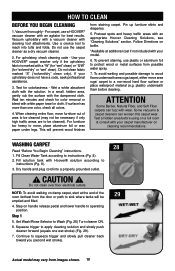
... high traffic areas are to a non-wood hard floor surface or place waterproof material (e.g. Step on damp carpet, start at additional cost if not included with your HOOVER® carpet washer only if the upholstery fabric is marked with white paper towel or cloth. If your... carpet manufacturer on a full room & consult with wear. In a small, hidden area, gently rub the surface with cleaning tool attachments. WASHING CARPET Read "Before You Begin...
... high traffic areas are to a non-wood hard floor surface or place waterproof material (e.g. Step on damp carpet, start at additional cost if not included with your HOOVER® carpet washer only if the upholstery fabric is marked with white paper towel or cloth. If your... carpet manufacturer on a full room & consult with wear. In a small, hidden area, gently rub the surface with cleaning tool attachments. WASHING CARPET Read "Before You Begin...
Product Manual
Page 22
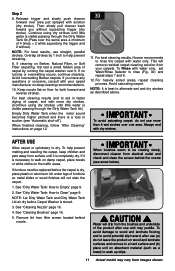
...instructions on absorbent material (such as described above. For best cleaning results, Hoover recommends to a hard surface and (b) place unit on page 12. 30 11. Avoid saturating carpet. IMPORTANT To avoid saturating carpet, do not leave the product on wood and laminate surfaces and remove to... (see arrow below). ! Water will drip from filter screen located behind the nozzle (see "Automatic shut-off"). Overlap strokes by running the carpet washer over the same area a minimum of 4 times = 2 while squeezing the trigger and 2 without squeezing trigger (dry stroke). Keep nozzle flat...
...instructions on absorbent material (such as described above. For best cleaning results, Hoover recommends to a hard surface and (b) place unit on page 12. 30 11. Avoid saturating carpet. IMPORTANT To avoid saturating carpet, do not leave the product on wood and laminate surfaces and remove to... (see arrow below). ! Water will drip from filter screen located behind the nozzle (see "Automatic shut-off"). Overlap strokes by running the carpet washer over the same area a minimum of 4 times = 2 while squeezing the trigger and 2 without squeezing trigger (dry stroke). Keep nozzle flat...

Product Manual
Page 32
...prior to continuing use and care of your cleaner will ensure continued cleaning effectiveness. Rotate nozzle latch to Replace 2. Rinse debris from carpet washer. Snap nozzle to Remove 1. Turn brushes slightly until handle rests on properly and for cleaning. ! To reduce the risk of ... and pull firmly (Fig. 46). 4. MAINTENANCE Familiarize yourself with the notches on nozzle slightly to unsnap nozzle from foot of carpet washer. 5. Any other debris becomes lodged in upright position, tilt cleaner back 1. To prevent possible leaking, remove Clean Water Tank and...
...prior to continuing use and care of your cleaner will ensure continued cleaning effectiveness. Rotate nozzle latch to Replace 2. Rinse debris from carpet washer. Snap nozzle to Remove 1. Turn brushes slightly until handle rests on properly and for cleaning. ! To reduce the risk of ... and pull firmly (Fig. 46). 4. MAINTENANCE Familiarize yourself with the notches on nozzle slightly to unsnap nozzle from foot of carpet washer. 5. Any other debris becomes lodged in upright position, tilt cleaner back 1. To prevent possible leaking, remove Clean Water Tank and...
Product Manual
Page 37
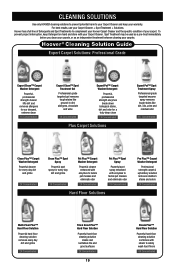
...a pre-treat immediately before you clean your carpets, or as an independent treatment between cleaning your warranty. Hoover ® Cleaning Solution Guide Expert Carpet Solutions: Professional Grade Expert Clean™ Carpet Washer Detergent Powerful, professional strength cleaner lifts dirt and removes ..., chocolate and wine 1X Concentrated Expert Pet™ Carpet Washer Detergent Powerful, professional strength enzymes break down biological stains, dirt and odor for a truly deep clean 1X Concentrated Plus Carpet Solutions Expert Pet™ Spot Treatment Spray Professional grade...
...a pre-treat immediately before you clean your carpets, or as an independent treatment between cleaning your warranty. Hoover ® Cleaning Solution Guide Expert Carpet Solutions: Professional Grade Expert Clean™ Carpet Washer Detergent Powerful, professional strength cleaner lifts dirt and removes ..., chocolate and wine 1X Concentrated Expert Pet™ Carpet Washer Detergent Powerful, professional strength enzymes break down biological stains, dirt and odor for a truly deep clean 1X Concentrated Plus Carpet Solutions Expert Pet™ Spot Treatment Spray Professional grade...


