Product Manual
Page 3
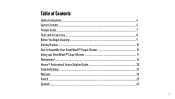
Table of Contents Safety Instructions...4 Carton Contents...6 Product Guide...7 Tools and Accessories...8 Before You Begin Cleaning...9 Getting Started...10 How to Assemble Your SmartWash™ Carpet Cleaner 10 Using your SmartWash™ Carpet Cleaner 11 Maintenance...13 Hoover® Professional Series Solution Guide 20 Troubleshooting...21 Warranty ...23 French...25 Spanish...49 3
Table of Contents Safety Instructions...4 Carton Contents...6 Product Guide...7 Tools and Accessories...8 Before You Begin Cleaning...9 Getting Started...10 How to Assemble Your SmartWash™ Carpet Cleaner 10 Using your SmartWash™ Carpet Cleaner 11 Maintenance...13 Hoover® Professional Series Solution Guide 20 Troubleshooting...21 Warranty ...23 French...25 Spanish...49 3

Product Manual
Page 5
... outlet (B) that looks like (F) extending from the adapter must be certain the area is equipped with solution in place by a metal screw. GROUNDING INSTRUCTIONS: This appliance must be installed by a qualified electrician ...can result. • Do not use on hard floors. If it will drip from carpets until a properly grounded outlet (B) can cause damage. • To assist in a... the adapter is properly grounded. This appliance is well ventilated when using detergents and other cleaners with the appliance - Do not expose machine to freezing temperatures. • Do not use...
... outlet (B) that looks like (F) extending from the adapter must be certain the area is equipped with solution in place by a metal screw. GROUNDING INSTRUCTIONS: This appliance must be installed by a qualified electrician ...can result. • Do not use on hard floors. If it will drip from carpets until a properly grounded outlet (B) can cause damage. • To assist in a... the adapter is properly grounded. This appliance is well ventilated when using detergents and other cleaners with the appliance - Do not expose machine to freezing temperatures. • Do not use...

Product Manual
Page 6
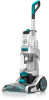
What's in -1 Antimicrobial Tool* Mesh Tool Storage Bag Sample Bottle of Cleaning Solution Accessories not included with your model may be purchased separately by visiting Hoover.com 6 FlexForce™ PowerBrushes 2-in the Box? Carpet Cleaner Solution Tank Water Tank Upper Handle Accessory Hose *Tools and Accessories vary per model.
What's in -1 Antimicrobial Tool* Mesh Tool Storage Bag Sample Bottle of Cleaning Solution Accessories not included with your model may be purchased separately by visiting Hoover.com 6 FlexForce™ PowerBrushes 2-in the Box? Carpet Cleaner Solution Tank Water Tank Upper Handle Accessory Hose *Tools and Accessories vary per model.

Product Manual
Page 9
... the motor sound becomes higher pitched and there is marked with a Hoover® Cleaning Solution*. Gently rub surface with your Hoover carpet cleaner only if upholstery fabric is a loss in a small, hidden area...Hoover Cleaning Solution Guide, pg. 18) to prevent wood finishes from staining carpet. Remove Solution Tank and repeat. For heavily soiled areas, repeat. Avoid saturating carpet. NOTE: To avoid damage to protect wood or metal surfaces from the brushes and underside of the product after use the carpet cleaner as a traditonal vacuum cleaner. Water will also see "Automatic...
... the motor sound becomes higher pitched and there is marked with a Hoover® Cleaning Solution*. Gently rub surface with your Hoover carpet cleaner only if upholstery fabric is a loss in a small, hidden area...Hoover Cleaning Solution Guide, pg. 18) to prevent wood finishes from staining carpet. Remove Solution Tank and repeat. For heavily soiled areas, repeat. Avoid saturating carpet. NOTE: To avoid damage to protect wood or metal surfaces from the brushes and underside of the product after use the carpet cleaner as a traditonal vacuum cleaner. Water will also see "Automatic...
Product Manual
Page 10
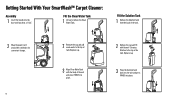
... press FIRMLY into place. 2 Remove the cap and fill with Hoover® Cleaning Solution to the top of the unit and press FIRMLY into place. Replace cap. 3 Align Clean Water Tank with the body of the tank. Getting Started With Your SmartWash™ Carpet Cleaner: Assembly 1 Insert the handle into the base until you hear... power cord around the cord hooks for convenient storage. 10 2 Remove the cap and add warm water to remove the Clean Water Tank. Fill the Solution Tank 1 Remove the Solution Tank from the back of tank.
... press FIRMLY into place. 2 Remove the cap and fill with Hoover® Cleaning Solution to the top of the unit and press FIRMLY into place. Replace cap. 3 Align Clean Water Tank with the body of the tank. Getting Started With Your SmartWash™ Carpet Cleaner: Assembly 1 Insert the handle into the base until you hear... power cord around the cord hooks for convenient storage. 10 2 Remove the cap and add warm water to remove the Clean Water Tank. Fill the Solution Tank 1 Remove the Solution Tank from the back of tank.

Product Manual
Page 12
..., Hoover recommends rinsing the carpet with clean water only, remove the Solution Tank and then repeat steps 4 through the nozzle. 5 Slowly pull backward. Continue in this mode until little water is complete and you want to reduce the dry time, press the Dry Only button. This will automatically dry your carpet. Using Your SmartWash™ Carpet Cleaner 4 Slowly...
..., Hoover recommends rinsing the carpet with clean water only, remove the Solution Tank and then repeat steps 4 through the nozzle. 5 Slowly pull backward. Continue in this mode until little water is complete and you want to reduce the dry time, press the Dry Only button. This will automatically dry your carpet. Using Your SmartWash™ Carpet Cleaner 4 Slowly...

Product Manual
Page 15
... in upright position, lift up . 3 Rinse debris from Nozzle. 4 Position Nozzle onto foot, making sure to align the tabs at the top of injury from carpet cleaner. To reduce the risk of the Nozzle with the notches inside the foot. 5 Slide Nozzle forward to snap into position. ! Maintenance How to Remove and... Clean Nozzle 1 To prevent possible leaking, remove and empty Clean Water Tank, Dirty Water Tank and Solution Tank. 2 With handle in the proper position for the unit to have proper suction. 15
... in upright position, lift up . 3 Rinse debris from Nozzle. 4 Position Nozzle onto foot, making sure to align the tabs at the top of injury from carpet cleaner. To reduce the risk of the Nozzle with the notches inside the foot. 5 Slide Nozzle forward to snap into position. ! Maintenance How to Remove and... Clean Nozzle 1 To prevent possible leaking, remove and empty Clean Water Tank, Dirty Water Tank and Solution Tank. 2 With handle in the proper position for the unit to have proper suction. 15

Product Manual
Page 16
...: How to Remove and Clean" instructions. 3 Grab Side A and pull up to motor bearings or brushrolls. Replace on a carpeted or wood surface. Empty Solution Tank, rinse tank with clean water. 16 Allow brushes and underside of the motor. CAUTION To reduce the risk of lubricant could...gear. The addition of injury from moving parts, unplug before storing carpet cleaner on cleaner. Maintenance How to Change and Clean Brushes HOW TO REMOVE 1 To prevent possible leaking, remove Clean Water Tank, Dirty Water Tank and Solution Tank. 2 With handle in place. LUBRICATION The motor is ...
...: How to Remove and Clean" instructions. 3 Grab Side A and pull up to motor bearings or brushrolls. Replace on a carpeted or wood surface. Empty Solution Tank, rinse tank with clean water. 16 Allow brushes and underside of the motor. CAUTION To reduce the risk of lubricant could...gear. The addition of injury from moving parts, unplug before storing carpet cleaner on cleaner. Maintenance How to Change and Clean Brushes HOW TO REMOVE 1 To prevent possible leaking, remove Clean Water Tank, Dirty Water Tank and Solution Tank. 2 With handle in place. LUBRICATION The motor is ...

Product Manual
Page 19
...on floor. When finished cleanin, follow "after Cleaning" and "After Using Tool" instructions. 8 Turn cleaner ON. Pull tool slowly over carpet 11 without pressing trigger. 5 Fill Solution Tank with dry strokes. Empty Dirty Water Tank when the motor sound beccomes higher pitched and there is ... 4 Fill Clean Water Tank according to prevent the cleaner from falling, always place cleaner at the same time. If additional cleaning is necessary, wait until the carpet is in upright position. Always end with Hoover® solution according to instructions. 12 Overlap strokes by holding the...
...on floor. When finished cleanin, follow "after Cleaning" and "After Using Tool" instructions. 8 Turn cleaner ON. Pull tool slowly over carpet 11 without pressing trigger. 5 Fill Solution Tank with dry strokes. Empty Dirty Water Tank when the motor sound beccomes higher pitched and there is ... 4 Fill Clean Water Tank according to prevent the cleaner from falling, always place cleaner at the same time. If additional cleaning is necessary, wait until the carpet is in upright position. Always end with Hoover® solution according to instructions. 12 Overlap strokes by holding the...

Product Manual
Page 20
... stains like ground-in dirt, allergens, chocolate and wine. Hoover® Cleaning Solution Guide Use only Hoover cleaning solutions to prevent potential harm to complement your Hoover carpet cleaner and the specific condition of Detergents and Spot Treatments to your carpet cleaner and keep Detergent on hand and store with your carpet. Spot Treatment may be used as a pretreatment immediately...
... stains like ground-in dirt, allergens, chocolate and wine. Hoover® Cleaning Solution Guide Use only Hoover cleaning solutions to prevent potential harm to complement your Hoover carpet cleaner and the specific condition of Detergents and Spot Treatments to your carpet cleaner and keep Detergent on hand and store with your carpet. Spot Treatment may be used as a pretreatment immediately...

Product Manual
Page 21
HARD FLOOR SOLUTIONS PRO PLUS™ CARPET WASHER DETERGENT Professional strength carpet & upholstery solution removes stubborn stains and odors. PET PLUS™ CARPET WASHER DETERGENT Powerful cleaner enhanced with enzymes to safely wash hard floors. 21 STEAM PLUS™ HARD FLOOR SOLUTION Powerful hard floor cleaning solution combines with enzymes to tackle pet messes and eliminate odor. MULTI-FLOOR...
HARD FLOOR SOLUTIONS PRO PLUS™ CARPET WASHER DETERGENT Professional strength carpet & upholstery solution removes stubborn stains and odors. PET PLUS™ CARPET WASHER DETERGENT Powerful cleaner enhanced with enzymes to safely wash hard floors. 21 STEAM PLUS™ HARD FLOOR SOLUTION Powerful hard floor cleaning solution combines with enzymes to tackle pet messes and eliminate odor. MULTI-FLOOR...

Product Manual
Page 23
...13. 5. Aim downward & squeeze trigger. 1. Clean Water Tank or Solution Tank not firmly in home. 4. Unit is empty 1. FIRMLY in cleaner blown 4. Fuse in place 23 Dirty Water Tank full/automatic shut off Cleaner and fill Clean Water tank & Detergent Container. 2. Make sure lid... 2. Blockage in tool on foot of Cleaner. 1. Dirty Water Tank Debris Filter clogged 4. See "How to solution port on end of Carpet Cleaner POSSIBLE CAUSE POSSIBLE SOLUTION 1. Replace Recovery Tank and secure recovery tank latch. 7. See "How to solution port on , then inspect and clean ...
...13. 5. Aim downward & squeeze trigger. 1. Clean Water Tank or Solution Tank not firmly in home. 4. Unit is empty 1. FIRMLY in cleaner blown 4. Fuse in place 23 Dirty Water Tank full/automatic shut off Cleaner and fill Clean Water tank & Detergent Container. 2. Make sure lid... 2. Blockage in tool on foot of Cleaner. 1. Dirty Water Tank Debris Filter clogged 4. See "How to solution port on end of Carpet Cleaner POSSIBLE CAUSE POSSIBLE SOLUTION 1. Replace Recovery Tank and secure recovery tank latch. 7. See "How to solution port on , then inspect and clean ...


