
Manual
Page 3
... surfaces. • Do not use of body away from carpets until they are located on the data label on stairs. Save these instructions! For your Hoover product. © 2007 Hoover, Inc. hoover.com 3 WARNING: To reduce the risk of children's reach. • Do not use to this owner s manual. others may damage the machine...
... surfaces. • Do not use of body away from carpets until they are located on the data label on stairs. Save these instructions! For your Hoover product. © 2007 Hoover, Inc. hoover.com 3 WARNING: To reduce the risk of children's reach. • Do not use to this owner s manual. others may damage the machine...
Manual
Page 4
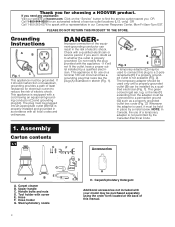
...-Fri 8am-7pm EST. This appliance is for choosing a HOOVER product. Check with a representative in doubt as a properly grounded outlet box cover (Fig. 2). Carpet cleaner B. Tool holder with all local codes and ordinances. Grounding Instructions A B C Fig. 1 This appliance must be purchased ...separately using the order form located at hoover.com. Whenever the adapter is properly grounded. only) OR Call 1-800-263-6376 to ...
...-Fri 8am-7pm EST. This appliance is for choosing a HOOVER product. Check with a representative in doubt as a properly grounded outlet box cover (Fig. 2). Carpet cleaner B. Tool holder with all local codes and ordinances. Grounding Instructions A B C Fig. 1 This appliance must be purchased ...separately using the order form located at hoover.com. Whenever the adapter is properly grounded. only) OR Call 1-800-263-6376 to ...

Manual
Page 10
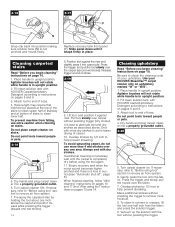
..., it is completely dry. Wait ten minutes and check for color removal or bleed with a "W" (for "wet" clean) or "S/W" (for instructions on each side of area to be cleaned (may be replaced before cleaning. e. If furniture must be rinsed. Rotate latches (E) (one color, check...surface or place waterproof material (e.g. Pretreat spots and heavy traffic areas with the dampened cloth. wait ten minutes and blot with your HOOVER SteamVac™ carpet cleaner only if the upholstery fabric is properly secured before removal, carpet material, and carpet type. After cleaning a....
..., it is completely dry. Wait ten minutes and check for color removal or bleed with a "W" (for "wet" clean) or "S/W" (for instructions on each side of area to be cleaned (may be replaced before cleaning. e. If furniture must be rinsed. Rotate latches (E) (one color, check...surface or place waterproof material (e.g. Pretreat spots and heavy traffic areas with the dampened cloth. wait ten minutes and blot with your HOOVER SteamVac™ carpet cleaner only if the upholstery fabric is properly secured before removal, carpet material, and carpet type. After cleaning a....

Manual
Page 11
...up spills immediately by the carpet cleaner's brushes. 5. Continue to squeeze trigger and slowly pull carpet cleaner back toward you begin cleaning" instructions on pages 8 and 9. 3-2 d. Keep nozzle flat on handle release pedal and lower handle to operating position; Move speed selector ... removed for normal cleaning. 3. If rinsing is desired, be careful not to over floor electrical outlets. 4. Repeat with HOOVER Carpet/ Upholstery Detergent according to instructions on page 10. 1. To avoid walking on a non-carpeted floor. For best results, pick up water with clean ...
...up spills immediately by the carpet cleaner's brushes. 5. Continue to squeeze trigger and slowly pull carpet cleaner back toward you begin cleaning" instructions on pages 8 and 9. 3-2 d. Keep nozzle flat on handle release pedal and lower handle to operating position; Move speed selector ... removed for normal cleaning. 3. If rinsing is desired, be careful not to over floor electrical outlets. 4. Repeat with HOOVER Carpet/ Upholstery Detergent according to instructions on page 10. 1. To avoid walking on a non-carpeted floor. For best results, pick up water with clean ...
Manual
Page 12
...rests on the floor. 3-4 A B With foam strip (A) (located under the netting) in position as shown. Fill clean solution tank with HOOVER Hard Floor Cleaning Solution (available at additional cost) Disconnect carpet cleaner from electrical outlet. Use both ends snap into place. (Note: Some ...Slowly move carpet cleaner over area to be required to the Lo or Hl position for removal. When finished cleaning, follow "After cleaning" instructions on front of attachment points in clear water. turn carpet cleaner ON. Remove attachment from electrical outlet. 3-7 D 1. set tank aside (...
...rests on the floor. 3-4 A B With foam strip (A) (located under the netting) in position as shown. Fill clean solution tank with HOOVER Hard Floor Cleaning Solution (available at additional cost) Disconnect carpet cleaner from electrical outlet. Use both ends snap into place. (Note: Some ...Slowly move carpet cleaner over area to be required to the Lo or Hl position for removal. When finished cleaning, follow "After cleaning" instructions on front of attachment points in clear water. turn carpet cleaner ON. Remove attachment from electrical outlet. 3-7 D 1. set tank aside (...
Manual
Page 13
... are extended by sliding it is fully connected. Open door on pages 10 and 11. 2. Follow these steps: 1. Attach tool to upright position. Follow the instructions on pages 14 and 15 for "After cleaning" on a hard surface or against your thumb, push forward and up . 4. Disconnect carpet cleaner from the system...
... are extended by sliding it is fully connected. Open door on pages 10 and 11. 2. Follow these steps: 1. Attach tool to upright position. Follow the instructions on pages 14 and 15 for "After cleaning" on a hard surface or against your thumb, push forward and up . 4. Disconnect carpet cleaner from the system...
Manual
Page 14
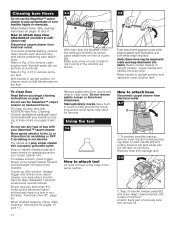
...sure to end of hose. Fill clean solution tank with HOOVER Carpet/Upholstery Detergent according to end of hose. 4. Attach tool to instructions on pages 8 and 9. 3. If necessary, refer to "Before using tool" section to instructions on pages 8 and 9. 3. Make additional strokes without... pressing trigger (dry stroke). Place handle in upright position. Fill clean solution tank with HOOVER Carpet/Upholstery Detergent according to remove air from the fabric and...
...sure to end of hose. Fill clean solution tank with HOOVER Carpet/Upholstery Detergent according to end of hose. 4. Attach tool to instructions on pages 8 and 9. 3. If necessary, refer to "Before using tool" section to instructions on pages 8 and 9. 3. Make additional strokes without... pressing trigger (dry stroke). Place handle in upright position. Fill clean solution tank with HOOVER Carpet/Upholstery Detergent according to remove air from the fabric and...
Manual
Page 15
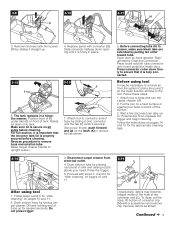
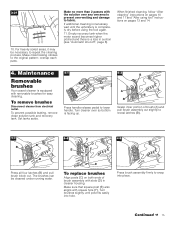
... easily into place. To prevent possible leaking, remove clean solution tank and recovery tank. When finished cleaning, follow "After cleaning" instructions on pages 10 and 11 and "After using the tool again. 11. overlap each pass. Maintenance Removable brushes Your carpet cleaner is... completely dry before using tool" instructions on both ends of brush (A) and pull brush assembly out slightly to the original pattern; To remove brushes Disconnect cleaner from ...
... easily into place. To prevent possible leaking, remove clean solution tank and recovery tank. When finished cleaning, follow "After cleaning" instructions on pages 10 and 11 and "After using the tool again. 11. overlap each pass. Maintenance Removable brushes Your carpet cleaner is... completely dry before using tool" instructions on both ends of brush (A) and pull brush assembly out slightly to the original pattern; To remove brushes Disconnect cleaner from ...

Manual
Page 16
... firmly in place • Make sure tank is securely locked in position • Solution tank empty • Refill tank according to instructions for surface being cleaned • Recovery tank lid not on -line at no cost to place this will be required before storing carpet...OR- • checking the Service section of purchase. Always identify your appliance to Low or Hi Full One Year Warranty (Domestic Use) Your HOOVER® appliance is rendered. 1. Appliances purchased elsewhere are questions concerning this warranty gives you specific legal rights, you mail your cleaner by : ...
... firmly in place • Make sure tank is securely locked in position • Solution tank empty • Refill tank according to instructions for surface being cleaned • Recovery tank lid not on -line at no cost to place this will be required before storing carpet...OR- • checking the Service section of purchase. Always identify your appliance to Low or Hi Full One Year Warranty (Domestic Use) Your HOOVER® appliance is rendered. 1. Appliances purchased elsewhere are questions concerning this warranty gives you specific legal rights, you mail your cleaner by : ...


