
Product Manual
Page 2
... with a customer service representative; CODE Hint: Attach your product online at hoover.com. Please do not return this owner's manual. Follow the authorized dealer locator link to register by phone. only) or to the store. 2 Please enter the complete model and Manufacturing Code in China Manufacturing code (Label located on bottom of...
... with a customer service representative; CODE Hint: Attach your product online at hoover.com. Please do not return this owner's manual. Follow the authorized dealer locator link to register by phone. only) or to the store. 2 Please enter the complete model and Manufacturing Code in China Manufacturing code (Label located on bottom of...

Product Manual
Page 5
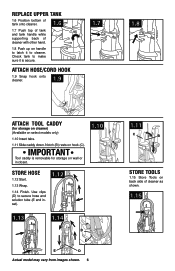
.... 1.5 Insert bolts and attach nuts. 1. Make sure all parts from images shown. Accessories not included with your model may be in bag with screwdriver. 1.2 1.3 Cord Protector -V2 1.4 1.5 5 Actual model may be purchased separately by visiting hoover.com. Upper Handle C. Handle Bolts and Nuts (Three nuts may vary from carton and identify each item...
.... 1.5 Insert bolts and attach nuts. 1. Make sure all parts from images shown. Accessories not included with your model may be in bag with screwdriver. 1.2 1.3 Cord Protector -V2 1.4 1.5 5 Actual model may be purchased separately by visiting hoover.com. Upper Handle C. Handle Bolts and Nuts (Three nuts may vary from carton and identify each item...
Product Manual
Page 6
Notch (B) rests on select models only) 1.10 Insert tabs. 1.11 Slide caddy down. Use clips (D) to cleaner. Attach hose/cord hook 1.9 1.9 Snap hook onto cleaner. 1.7 1.8 Attach tool caddy (for storage ... for storage on cleaner) (Available on hook (C). Check tank to make sure it to secure hose and solution tube (E and inset). 1.12 1.13 1.14 D E E D Actual model may vary from images shown. 6 1.11 C B Store tools 1.15 Store Tools on wall or in closet. 1.10 Store hose 1.12 Start. 1.13 Wrap. 1.14 Finish...
Notch (B) rests on select models only) 1.10 Insert tabs. 1.11 Slide caddy down. Use clips (D) to cleaner. Attach hose/cord hook 1.9 1.9 Snap hook onto cleaner. 1.7 1.8 Attach tool caddy (for storage ... for storage on cleaner) (Available on hook (C). Check tank to make sure it to secure hose and solution tube (E and inset). 1.12 1.13 1.14 D E E D Actual model may vary from images shown. 6 1.11 C B Store tools 1.15 Store Tools on wall or in closet. 1.10 Store hose 1.12 Start. 1.13 Wrap. 1.14 Finish...
Product Manual
Page 7
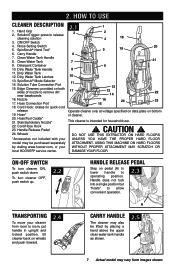
...Water Tank Handle 8. Wheels DO NOT USE THIS EXTRACTOR ON HARD FLOORS *Accessories not included with your WITHOUT PROPER ATTACHMENT MAY SCRATCH OR local HOOVER® service center. SolutionTrigger: press to operating position. Hose/Tool Caddy* 21. SpinScrub® Mode Selector 14. Detergent Container 9 10...placing a hand above the upper clean water tank handle as shown. 2.5 7 Actual model may be lifted by visiting www.hoover.com, or your UNLESS YOU HAVE THE PROPER HARD FLOOR model may vary from room to room, put handle in upright and locked position, tilt ...
...Water Tank Handle 8. Wheels DO NOT USE THIS EXTRACTOR ON HARD FLOORS *Accessories not included with your WITHOUT PROPER ATTACHMENT MAY SCRATCH OR local HOOVER® service center. SolutionTrigger: press to operating position. Hose/Tool Caddy* 21. SpinScrub® Mode Selector 14. Detergent Container 9 10...placing a hand above the upper clean water tank handle as shown. 2.5 7 Actual model may be lifted by visiting www.hoover.com, or your UNLESS YOU HAVE THE PROPER HARD FLOOR model may vary from room to room, put handle in upright and locked position, tilt ...
Product Manual
Page 8
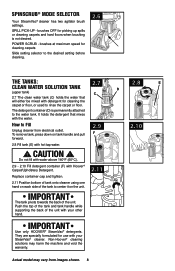
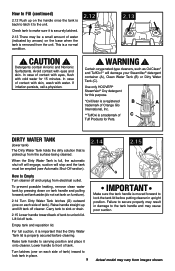
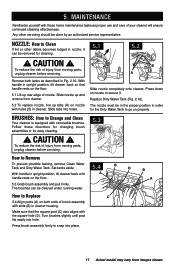
...the carpet or floor, or used to Fill Unplug cleaner from images shown. 8 POWER SCRUB - How to rinse the carpet or floor. Actual model may harm the machine and void the warranty. brushes at maximum speed for cleaning carpets Slide setting selector to the desired setting before cleaning. 2.6 ...with hot tap water. ! To remove tank, press down on the unit. 2.11 IMPORTANT The tank pivots towards the back of the unit with Hoover® Carpet/Upholstery Detergent. It holds the detergent that will either be mixed with the water. CAUTION ! Do not fill with water above 140...
...the carpet or floor, or used to Fill Unplug cleaner from images shown. 8 POWER SCRUB - How to rinse the carpet or floor. Actual model may harm the machine and void the warranty. brushes at maximum speed for cleaning carpets Slide setting selector to the desired setting before cleaning. 2.6 ...with hot tap water. ! To remove tank, press down on the unit. 2.11 IMPORTANT The tank pivots towards the back of the unit with Hoover® Carpet/Upholstery Detergent. It holds the detergent that will either be mixed with the water. CAUTION ! Do not fill with water above 140...
Product Manual
Page 9
... Surfactants. WARNING ! G How to lock tank in place. 9 Actual model may cause poor suction. Raise handle straight up and lift tank off tank. Lift lid off cleaner. Turn latches (one on each side of C Tuff Products for 15 minutes. Use only HOOVER® SteamVac® Oxy detergent for this purpose. *OxiClean is...
... Surfactants. WARNING ! G How to lock tank in place. 9 Actual model may cause poor suction. Raise handle straight up and lift tank off tank. Lift lid off cleaner. Turn latches (one on each side of C Tuff Products for 15 minutes. Use only HOOVER® SteamVac® Oxy detergent for this purpose. *OxiClean is...
Product Manual
Page 10
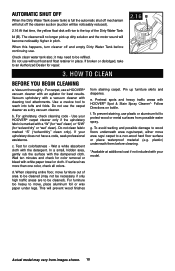
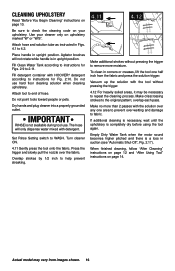
...tool attachments. When cleaning entire floor, move area rugs/ carpet to the top of area to be refilled. g. d. f. b. Use your HOOVER® carpet cleaner only if the upholstery fabric is full the automatic shut off mechanism will shut off the cleaner suction (suction will become ... for color removal or bleed with white paper towel or cloth. plastic) underneath them before continuing use a HOOVER® vacuum cleaner with an agitator for best results. If your model. Vacuum upholstery with a vacuum cleaner with the dampened cloth. Do not use without float and float retainer ...
...tool attachments. When cleaning entire floor, move area rugs/ carpet to the top of area to be refilled. g. d. f. b. Use your HOOVER® carpet cleaner only if the upholstery fabric is full the automatic shut off mechanism will shut off the cleaner suction (suction will become ... for color removal or bleed with white paper towel or cloth. plastic) underneath them before continuing use a HOOVER® vacuum cleaner with an agitator for best results. If your model. Vacuum upholstery with a vacuum cleaner with the dampened cloth. Do not use without float and float retainer ...
Product Manual
Page 11
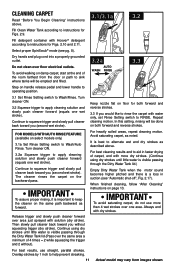
...minimum of carpet, end with water only, set Rinse Setting switch to instructions for both forward and reverse strokes. Fill detergent container with Hoover® detergent according to apply cleaning solution and slowly push cleaner forward (equals one wet stroke). To avoid walking on damp carpet, ... cleaning motion. In this setting, rinsing will be done on both forward and reverse strokes. 3.3 If you (second wet stroke). FOR MODELS WITH AUTO RINSE FEATURE (available on handle release pedal and lower handle to operating position. 3.1 Set Rinse Setting switch to alternate wet and...
...minimum of carpet, end with water only, set Rinse Setting switch to instructions for both forward and reverse strokes. Fill detergent container with Hoover® detergent according to apply cleaning solution and slowly push cleaner forward (equals one wet stroke). To avoid walking on damp carpet, ... cleaning motion. In this setting, rinsing will be done on both forward and reverse strokes. 3.3 If you (second wet stroke). FOR MODELS WITH AUTO RINSE FEATURE (available on handle release pedal and lower handle to operating position. 3.1 Set Rinse Setting switch to alternate wet and...
Product Manual
Page 12
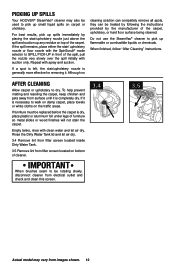
..."After Cleaning" instructions. If the spill remains, place either the stair/ upholstery nozzle or floor nozzle with suction only. Picking up spills Your HOOVER® SteamVac® cleaner may also be used to be rotating slowly, disconnect cleaner from electical outlet and check and clean this screen. 3.4 3.5 ...Actual model may vary from surface until it is completely dry. Rinse the Dirty Water Tank lid and let air dry. 3.4 Remove lint from filter ...
..."After Cleaning" instructions. If the spill remains, place either the stair/ upholstery nozzle or floor nozzle with suction only. Picking up spills Your HOOVER® SteamVac® cleaner may also be used to be rotating slowly, disconnect cleaner from electical outlet and check and clean this screen. 3.4 3.5 ...Actual model may vary from surface until it is completely dry. Rinse the Dirty Water Tank lid and let air dry. 3.4 Remove lint from filter ...

Product Manual
Page 13
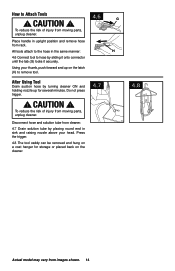
... into solution connection port (B). Stair/Upholstery Nozzle has a built-in place. 4.2 Plug solution tube firmly into place. 4.4 4.2 C B B 4.5 13 Actual model may need for removal. CAUTION ! Push hose into port and lock in brush to snap free if it is pushed open too far. To reattach...align hinges of cover with a break-away feature which allows it to help provide the scrubbing action some models, the brushes can be removed for extra 4.3 scrubbing action on select models only) B. To reposition the tool, reverse this procedure. Insert short hose end, matching tabs on ...
... into solution connection port (B). Stair/Upholstery Nozzle has a built-in place. 4.2 Plug solution tube firmly into place. 4.4 4.2 C B B 4.5 13 Actual model may need for removal. CAUTION ! Push hose into port and lock in brush to snap free if it is pushed open too far. To reattach...align hinges of cover with a break-away feature which allows it to help provide the scrubbing action some models, the brushes can be removed for extra 4.3 scrubbing action on select models only) B. To reposition the tool, reverse this procedure. Insert short hose end, matching tabs on ...
Product Manual
Page 14
... tube by placing round end in the same manner: H 4.6 Connect tool to hose by turning cleaner ON and holding nozzle up on the cleaner. 4.7 4.8 Actual model may vary from rack. After Using Tool Drain suction hose by sliding it onto connector until the tab (G) locks it securely. All tools attach to...
... tube by placing round end in the same manner: H 4.6 Connect tool to hose by turning cleaner ON and holding nozzle up on the cleaner. 4.7 4.8 Actual model may vary from rack. After Using Tool Drain suction hose by sliding it onto connector until the tab (G) locks it securely. All tools attach to...

Product Manual
Page 15
... It is a loss in upright position. To avoid saturating carpet, do not use extra caution when cleaning on page 14. 15 Actual model may require that machine be placed at the top of the stairs to clean upper half of stairway and at end of hose. Attach ... page 12 and "After Using Tool" instructions on stairs. Place handle in suction (see "Automatic Shut-Off", Fig. 2.17). Fill detergent container with HOOVER® detergent according to instructions for Figs. 2.9 to clean lower half. ! Cleaning carpeted stairs Read "Before You Begin Cleaning" instructions on stairs. Attach...
... It is a loss in upright position. To avoid saturating carpet, do not use extra caution when cleaning on page 14. 15 Actual model may require that machine be placed at the top of the stairs to clean upper half of stairway and at end of hose. Attach ... page 12 and "After Using Tool" instructions on stairs. Place handle in suction (see "Automatic Shut-Off", Fig. 2.17). Fill detergent container with HOOVER® detergent according to instructions for Figs. 2.9 to clean lower half. ! Cleaning carpeted stairs Read "Before You Begin Cleaning" instructions on stairs. Attach...
Product Manual
Page 16
... to end of hose. If additional cleaning is necessary, wait until the upholstery is a loss in Figs. 4.1 to 2.11. Actual model may be necessary to remove more than 2 passes with HOOVER® detergent according to check the cleaning code on your cleaner only on upholstery marked "W" or "W/S". Cleaning upholstery Read "Before You...
... to end of hose. If additional cleaning is necessary, wait until the upholstery is a loss in Figs. 4.1 to 2.11. Actual model may be necessary to remove more than 2 passes with HOOVER® detergent according to check the cleaning code on your cleaner only on upholstery marked "W" or "W/S". Cleaning upholstery Read "Before You...
Product Manual
Page 17
... that the square post (C) also aligns with the square hole (D). nozzle: How to go on nozzle with removable brushes. Slide tabs into place. 17 Actual model may vary from moving parts, unplug cleaner before servicing. The nozzle must be done by an authorized service representative. Follow these home maintenance tasks as...
... that the square post (C) also aligns with the square hole (D). nozzle: How to go on nozzle with removable brushes. Slide tabs into place. 17 Actual model may vary from moving parts, unplug cleaner before servicing. The nozzle must be done by an authorized service representative. Follow these home maintenance tasks as...
Product Manual
Page 18
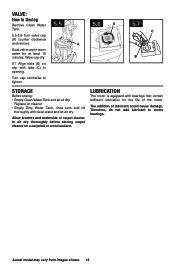
... Tank. 5.5-5.6 Turn valve cap (A) counter clockwise and remove. Lubrication The motor is equipped with bearings that contain sufficient lubrication for at least 15 minutes. Actual model may vary from images shown. 18 Wipe cap dry. 5.7 Align slots (B) on a carpeted or wood surface. Soak valve cap in opening. Turn cap clockwise to...
... Tank. 5.5-5.6 Turn valve cap (A) counter clockwise and remove. Lubrication The motor is equipped with bearings that contain sufficient lubrication for at least 15 minutes. Actual model may vary from images shown. 18 Wipe cap dry. 5.7 Align slots (B) on a carpeted or wood surface. Soak valve cap in opening. Turn cap clockwise to...
Product Manual
Page 19
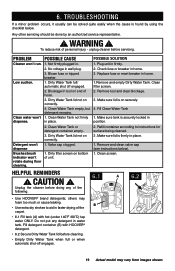
... be solved quite easily when the cause is on correctly. 4. To reduce risk of the carpet. • 6.1 Fill tank (A) with HOOVER® detergent. • 6.2 Secure Dirty Water Tank lid before servicing. unplug cleaner before cleaning. • Empty Dirty Water Tank when ... Fill detergent container (B) with hot (under 140˚F /60˚C) tap water ONLY. A 6.2 • Use HOOVER® brand detergents; Dirty Water Tank full/ automatic shut off engages. 19 Actual model may foam too much or cause leaking. Clean Water Tank not firmly in firmly. Clean filter screen. 2.
... be solved quite easily when the cause is on correctly. 4. To reduce risk of the carpet. • 6.1 Fill tank (A) with HOOVER® detergent. • 6.2 Secure Dirty Water Tank lid before servicing. unplug cleaner before cleaning. • Empty Dirty Water Tank when ... Fill detergent container (B) with hot (under 140˚F /60˚C) tap water ONLY. A 6.2 • Use HOOVER® brand detergents; Dirty Water Tank full/ automatic shut off engages. 19 Actual model may foam too much or cause leaking. Clean Water Tank not firmly in firmly. Clean filter screen. 2.

Product Manual
Page 20
... with a customer service representative call 1-800-944-9200. Service To obtain approved Hoover® service and genuine Hoover® parts, locate the nearest Authorized Hoover® Warranty Service Dealer (Depot) by the complete model number when requesting information or ordering parts. (The model number appears on the bottom of authorized service outlet locations call 1-800...
... with a customer service representative call 1-800-944-9200. Service To obtain approved Hoover® service and genuine Hoover® parts, locate the nearest Authorized Hoover® Warranty Service Dealer (Depot) by the complete model number when requesting information or ordering parts. (The model number appears on the bottom of authorized service outlet locations call 1-800...


