
Manual
Page 2
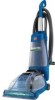
.... Verification of date of purchase may be required for warranty service of Hoover® authorized dealer locations (U.S. Manufacturing code (Label located under cleaner) Contents Important Safeguards 3 Assembling Cleaner 5 Carton contents 5 How To Use...7 Cleaner Description 7 Preparing the Carpet 8 Remove and Replace Clean Water Solution Tank 8 Carpet Cleaning 9 Above Floor Cleaning/Attachments 9 Dirty Water Tank 10 Maintenance...11...
.... Verification of date of purchase may be required for warranty service of Hoover® authorized dealer locations (U.S. Manufacturing code (Label located under cleaner) Contents Important Safeguards 3 Assembling Cleaner 5 Carton contents 5 How To Use...7 Cleaner Description 7 Preparing the Carpet 8 Remove and Replace Clean Water Solution Tank 8 Carpet Cleaning 9 Above Floor Cleaning/Attachments 9 Dirty Water Tank 10 Maintenance...11...
Manual
Page 7
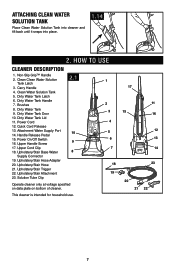
... intended for household use. 1 2 3 4 5 6 7 18 19 17 11 15 16 12 13 14 23 20 21 22 7 HOW TO USE Cleaner Description 1. Dirty Water Tank Door 10. Brushes 8. Upholstery/Stair Trigger 22. Upholstery/Stair Attachment 23. Upholstery/Stair Hose 21. Dirty Water Tank Latch 6. Power Cord 12. ...
... intended for household use. 1 2 3 4 5 6 7 18 19 17 11 15 16 12 13 14 23 20 21 22 7 HOW TO USE Cleaner Description 1. Dirty Water Tank Door 10. Brushes 8. Upholstery/Stair Trigger 22. Upholstery/Stair Attachment 23. Upholstery/Stair Hose 21. Dirty Water Tank Latch 6. Power Cord 12. ...