Manual
Page 3
.... • For use of an extension cord is not recommended. Keep cord away from heated surfaces. • Always disconnect cord from openings and moving parts. • Do not pick up anything that may damage the machine. • Do not put any other toxic material with this appliance. •... in areas where they may be present. • Avoid picking up chlorine bleach, drain cleaner, gasoline or any object into openings. Turn off all parts of children's reach. • Do not pick up hard, sharp objects with the cleaner. If an extension cord is absolutely necessary, use cord as...
.... • For use of an extension cord is not recommended. Keep cord away from heated surfaces. • Always disconnect cord from openings and moving parts. • Do not pick up anything that may damage the machine. • Do not put any other toxic material with this appliance. •... in areas where they may be present. • Avoid picking up chlorine bleach, drain cleaner, gasoline or any object into openings. Turn off all parts of children's reach. • Do not pick up hard, sharp objects with the cleaner. If an extension cord is absolutely necessary, use cord as...
Manual
Page 5
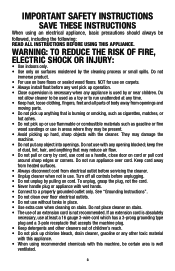
... to the upright position until post fits easily into hole. 1.5 Press brush assembly firmly to lock in upright 1.4 B position. Push upper handle (C) all parts from squeegee area on underside of nozzle with opening (E) on upper handle (C) with hole (B) on the floor. Make sure all... parts are out. Nozzle E. Turn brushes slightly until a snap is felt. 1.3 Align control rod (B) on cleaner. Align middle section (D) of nozzle. 1.6 DE C 1.7 While ...
... to the upright position until post fits easily into hole. 1.5 Press brush assembly firmly to lock in upright 1.4 B position. Push upper handle (C) all parts from squeegee area on underside of nozzle with opening (E) on upper handle (C) with hole (B) on the floor. Make sure all... parts are out. Nozzle E. Turn brushes slightly until a snap is felt. 1.3 Align control rod (B) on cleaner. Align middle section (D) of nozzle. 1.6 DE C 1.7 While ...
Manual
Page 11
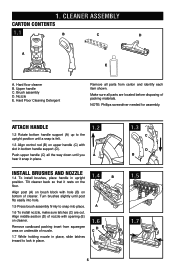
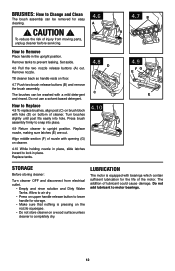
... to pick up detergents that contain solvent based ingredients. 4. Remove debris from squeegee (C) and wipe with removable brushes for easier assembly of injury from moving parts, unplug cleaner before servicing. 4.1 Slide the two nozzle release latches (A) outward. 4.2 Remove nozzle (B) by an authorized service representative. Cleaner should be done by pulling straight...
... to pick up detergents that contain solvent based ingredients. 4. Remove debris from squeegee (C) and wipe with removable brushes for easier assembly of injury from moving parts, unplug cleaner before servicing. 4.1 Slide the two nozzle release latches (A) outward. 4.2 Remove nozzle (B) by an authorized service representative. Cleaner should be done by pulling straight...
Manual
Page 12
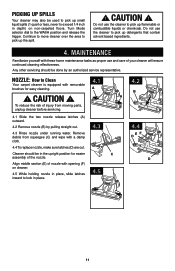
... the motor. CAUTION ! Replace nozzle, making sure latches (E) are out. Replace tanks. 4.8 D C 4.10 4.7 B A 4.9 FG E E StorAGE Before storing cleaner: Turn cleaner OFF and disconnect from moving parts, unplug cleaner before servicing. Lubrication The motor is pressing on the nozzle squeegee. • Do not store cleaner on bottom of cleaner.
... the motor. CAUTION ! Replace nozzle, making sure latches (E) are out. Replace tanks. 4.8 D C 4.10 4.7 B A 4.9 FG E E StorAGE Before storing cleaner: Turn cleaner OFF and disconnect from moving parts, unplug cleaner before servicing. Lubrication The motor is pressing on the nozzle squeegee. • Do not store cleaner on bottom of cleaner.
Manual
Page 14
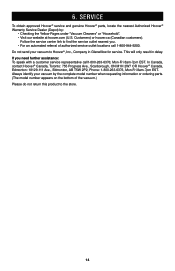
...the Yellow Pages under "Vacuum Cleaners" or "Household". • Visit our website at hoover.com (U.S. Service To obtain approved Hoover® service and genuine Hoover® parts, locate the nearest Authorized Hoover® Warranty Service Dealer (Depot) by the complete model number when requesting information or... ordering parts. (The model number appears on the bottom of authorized service outlet locations call 1-800-944-9200. In Canada, contact Hoover® Canada, Toronto: 755 Progress Ave., Scarborough, ON M1H 2W7 OR Hoover® Canada, Edmonton: 18129...
...the Yellow Pages under "Vacuum Cleaners" or "Household". • Visit our website at hoover.com (U.S. Service To obtain approved Hoover® service and genuine Hoover® parts, locate the nearest Authorized Hoover® Warranty Service Dealer (Depot) by the complete model number when requesting information or... ordering parts. (The model number appears on the bottom of authorized service outlet locations call 1-800-944-9200. In Canada, contact Hoover® Canada, Toronto: 755 Progress Ave., Scarborough, ON M1H 2W7 OR Hoover® Canada, Edmonton: 18129...

Manual
Page 15
P 3 When cleaning a hard surface, the optional Hoover® hard surface attachment below must be used : 6 Brush Hoover® part # 36419008 5 Brush Hoover® part # 48417007. For optimal performance use with the appliance as noted below. ® Hoover Cleaning Product Guide Hoover Hoover Platinum Platinum Collection® Collection® Deep Professional Pet Plus Product Name Cleansing Premium Pet Oxy Anti...
P 3 When cleaning a hard surface, the optional Hoover® hard surface attachment below must be used : 6 Brush Hoover® part # 36419008 5 Brush Hoover® part # 48417007. For optimal performance use with the appliance as noted below. ® Hoover Cleaning Product Guide Hoover Hoover Platinum Platinum Collection® Collection® Deep Professional Pet Plus Product Name Cleansing Premium Pet Oxy Anti...
Manual
Page 16
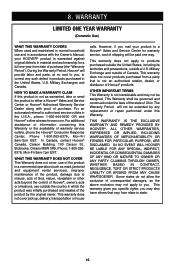
...-Fri 8am-7pm EST. The Warranty Period will provide labor and parts, at www.hoover.com. However, if you specific rights; 8. During the Warranty Period, Hoover® will not be governed and construed under this Warranty. This warranty gives you mail your HOOVER® product is not an authorized retailer, dealer, or distributor of...
...-Fri 8am-7pm EST. The Warranty Period will provide labor and parts, at www.hoover.com. However, if you specific rights; 8. During the Warranty Period, Hoover® will not be governed and construed under this Warranty. This warranty gives you mail your HOOVER® product is not an authorized retailer, dealer, or distributor of...


