Manual
Page 2
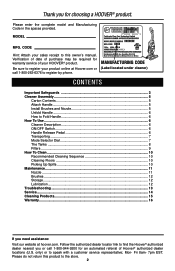
Be sure to register your product online at hoover.com. Manufacturing code (Label located under cleaner) Contents Important Safeguards 3 Cleaner Assembly...5 Carton Contents 5 Attach Handle...5 Install Brushes and Nozzle 5 Unfold Handle...6 How to Fold Handle 6 How To Use...6 Cleaner Description 6 ON/OFF Switch......9 How To Clean...10 Recommended Cleaning Sequence 10 Cleaning Floors 10 Picking Up Spills 10 Maintenance...11 Nozzle...11 Brushes...12 Storage...12 Lubrication...12 Troubleshooting...13 Service...14 Cleaning Products...15 Warranty...16 If you for an automated referral...
Be sure to register your product online at hoover.com. Manufacturing code (Label located under cleaner) Contents Important Safeguards 3 Cleaner Assembly...5 Carton Contents 5 Attach Handle...5 Install Brushes and Nozzle 5 Unfold Handle...6 How to Fold Handle 6 How To Use...6 Cleaner Description 6 ON/OFF Switch......9 How To Clean...10 Recommended Cleaning Sequence 10 Cleaning Floors 10 Picking Up Spills 10 Maintenance...11 Nozzle...11 Brushes...12 Storage...12 Lubrication...12 Troubleshooting...13 Service...14 Cleaning Products...15 Warranty...16 If you for an automated referral...
Manual
Page 5
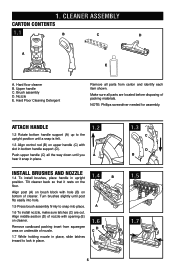
... assembly. Tilt cleaner back so that it snap in place. 1.2 A Install brushes and nozzle 1.4 To install brushes, place handle in upright 1.4 B position. Align middle section (D) of nozzle with hole (B) on bottom of cleaner. Brush assembly D. Hard Floor Cleaning Detergent Remove all parts from squeegee area on upper handle...in bottom handle support (D). Nozzle E. Hard floor cleaner B. Push upper handle (C) all parts are out. Align post (A) on brush block with opening (E) on the floor. Attach handle 1.2 Rotate bottom handle support (A) up to snap into place. Turn...
... assembly. Tilt cleaner back so that it snap in place. 1.2 A Install brushes and nozzle 1.4 To install brushes, place handle in upright 1.4 B position. Align middle section (D) of nozzle with hole (B) on bottom of cleaner. Brush assembly D. Hard Floor Cleaning Detergent Remove all parts from squeegee area on upper handle...in bottom handle support (D). Nozzle E. Hard floor cleaner B. Push upper handle (C) all parts are out. Align post (A) on brush block with opening (E) on the floor. Attach handle 1.2 Rotate bottom handle support (A) up to snap into place. Turn...
Manual
Page 6
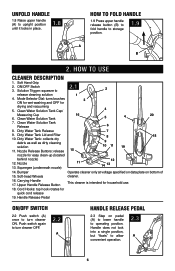
... solution 11. Squeegee (underneath nozzle) 12 14 13 14. Upper Handle Release Button This cleaner is intended for drying and vacuuming 5. Mode Selector Dial: turns brushes 3 ON for wet washing and OFF for household use. 18. Clean Water Solution Tank 5 4 20 7. Clean Water Solution Tank Release 6 8. Nozzle Release Buttons: release 15...
... solution 11. Squeegee (underneath nozzle) 12 14 13 14. Upper Handle Release Button This cleaner is intended for drying and vacuuming 5. Mode Selector Dial: turns brushes 3 ON for wet washing and OFF for household use. 18. Clean Water Solution Tank 5 4 20 7. Clean Water Solution Tank Release 6 8. Nozzle Release Buttons: release 15...
Manual
Page 7
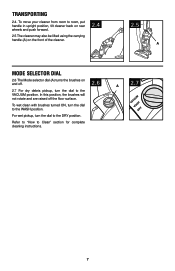
... the DRY position. For wet pickup, turn the dial to Clean" section for complete cleaning instructions. 2.6 2.7 A VACUWUAMSDHRY 7 In this position, the brushes will not rotate and are raised off . 2.7 For dry debris pickup, turn the dial to room, put handle in upright position, tilt cleaner back ... (A) on the front of the cleaner. 2.4 2.5 A Mode selector dial 2.6 The Mode selector dial (A) turns the brushes on and off the floor surface. To wet clean with brushes turned ON, turn the dial to the VACUUM position. To move your cleaner from room to the WASH position. Transporting ...
... the DRY position. For wet pickup, turn the dial to Clean" section for complete cleaning instructions. 2.6 2.7 A VACUWUAMSDHRY 7 In this position, the brushes will not rotate and are raised off . 2.7 For dry debris pickup, turn the dial to room, put handle in upright position, tilt cleaner back ... (A) on the front of the cleaner. 2.4 2.5 A Mode selector dial 2.6 The Mode selector dial (A) turns the brushes on and off the floor surface. To wet clean with brushes turned ON, turn the dial to the VACUUM position. To move your cleaner from room to the WASH position. Transporting ...

Manual
Page 9
It may also be cleaned by tapping the filter or gently brushing using your hand. Empty tank. 2.15 G filters The tank lid contains a washable, reusable filter. Remove loose debris from overflowing. Allow filter to prevent the tank ...
It may also be cleaned by tapping the filter or gently brushing using your hand. Empty tank. 2.15 G filters The tank lid contains a washable, reusable filter. Remove loose debris from overflowing. Allow filter to prevent the tank ...
Manual
Page 10
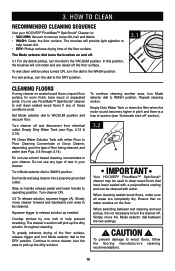
...DRY position. 3.1 VACUWUAMSDHRY Cleaning floors If using cleaner on handle release pedal and lower handle to WASH position. The Mode selector dial turns the brushes on the floor. Turn cleaner off . Continue to move cleaner forward and backward over the area to help loosen dirt. • DRY: ... will not rotate and are completely dry. When cleaning sealed wood floors, make sure all areas are raised off " section). 3.2 A IMPORTANT Your HOOVER® FloorMate™ SpinScrub® cleaner may be used to wet clean sealed wood floors if any type of wax in pitch and there is...
...DRY position. 3.1 VACUWUAMSDHRY Cleaning floors If using cleaner on handle release pedal and lower handle to WASH position. The Mode selector dial turns the brushes on the floor. Turn cleaner off . Continue to move cleaner forward and backward over the area to help loosen dirt. • DRY: ... will not rotate and are completely dry. When cleaning sealed wood floors, make sure all areas are raised off " section). 3.2 A IMPORTANT Your HOOVER® FloorMate™ SpinScrub® cleaner may be used to wet clean sealed wood floors if any type of wax in pitch and there is...
Manual
Page 11
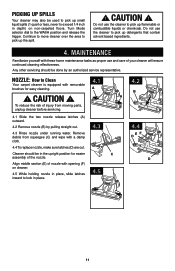
... use the cleaner to pick up detergents that contain solvent based ingredients. 4. Turn Mode selector dial to Clean Your carpet cleaner is equipped with removable brushes for easier assembly of nozzle with a damp cloth. 4.4 To replace nozzle, make sure latches (D) are out. Continue to move cleaner over the area to pick...
... use the cleaner to pick up detergents that contain solvent based ingredients. 4. Turn Mode selector dial to Clean Your carpet cleaner is equipped with removable brushes for easier assembly of nozzle with a damp cloth. 4.4 To replace nozzle, make sure latches (D) are out. Continue to move cleaner over the area to pick...
Manual
Page 12
... Tilt cleaner back so handle rests on bottom of nozzle with hole (D) on floor. 4.7 Push two brush release buttons (B) and remove the brush assembly. How to Replace 4.8 To replace brushes, align post (C) on brush block with opening (G) on a wood surface unless cleaner is pressing on the nozzle squeegee. •... Do not store cleaner on cleaner. 4.10 While holding nozzle in place, slide latches inward to snap into hole. Press brush assembly firmly to lock in the upright position. Allow to air dry. • Press on upper handle release button to Remove Place handle...
... Tilt cleaner back so handle rests on bottom of nozzle with hole (D) on floor. 4.7 Push two brush release buttons (B) and remove the brush assembly. How to Replace 4.8 To replace brushes, align post (C) on brush block with opening (G) on a wood surface unless cleaner is pressing on the nozzle squeegee. •... Do not store cleaner on cleaner. 4.10 While holding nozzle in place, slide latches inward to snap into hole. Press brush assembly firmly to lock in the upright position. Allow to air dry. • Press on upper handle release button to Remove Place handle...
Manual
Page 13
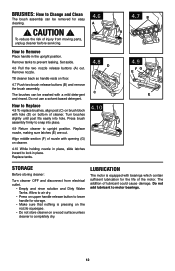
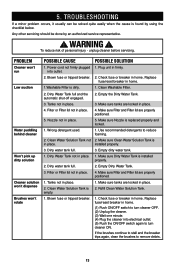
... water tank full. 3. Clean Water Solution Tank is found by an authorized service representative. ! If the brushes continue to stall and the breaker trips again, clean the brushes to reduce foaming. 2. TROUBLESHOOTING If a minor problem occurs, it usually can be done by using the ...checklist below. unplug cleaner before servicing. Clean Water Solution Tank not 2. Empty dirty water tank. Cleaner solution won't dispense Brushes won 't run 1. Blown fuse or tripped breaker. 1. Check fuse or breaker in place. 2. Any other servicing should be solved ...
... water tank full. 3. Clean Water Solution Tank is found by an authorized service representative. ! If the brushes continue to stall and the breaker trips again, clean the brushes to reduce foaming. 2. TROUBLESHOOTING If a minor problem occurs, it usually can be done by using the ...checklist below. unplug cleaner before servicing. Clean Water Solution Tank not 2. Empty dirty water tank. Cleaner solution won't dispense Brushes won 't run 1. Blown fuse or tripped breaker. 1. Check fuse or breaker in place. 2. Any other servicing should be solved ...

Manual
Page 15
...; hard surface attachment below must be used : 6 Brush Hoover® part # 36419008 5 Brush Hoover® part # 48417007. ClLeEaAnNiInNG pPrRoOdDuUCtTsS WARNING: To reduce the risk of fire and electric shock due to internal component damage, use only Hoover® cleaning products and Hoover® hard surface attachments intended for use Hoover® brand detergents, wipes, and spot cleaners...
...; hard surface attachment below must be used : 6 Brush Hoover® part # 36419008 5 Brush Hoover® part # 48417007. ClLeEaAnNiInNG pPrRoOdDuUCtTsS WARNING: To reduce the risk of fire and electric shock due to internal component damage, use only Hoover® cleaning products and Hoover® hard surface attachments intended for use Hoover® brand detergents, wipes, and spot cleaners...


