
Manual
Page 5
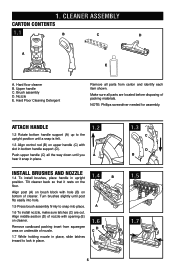
...(B) on upper handle (C) with hole (B) on cleaner. Turn brushes slightly until you hear it rests on brush block with slot in upright 1.4 B position. Nozzle E. Tilt cleaner back so ...that it snap in place. 1.2 A Install brushes and nozzle 1.4 To install brushes, place handle in bottom handle support (D). Align post (A) on the floor. Upper handle C. Remove cardboard packing insert from carton and identify each item shown. NOTE: Phillips screwdriver needed for assembly...
...(B) on upper handle (C) with hole (B) on cleaner. Turn brushes slightly until you hear it rests on brush block with slot in upright 1.4 B position. Nozzle E. Tilt cleaner back so ...that it snap in place. 1.2 A Install brushes and nozzle 1.4 To install brushes, place handle in bottom handle support (D). Align post (A) on the floor. Upper handle C. Remove cardboard packing insert from carton and identify each item shown. NOTE: Phillips screwdriver needed for assembly...
Manual
Page 12
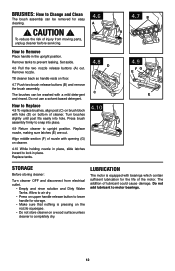
... and Dirty Water Tanks. Press brush assembly firmly to lock in place, slide latches inward to snap into hole. Replace tanks. 4.8 D C 4.10 4.7 B A 4.9 FG E E StorAGE Before storing cleaner: Turn cleaner OFF and disconnect from moving parts, unplug cleaner before servicing. How to Replace 4.8 To replace brushes, align post (C) on brush block with opening (G) on cleaner. 4.10...
... and Dirty Water Tanks. Press brush assembly firmly to lock in place, slide latches inward to snap into hole. Replace tanks. 4.8 D C 4.10 4.7 B A 4.9 FG E E StorAGE Before storing cleaner: Turn cleaner OFF and disconnect from moving parts, unplug cleaner before servicing. How to Replace 4.8 To replace brushes, align post (C) on brush block with opening (G) on cleaner. 4.10...


