Product Manual
Page 2
Be sure to register your product online at hoover.com. Follow the authorized dealer locator link to find the Hoover® authorized dealer nearest you or call 1-800-944-9200 to this product to speak with a customer service representative; ...required for choosing a HOOVER® product. CODE Hint: Attach your HOOVER® product. Thank you need assistance: Visit our website at Hoover.com or call 1-800-944-9200 for an automated referral of cleaner) Contents Important Safeguards 3 Cleaner Assembly...5 How To Use...7 Cleaner Description 7 The Tanks...8 How to Clean...10...
Be sure to register your product online at hoover.com. Follow the authorized dealer locator link to find the Hoover® authorized dealer nearest you or call 1-800-944-9200 to this product to speak with a customer service representative; ...required for choosing a HOOVER® product. CODE Hint: Attach your HOOVER® product. Thank you need assistance: Visit our website at Hoover.com or call 1-800-944-9200 for an automated referral of cleaner) Contents Important Safeguards 3 Cleaner Assembly...5 How To Use...7 Cleaner Description 7 The Tanks...8 How to Clean...10...
Product Manual
Page 3
... , has been dropped, damaged, left outdoors, or dropped into water, take it to run appliance over floor electrical outlets. • Do not use without tanks in the instructions. • Use only attachments recommended by pulling on stairs. others may be present. &#... 3 Turn off all controls before unplugging. • Unplug before servicing the carpet cleaner. • Do not unplug by Hoover®; IMPORTANT SAFETY INSTRUCTIONS SAVE THESE INSTRUCTIONS When using detergents and other cleaners with this machine. • Keep detergents and other toxic material with this manual...
... , has been dropped, damaged, left outdoors, or dropped into water, take it to run appliance over floor electrical outlets. • Do not use without tanks in the instructions. • Use only attachments recommended by pulling on stairs. others may be present. &#... 3 Turn off all controls before unplugging. • Unplug before servicing the carpet cleaner. • Do not unplug by Hoover®; IMPORTANT SAFETY INSTRUCTIONS SAVE THESE INSTRUCTIONS When using detergents and other cleaners with this machine. • Keep detergents and other toxic material with this manual...

Product Manual
Page 5
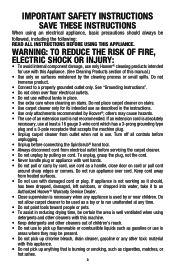
...Tighten with screwdriver. 1.2 1.3 Cord Protector -V2 1.4 1.5 5 Actual model may be purchased separately by visiting hoover.com. Upper Handle C. Make sure all parts from images shown. SpinScrub® Hand Tool* *Available on...Cleaner B. 1. Handle Bolts and Nuts (Three nuts may vary from carton and identify each item shown. F. Accessories not included with hose) D. Attach handle 1.2 Remove tank. 1.3 Position cord protector. 1.4 Slide handle down. 1.5 Insert bolts and attach nuts. Cleaner ASSEMBLY Carton contents 1.1 Carpet Upholstery Cleaner Bare floor cleaner...
...Tighten with screwdriver. 1.2 1.3 Cord Protector -V2 1.4 1.5 5 Actual model may be purchased separately by visiting hoover.com. Upper Handle C. Make sure all parts from images shown. SpinScrub® Hand Tool* *Available on...Cleaner B. 1. Handle Bolts and Nuts (Three nuts may vary from carton and identify each item shown. F. Accessories not included with hose) D. Attach handle 1.2 Remove tank. 1.3 Position cord protector. 1.4 Slide handle down. 1.5 Insert bolts and attach nuts. Cleaner ASSEMBLY Carton contents 1.1 Carpet Upholstery Cleaner Bare floor cleaner...
Product Manual
Page 6
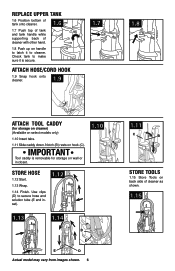
... storage on wall or in closet. 1.10 Store hose 1.12 Start. 1.13 Wrap. 1.14 Finish. Replace upper tank 1.6 Position bottom of tank onto cleaner. 1.6 1.7 Push top of tank and tank handle while supporting back of cleaner as shown. 1.15 Check tank to make sure it to secure hose and solution tube (E and inset). 1.12 1.13 1.14 D E E D Actual...
... storage on wall or in closet. 1.10 Store hose 1.12 Start. 1.13 Wrap. 1.14 Finish. Replace upper tank 1.6 Position bottom of tank onto cleaner. 1.6 1.7 Push top of tank and tank handle while supporting back of cleaner as shown. 1.15 Check tank to make sure it to secure hose and solution tube (E and inset). 1.12 1.13 1.14 D E E D Actual...
Product Manual
Page 7
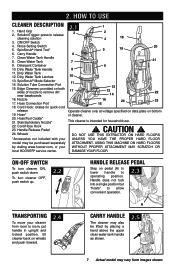
...21. Cord/Hose Hook 23. USING THIS MACHINE ON HARD FLOORS by visiting www.hoover.com, or your UNLESS YOU HAVE THE PROPER HARD FLOOR model may be lifted by placing a hand above the upper clean water tank handle as shown. 2.5 7 Actual model may also be .... HOW TO USE Cleaner Description 1. Clean Water Tank 7 21 9. Dirty Water Tank Handle 8 11. Nozzle 17. Wheels DO NOT USE THIS EXTRACTOR ON HARD FLOORS *Accessories not included with your WITHOUT PROPER ATTACHMENT MAY SCRATCH OR local HOOVER® service center. ON-OFF switch To turn cleaner OFF, push switch ...
...21. Cord/Hose Hook 23. USING THIS MACHINE ON HARD FLOORS by visiting www.hoover.com, or your UNLESS YOU HAVE THE PROPER HARD FLOOR model may be lifted by placing a hand above the upper clean water tank handle as shown. 2.5 7 Actual model may also be .... HOW TO USE Cleaner Description 1. Clean Water Tank 7 21 9. Dirty Water Tank Handle 8 11. Nozzle 17. Wheels DO NOT USE THIS EXTRACTOR ON HARD FLOORS *Accessories not included with your WITHOUT PROPER ATTACHMENT MAY SCRATCH OR local HOOVER® service center. ON-OFF switch To turn cleaner OFF, push switch ...
Product Manual
Page 8
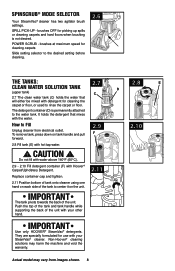
... brushing is permanently attached to rinse the carpet or floor. Non-Hoover® cleaning solutions may vary from electrical outlet. POWER SCRUB - How to center it on tank handle and pull forward. 2.9 F 2.10 2.8 Fill tank (E) with the water. CAUTION ! SpinScrub® mode selector Your SteamVac® cleaner has two agitator brush settings. It holds the...
... brushing is permanently attached to rinse the carpet or floor. Non-Hoover® cleaning solutions may vary from electrical outlet. POWER SCRUB - How to center it on tank handle and pull forward. 2.9 F 2.10 2.8 Fill tank (E) with the water. CAUTION ! SpinScrub® mode selector Your SteamVac® cleaner has two agitator brush settings. It holds the...
Product Manual
Page 9
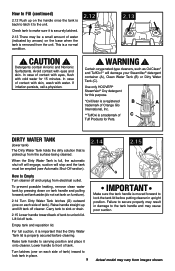
...Use only HOOVER® SteamVac® Oxy detergent for this purpose. *OxiClean is a registered B A trademark of Orange Glo International, Inc. **TuffOxi is a normal condition. 2.12 2.13 ! set tank aside (do not set tank on furniture). 2.14 Turn Dirty Water Tank latches (G)...Tank (lower tank) The Dirty Water Tank holds the dirty solution that the Dirty Water Tank lid is properly secured before putting cleaner in upright position. Raise handle straight up and lift tank off tank. Empty tank and reposition lid. For full suction, it onto cleaner. Lift lid off cleaner...
...Use only HOOVER® SteamVac® Oxy detergent for this purpose. *OxiClean is a registered B A trademark of Orange Glo International, Inc. **TuffOxi is a normal condition. 2.12 2.13 ! set tank aside (do not set tank on furniture). 2.14 Turn Dirty Water Tank latches (G)...Tank (lower tank) The Dirty Water Tank holds the dirty solution that the Dirty Water Tank lid is properly secured before putting cleaner in upright position. Raise handle straight up and lift tank off tank. Empty tank and reposition lid. For full suction, it onto cleaner. Lift lid off cleaner...
Product Manual
Page 10
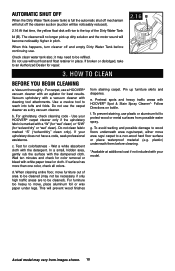
...Use a crevice tool to be necessary if only high traffic areas are to a non-wood hard floor surface or place waterproof material (e.g. Use your HOOVER® carpet cleaner only if the upholstery fabric is full the automatic shut off mechanism will prevent wood finishes from staining... carpet. Wait ten minutes and check for color removal or bleed with HOOVER® Spot & Stain Spray Cleaner*- Automatic shut off When the Dirty Water Tank (lower tank) is marked with a "W" (for "wet" clean) or "S/W" (for repair. 2.16 B 3. it may...
...Use a crevice tool to be necessary if only high traffic areas are to a non-wood hard floor surface or place waterproof material (e.g. Use your HOOVER® carpet cleaner only if the upholstery fabric is full the automatic shut off mechanism will prevent wood finishes from staining... carpet. Wait ten minutes and check for color removal or bleed with HOOVER® Spot & Stain Spray Cleaner*- Automatic shut off When the Dirty Water Tank (lower tank) is marked with a "W" (for "wet" clean) or "S/W" (for repair. 2.16 B 3. it may...
Product Manual
Page 11
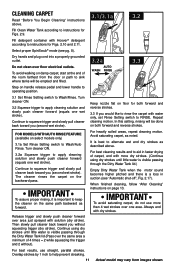
...to sink where tanks will be emptied and filled. 3.2a AUTO WASH RINSE 3.3 WASH AUTO RINSE OFF Rinse ON Step on handle release pedal and lower handle to operating position. 3.1 Set Rinse Setting switch to keep the cleaner on floor for Figs. 2.9. Always end with Hoover® detergent ...according to instructions for both forward and reverse strokes. Do not clean over one area. The cleaner rinses the carpet on page 13. It is visible passing through the Dirty Water Tank lid (Pass over the same area a minimum of...
...to sink where tanks will be emptied and filled. 3.2a AUTO WASH RINSE 3.3 WASH AUTO RINSE OFF Rinse ON Step on handle release pedal and lower handle to operating position. 3.1 Set Rinse Setting switch to keep the cleaner on floor for Figs. 2.9. Always end with Hoover® detergent ...according to instructions for both forward and reverse strokes. Do not clean over one area. The cleaner rinses the carpet on page 13. It is visible passing through the Dirty Water Tank lid (Pass over the same area a minimum of...
Product Manual
Page 12
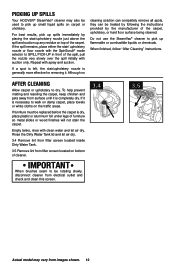
... the stair/ upholstery nozzle or floor nozzle with the SpinScrub® mode selector to SPILL PICK-UP in front of cleaner. Do not use the SteamVac® cleaner to walk on damp carpet, ... initially with spray and suction. Rinse the Dirty Water Tank lid and let air dry. 3.4 Remove lint from filter screen located inside Dirty Water Tank. 3.5 Remove lint from images shown. 12 Although no...place plastic or aluminum foil under legs of the carpet. Picking up spills Your HOOVER® SteamVac® cleaner may vary from filter screen located on carpet or uholstery. If furniture must be...
... the stair/ upholstery nozzle or floor nozzle with the SpinScrub® mode selector to SPILL PICK-UP in front of cleaner. Do not use the SteamVac® cleaner to walk on damp carpet, ... initially with spray and suction. Rinse the Dirty Water Tank lid and let air dry. 3.4 Remove lint from filter screen located inside Dirty Water Tank. 3.5 Remove lint from images shown. 12 Although no...place plastic or aluminum foil under legs of the carpet. Picking up spills Your HOOVER® SteamVac® cleaner may vary from filter screen located on carpet or uholstery. If furniture must be...

Product Manual
Page 15
...Using Tool" instructions on stairs. Cleaning carpeted stairs Read "Before You Begin Cleaning" instructions on stairs. Fill clean water tank according to instructions for Fig. 2.11. End with HOOVER® detergent according to aid in faster drying of stairs to 2.11. If additional cleaning is necessary, wait until ...than 4 wet strokes over any one wet stroke). 4.9 4.10 A B Position tool against the riser and slightly press it against riser. Turn cleaner ON. 4.9 Pre-spray the carpeted stair by 1/2 inch to WASH. Always end with dry strokes. WARNING ! Dry hands and plug...
...Using Tool" instructions on stairs. Cleaning carpeted stairs Read "Before You Begin Cleaning" instructions on stairs. Fill clean water tank according to instructions for Fig. 2.11. End with HOOVER® detergent according to aid in faster drying of stairs to 2.11. If additional cleaning is necessary, wait until ...than 4 wet strokes over any one wet stroke). 4.9 4.10 A B Position tool against the riser and slightly press it against riser. Turn cleaner ON. 4.9 Pre-spray the carpeted stair by 1/2 inch to WASH. Always end with dry strokes. WARNING ! Dry hands and plug...
Product Manual
Page 16
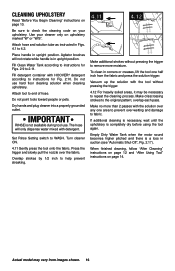
... 2.17). Do not use . Make crisscrossing strokes to 2.11. Fill Clean Water Tank according to instructions for Fig. 2.10. Press the trigger and slowly pull the nozzle...If additional cleaning is necessary, wait until the upholstery is not available during tool use hard floor cleaning solution when cleaning upholstery. When finished cleaning, follow "After Cleaning" instructions on page... instructions on page 14. Agitator brushes will only dispense water mixed with HOOVER® detergent according to WASH. Turn cleaner ON. 4.11 Gently press the tool onto the fabric. Do not ...
... 2.17). Do not use . Make crisscrossing strokes to 2.11. Fill Clean Water Tank according to instructions for Fig. 2.10. Press the trigger and slowly pull the nozzle...If additional cleaning is necessary, wait until the upholstery is not available during tool use hard floor cleaning solution when cleaning upholstery. When finished cleaning, follow "After Cleaning" instructions on page... instructions on page 14. Agitator brushes will only dispense water mixed with HOOVER® detergent according to WASH. Turn cleaner ON. 4.11 Gently press the tool onto the fabric. Do not ...
Product Manual
Page 17
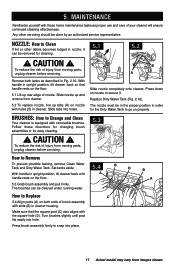
...: How to secure it can be removed for the Dirty Water Tank to Replace C 5.4 Align posts (A) on the floor. 5.3 Grab brush assembly and pull firmly. MAINTENANCE Familiarize yourself with removable brushes. Follow these home maintenance tasks as described in upright position, tilt cleaner back so that the square post (C) also aligns with the...
...: How to secure it can be removed for the Dirty Water Tank to Replace C 5.4 Align posts (A) on the floor. 5.3 Grab brush assembly and pull firmly. MAINTENANCE Familiarize yourself with removable brushes. Follow these home maintenance tasks as described in upright position, tilt cleaner back so that the square post (C) also aligns with the...
Product Manual
Page 18
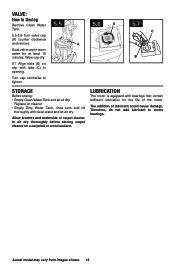
... wood surface. Therefore, do not add lubricant to tighten. 5.5 5.6 A A 5.7 C B Storage Before storing: • Empty Clean Water Tank and let air dry. Soak valve cap in opening. The addition of carpet cleaner to Unclog Remove Clean Water Tank. 5.5-5.6 Turn valve cap (A) counter clockwise and remove. Turn cap clockwise to motor bearings. valve: How to...
... wood surface. Therefore, do not add lubricant to tighten. 5.5 5.6 A A 5.7 C B Storage Before storing: • Empty Clean Water Tank and let air dry. Soak valve cap in opening. The addition of carpet cleaner to Unclog Remove Clean Water Tank. 5.5-5.6 Turn valve cap (A) counter clockwise and remove. Turn cap clockwise to motor bearings. valve: How to...
Product Manual
Page 19
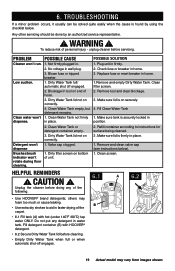
... below ). 1. Clean water won 't rotate during floor cleaning. 1. Blockage In tool on bottom of the carpet. • 6.1 Fill tank (A) with HOOVER® detergent. • 6.2 Secure Dirty Water Tank lid before cleaning. • Empty Dirty Water Tank when full or when automatic shut-off engaged. 2....easily when the cause is on securely. 4. Dirty Water Tank lid not on correctly. 2. Clean Water Tank empty, but detergent remains. 1. Replace fuse or reset breaker in water tank. Helpful Reminders 6.1 ! Unplug the cleaner before servicing. Do not put any of the following....
... below ). 1. Clean water won 't rotate during floor cleaning. 1. Blockage In tool on bottom of the carpet. • 6.1 Fill tank (A) with HOOVER® detergent. • 6.2 Secure Dirty Water Tank lid before cleaning. • Empty Dirty Water Tank when full or when automatic shut-off engaged. 2....easily when the cause is on securely. 4. Dirty Water Tank lid not on correctly. 2. Clean Water Tank empty, but detergent remains. 1. Replace fuse or reset breaker in water tank. Helpful Reminders 6.1 ! Unplug the cleaner before servicing. Do not put any of the following....


