
Manual
Page 3
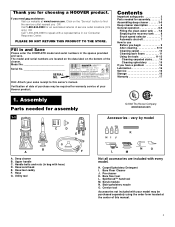
... with every model. only) OR Call 1-330-499-9499 to find the service outlet nearest you OR Call 1-800-944-9200 for choosing a HOOVER product. Contents Important safeguards 2 Parts needed for assembly 3 Assembling deep cleaner 3-5 Deep cleaner description 6 General operation 6-8 Filling the clean water tank...and serial numbers are included with your model may be purchased separately using the order form located at www.hoover.com. Upper handle C. Bare Floor Cleaner J. SpinScrub™ hand tool M. If you need any assistance: Visit our website at the center of your sales...
... with every model. only) OR Call 1-330-499-9499 to find the service outlet nearest you OR Call 1-800-944-9200 for choosing a HOOVER product. Contents Important safeguards 2 Parts needed for assembly 3 Assembling deep cleaner 3-5 Deep cleaner description 6 General operation 6-8 Filling the clean water tank...and serial numbers are included with your model may be purchased separately using the order form located at www.hoover.com. Upper handle C. Bare Floor Cleaner J. SpinScrub™ hand tool M. If you need any assistance: Visit our website at the center of your sales...

Manual
Page 4
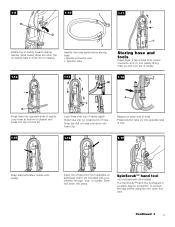
..., push upper handle down . Replace clean water tank (upper tank) by positioning bottom first. Place nuts in recessed areas on front of the handle) with SpinScrub™ hand tool is not pushed completely down onto lower handle. 1-7 Push bolts into slot in the cord protector into holes on back of cleaner...
..., push upper handle down . Replace clean water tank (upper tank) by positioning bottom first. Place nuts in recessed areas on front of the handle) with SpinScrub™ hand tool is not pushed completely down onto lower handle. 1-7 Push bolts into slot in the cord protector into holes on back of cleaner...
Manual
Page 5
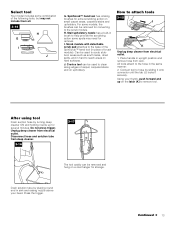
... up and over top of caddy again. Insert top of bare floor tool (available at bottom of cleaner and press into opposite side of caddy. SpinScrub™ hand tool (not included with your cleaner) through "loop" on cleaner. 1-9 H 1-10 I 1-11 G Rotate top of caddy toward end of hose. J ...Identify the hose parts before using the tool, open tool door. Loop hose at additional cost if not included with all models) The SpinScrub™ hand tool is shipped in hook (H) on caddy. Nozzle connector end J. Slide tool down so notch (G) on other end of hose. J Repeat...
... up and over top of caddy again. Insert top of bare floor tool (available at bottom of cleaner and press into opposite side of caddy. SpinScrub™ hand tool (not included with your cleaner) through "loop" on cleaner. 1-9 H 1-10 I 1-11 G Rotate top of caddy toward end of hose. J ...Identify the hose parts before using the tool, open tool door. Loop hose at additional cost if not included with all models) The SpinScrub™ hand tool is shipped in hook (H) on caddy. Nozzle connector end J. Slide tool down so notch (G) on other end of hose. J Repeat...

Manual
Page 7
...; hand tool (not included with SpinScrub™ hand tool is intended for quick cord release 18. Carrying handle 7. Recovery tank handle 11. Recovery tank latches 13. Plug deep cleaner into a single ...
...; hand tool (not included with SpinScrub™ hand tool is intended for quick cord release 18. Carrying handle 7. Recovery tank handle 11. Recovery tank latches 13. Plug deep cleaner into a single ...
Manual
Page 13
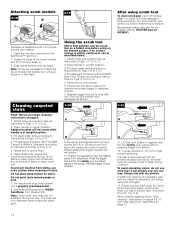
SpinScrub™ hand tool has rotating brushes for several minutes. Stair/upholstery nozzle has a built-in upright position and remove hose from deep cleaner. 3-16 3-17 ... reach areas on small carpet areas, carpeted stairs and upholstery. Do not press trigger. Drain solution tube by placing round end in place of the SpinScrub™ hand tool (in sink and raising nozzle above your thumb, push forward and up for extra scrubbing action on hard surfaces. All tools attach...
SpinScrub™ hand tool has rotating brushes for several minutes. Stair/upholstery nozzle has a built-in upright position and remove hose from deep cleaner. 3-16 3-17 ... reach areas on small carpet areas, carpeted stairs and upholstery. Do not press trigger. Drain solution tube by placing round end in place of the SpinScrub™ hand tool (in sink and raising nozzle above your thumb, push forward and up for extra scrubbing action on hard surfaces. All tools attach...
Manual
Page 14
...it in upright position. 3. Wash it into a properly grounded outlet. 8. Ask for Figs. 2-9 to 3-13. 2. Open the tool door and remove the SpinScrub™ hand tool. 2. Note: If may be necessary to end of stroke. 3-21 A B 11. Attach tool to rotate the scrub module (M) slightly...hidden area before using the tool again. 13. Grasp the sides of carpet. Do not point tools toward people or pets. 7. End with HOOVER Carpet/Upholstery Detergent according to instructions for Figs. 2-9 to dispense solution. 7. Pad must be placed at bottom of hose. 6. Agitator brushes ...
...it in upright position. 3. Wash it into a properly grounded outlet. 8. Ask for Figs. 2-9 to 3-13. 2. Open the tool door and remove the SpinScrub™ hand tool. 2. Note: If may be necessary to end of stroke. 3-21 A B 11. Attach tool to rotate the scrub module (M) slightly...hidden area before using the tool again. 13. Grasp the sides of carpet. Do not point tools toward people or pets. 7. End with HOOVER Carpet/Upholstery Detergent according to instructions for Figs. 2-9 to dispense solution. 7. Pad must be placed at bottom of hose. 6. Agitator brushes ...


