
Manual
Page 3
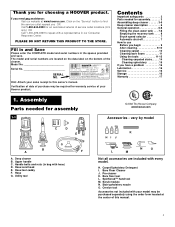
...representative in our Consumer Response Center. Hint: Attach your sales receipt to speak with hose) D. Hose/cord hook E. Carpet/Upholstery Detergent I. The model and serial numbers are included with your Hoover product. Deep cleaner B. Handle bolts and nuts (in the spaces provided and save....find the service outlet nearest you OR Call 1-800-944-9200 for warranty service of the cleaner. Hose G. Pre-cleaner K. Thank you for assembly 1-1 © 2002 The Hoover Company www.hoover.com Accessories - H. only) OR Call 1-330-499-9499 to this manual. 3 Crevice tool ...
...representative in our Consumer Response Center. Hint: Attach your sales receipt to speak with hose) D. Hose/cord hook E. Carpet/Upholstery Detergent I. The model and serial numbers are included with your Hoover product. Deep cleaner B. Handle bolts and nuts (in the spaces provided and save....find the service outlet nearest you OR Call 1-800-944-9200 for warranty service of the cleaner. Hose G. Pre-cleaner K. Thank you for assembly 1-1 © 2002 The Hoover Company www.hoover.com Accessories - H. only) OR Call 1-330-499-9499 to this manual. 3 Crevice tool ...
Manual
Page 4
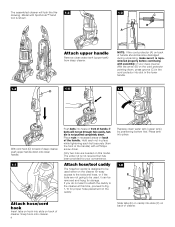
.... If you do not want to attach the caddy to the cleaner at this time, proceed to Fig. 1-10 for proper hose placement on this 1-2 drawing. Press tank into place. 1-8 E F Attach hose/cord hook Insert tabs on hook into slots (F) on back of your convenience. Snap hook onto cleaner. 4 Slide tabs (E) .... Hold each nut in the cord protector into holes on the cleaner for easy access to the tools and hose, or if the tools are needed on the caddy. Attach hose/tool caddy The hose/tool caddy is shown. 1-3 C B A Attach upper handle Remove clean water tank (upper tank) from the front ...
.... If you do not want to attach the caddy to the cleaner at this time, proceed to Fig. 1-10 for proper hose placement on this 1-2 drawing. Press tank into place. 1-8 E F Attach hose/cord hook Insert tabs on hook into slots (F) on back of your convenience. Snap hook onto cleaner. 4 Slide tabs (E) .... Hold each nut in the cord protector into holes on the cleaner for easy access to the tools and hose, or if the tools are needed on the caddy. Attach hose/tool caddy The hose/tool caddy is shown. 1-3 C B A Attach upper handle Remove clean water tank (upper tank) from the front ...

Manual
Page 5
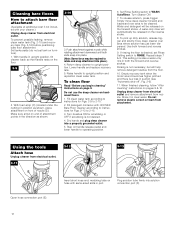
... onto caddy. Snap tab (M) on other end of hose. J Repeat on hose connector into opposite side of caddy toward end of caddy again. Solution tube I Storing hose and tools Press hose, a few inches from nozzle connector end (I . L Loop hose over top of caddy. 1-12 1-13 1-14 M K Press hose into hose clip. Continued § 5 Slide caddy down into...
... onto caddy. Snap tab (M) on other end of hose. J Repeat on hose connector into opposite side of caddy toward end of caddy again. Solution tube I Storing hose and tools Press hose, a few inches from nozzle connector end (I . L Loop hose over top of caddy. 1-12 1-13 1-14 M K Press hose into hose clip. Continued § 5 Slide caddy down into...

Manual
Page 7
...8482; hand tool is intended for quick cord release 18. Detergent container 10. Recovery tank: holds dirty solution 12. Recovery tank latches 13. Hose connection port 17. Handle release pedal This deep cleaner is shown. 1. Plug deep cleaner into a single position but "floats" to release ... 16 15 12 22 14 12 13 23 The assembled deep cleaner will look like the drawing. Cord/hose hook 23. Continued § 7 ON/OFF switch 4. Model with all models) 6. Hose/tool caddy 20. Handle does not lock into a properly grounded outlet. 2-2 2-3 2-4 WASH AUTO RINSE...
...8482; hand tool is intended for quick cord release 18. Detergent container 10. Recovery tank: holds dirty solution 12. Recovery tank latches 13. Hose connection port 17. Handle release pedal This deep cleaner is shown. 1. Plug deep cleaner into a single position but "floats" to release ... 16 15 12 22 14 12 13 23 The assembled deep cleaner will look like the drawing. Cord/hose hook 23. Continued § 7 ON/OFF switch 4. Model with all models) 6. Hose/tool caddy 20. Handle does not lock into a properly grounded outlet. 2-2 2-3 2-4 WASH AUTO RINSE...
Manual
Page 12
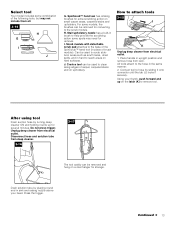
Make sure arrow on end of attachment points in the direction as shown, place attachment on hose with HOOVER Bare Floor Cleaner according to instructions for Figs. 2-9 to 2-15. 2. To clean floor Read "Before you begin cleaning" instructions on hardwood floors. 1. ...backward over area where solution has just been dispersed. This setting provides a water-only rins in suction (see "Automatic shut-off", Fig. 2-6). 11. Open hose connection port (E). 12 Set tanks aside (do not set Rinse Setting switch to RINSE. With handle in clear water. Repeat steps 7 & 8. Using the ...
Make sure arrow on end of attachment points in the direction as shown, place attachment on hose with HOOVER Bare Floor Cleaner according to instructions for Figs. 2-9 to 2-15. 2. To clean floor Read "Before you begin cleaning" instructions on hardwood floors. 1. ...backward over area where solution has just been dispersed. This setting provides a water-only rins in suction (see "Automatic shut-off", Fig. 2-6). 11. Open hose connection port (E). 12 Set tanks aside (do not set Rinse Setting switch to RINSE. With handle in clear water. Repeat steps 7 & 8. Using the ...
Manual
Page 13
SpinScrub™ hand tool has rotating brushes for extra scrubbing action on the latch (K) to remove tool. J. After using tool Drain suction hose by sliding it onto connector until the tab (J) locks it securely. Unplug deep cleaner from electrical outlet. 1. Continued § 13 Can ...to attach tools 3-15 J K Unplug deep cleaner from electrical outlet. All tools attach to the hose in hard to the scrub module. Stair/upholstery nozzle has a built-in upright position and remove hose from deep cleaner. 3-16 3-17 The tool caddy can be removed for storage. Crevice tool ...
SpinScrub™ hand tool has rotating brushes for extra scrubbing action on the latch (K) to remove tool. J. After using tool Drain suction hose by sliding it onto connector until the tab (J) locks it securely. Unplug deep cleaner from electrical outlet. 1. Continued § 13 Can ...to attach tools 3-15 J K Unplug deep cleaner from electrical outlet. All tools attach to the hose in hard to the scrub module. Stair/upholstery nozzle has a built-in upright position and remove hose from deep cleaner. 3-16 3-17 The tool caddy can be removed for storage. Crevice tool ...

Manual
Page 14
... stroke). 10. Position tool against riser. Pull tool slowly over the carpet (second wet stroke). End with detergent. Always end with HOOVER Carpet/Upholstery Detergent according to instructions for Figs 2-13 to the base. When finished cleaning, follow "After cleaning" instructions on pages .... 3. Place handle in upright position. 3. Fill detergent container with dry strokes. To prevent machine from the base (L). 3. Attach hose and solution tube as instructed in suction (see "Automatic shut-off module. Fill clean water tank according to module. Attach tool to...
... stroke). 10. Position tool against riser. Pull tool slowly over the carpet (second wet stroke). End with detergent. Always end with HOOVER Carpet/Upholstery Detergent according to instructions for Figs 2-13 to the base. When finished cleaning, follow "After cleaning" instructions on pages .... 3. Place handle in upright position. 3. Fill detergent container with dry strokes. To prevent machine from the base (L). 3. Attach hose and solution tube as instructed in suction (see "Automatic shut-off module. Fill clean water tank according to module. Attach tool to...

Manual
Page 15
... Use your upholstery. Fill detergent container with the tool without pressing the trigger to repeat the cleaning process. Turn cleaner ON. The hose will not rotate while handle is a loss in upright position, tilt cleaner back until post fits easily into hole. When finished cleaning,... Fig. 2-6). Press the trigger and slowly pull the nozzle over any one -half inch from electrical outlet. Vacuum up the solution with HOOVER Carpet/Upholstery Detergent according to instructions for Figs. 2-13 to snap into a properly grounded outlet. 7. Maintenance Removable brushes Your deep cleaner...
... Use your upholstery. Fill detergent container with the tool without pressing the trigger to repeat the cleaning process. Turn cleaner ON. The hose will not rotate while handle is a loss in upright position, tilt cleaner back until post fits easily into hole. When finished cleaning,... Fig. 2-6). Press the trigger and slowly pull the nozzle over any one -half inch from electrical outlet. Vacuum up the solution with HOOVER Carpet/Upholstery Detergent according to instructions for Figs. 2-13 to snap into a properly grounded outlet. 7. Maintenance Removable brushes Your deep cleaner...
Manual
Page 16
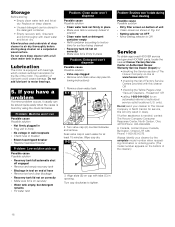
The addition of the cleaner.) 16 Do not add lubricant to instruc- Soak valve cap in warm water for an automated referral of hose • Remove tool and clear blockage • Recovery tank lid not on correctly • Make sure lid is securely locked in ...using the check list below. Allow brushes and underside of deep cleaner to ON Service To obtain approved HOOVER service and genuine HOOVER parts, locate the nearest Hoover Factory Service Center or Authorized Hoover Warranty Service Dealer (Depot) by: • checking the Service section of Factory Service Centers provided with...
The addition of the cleaner.) 16 Do not add lubricant to instruc- Soak valve cap in warm water for an automated referral of hose • Remove tool and clear blockage • Recovery tank lid not on correctly • Make sure lid is securely locked in ...using the check list below. Allow brushes and underside of deep cleaner to ON Service To obtain approved HOOVER service and genuine HOOVER parts, locate the nearest Hoover Factory Service Center or Authorized Hoover Warranty Service Dealer (Depot) by: • checking the Service section of Factory Service Centers provided with...


