
Manual
Page 3
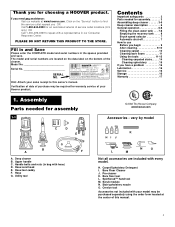
... Cleaning upholstery 15 If you need any assistance: Visit our website at the center of this owner's manual. Hose/tool caddy F. SpinScrub™ hand tool M. If you have a problem 16 Lubrication 16 Service 16 Storage 16 Warranty 17 1. only) OR Call 1-...330-499-9499 to find the service outlet nearest you for choosing a HOOVER product. Carpet/Upholstery Detergent I. vary by model C D E G B A F A. Utility tool Carpet Upholstery Cleaner Bare floor cleaner PreCleaner HI J ...
... Cleaning upholstery 15 If you need any assistance: Visit our website at the center of this owner's manual. Hose/tool caddy F. SpinScrub™ hand tool M. If you have a problem 16 Lubrication 16 Service 16 Storage 16 Warranty 17 1. only) OR Call 1-...330-499-9499 to find the service outlet nearest you for choosing a HOOVER product. Carpet/Upholstery Detergent I. vary by model C D E G B A F A. Utility tool Carpet Upholstery Cleaner Bare floor cleaner PreCleaner HI J ...
Manual
Page 4
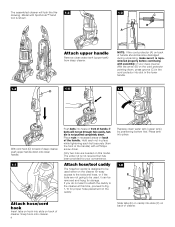
... cord protector into slots (F) on the caddy. Snap hook onto cleaner. 4 Slide tabs (E) on caddy into slot in recessed areas on this model. Model with SpinScrub™ hand tool is not required but has been provided for proper hose placement on back of your convenience. NOTE: If the cord protector (A) on...
... cord protector into slots (F) on the caddy. Snap hook onto cleaner. 4 Slide tabs (E) on caddy into slot in recessed areas on this model. Model with SpinScrub™ hand tool is not required but has been provided for proper hose placement on back of your convenience. NOTE: If the cord protector (A) on...

Manual
Page 5
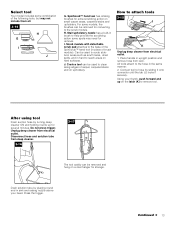
...few inches from nozzle connector end (I), into top of clip. 1-15 1-16 1-17 Snap stair/upholstery nozzle onto caddy. J Repeat on cleaner. SpinScrub™ hand tool (not included with your cleaner) through "loop" on hose connector into opposite side of hook (K). To remove the bag before ... 1-10 I . I 1-11 G Rotate top of caddy toward end of hose. Loop hose at additional cost if not included with all models) The SpinScrub™ hand tool is shipped in hook (H) on other end of hose. Slide hose clip (L) toward cleaner handle. Snap tab (M) on caddy. Press ...
...few inches from nozzle connector end (I), into top of clip. 1-15 1-16 1-17 Snap stair/upholstery nozzle onto caddy. J Repeat on cleaner. SpinScrub™ hand tool (not included with your cleaner) through "loop" on hose connector into opposite side of hook (K). To remove the bag before ... 1-10 I . I 1-11 G Rotate top of caddy toward end of hose. Loop hose at additional cost if not included with all models) The SpinScrub™ hand tool is shipped in hook (H) on other end of hose. Slide hose clip (L) toward cleaner handle. Snap tab (M) on caddy. Press ...

Manual
Page 7
... not lock into a properly grounded outlet. 2-2 2-3 2-4 WASH AUTO RINSE OFF Rinse ON ON/OFF switch To turn cleaner OFF, push switch up. SpinScrub™ hand tool (not included with SpinScrub™ hand tool is intended for quick cord release 18. Hose 19. Continued § 7 Brush setting selector 14. Clean water tank 9. Hose...
... not lock into a properly grounded outlet. 2-2 2-3 2-4 WASH AUTO RINSE OFF Rinse ON ON/OFF switch To turn cleaner OFF, push switch up. SpinScrub™ hand tool (not included with SpinScrub™ hand tool is intended for quick cord release 18. Hose 19. Continued § 7 Brush setting selector 14. Clean water tank 9. Hose...
Manual
Page 13
...cleaner. 3-16 3-17 The tool caddy can be removed and hung on small carpet areas, carpeted stairs and upholstery. How to the base of the SpinScrub™ hand tool (in upright position and remove hose from electrical outlet. Unplug deep cleaner from rack. Press the trigger. Continued § 13 For...onto connector until the tab (J) locks it securely. Select tool Your model includes some combination of the following tools, but may need for removal. SpinScrub™ hand tool has rotating brushes for several minutes. I J G. Place handle in place of brush module).
...cleaner. 3-16 3-17 The tool caddy can be removed and hung on small carpet areas, carpeted stairs and upholstery. How to the base of the SpinScrub™ hand tool (in upright position and remove hose from electrical outlet. Unplug deep cleaner from rack. Press the trigger. Continued § 13 For...onto connector until the tab (J) locks it securely. Select tool Your model includes some combination of the following tools, but may need for removal. SpinScrub™ hand tool has rotating brushes for several minutes. I J G. Place handle in place of brush module).

Manual
Page 14
...is necessary, wait until the carpet is a loss in upright position. 3. Replacement pads may be cleaned and press trigger to instructions for HOOVER part no surface change is visible, continue to 2-12. 4. Fill detergent container with tool. Pick up dirty solution with detergent. Lift tool...solution. 7. To avoid saturating carpet, do not use as instructed in Figs. 3-11 to WASHAutoRinse. Open the tool door and remove the SpinScrub™ hand tool. 2. Place handle in upright position. 3. Position tool against riser. Pull tool slowly over the carpet (second wet stroke)....
...is necessary, wait until the carpet is a loss in upright position. 3. Replacement pads may be cleaned and press trigger to instructions for HOOVER part no surface change is visible, continue to 2-12. 4. Fill detergent container with tool. Pick up dirty solution with detergent. Lift tool...solution. 7. To avoid saturating carpet, do not use as instructed in Figs. 3-11 to WASHAutoRinse. Open the tool door and remove the SpinScrub™ hand tool. 2. Place handle in upright position. 3. Position tool against riser. Pull tool slowly over the carpet (second wet stroke)....


