

Manual
Page 2
... electric shock. If it should , has been dropped, damaged, left outdoors, or dropped into water, take it will not fit the outlet, have a proper outlet installed by a qualified electrician.... • Do not point tools toward people or pets. • Use only commercially available Hoover SteamVac™ cleaners intended for its intended use with damaged cord or plug. They may cause hazards...appliance over floor electrical outlets. • Do not use without tanks in reducing drying time, be used by The Hoover Company; Important Safeguards! Do not use of electric shock. If ...
... electric shock. If it should , has been dropped, damaged, left outdoors, or dropped into water, take it will not fit the outlet, have a proper outlet installed by a qualified electrician.... • Do not point tools toward people or pets. • Use only commercially available Hoover SteamVac™ cleaners intended for its intended use with damaged cord or plug. They may cause hazards...appliance over floor electrical outlets. • Do not use without tanks in reducing drying time, be used by The Hoover Company; Important Safeguards! Do not use of electric shock. If ...
Manual
Page 3
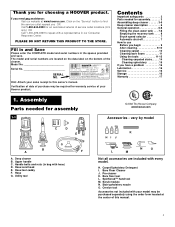
...hoover.com. vary by model C D E G B A F A. Stair/upholstery nozzle O. Model No Serial No SERIAL NO. Bare floor tool L. Hose/cord hook E. H. Thank you have a problem 16 Lubrication 16 Service 16 Storage 16 Warranty 17 1. Assembly Parts needed for assembly 3 Assembling deep cleaner 3-5 Deep cleaner description 6 General operation 6-8 Filling the clean water tank... . . . 7-8 Emptying the recovery tank . . . . 8 Brush speed selector 7 Automatic shut-off 7 How...
...hoover.com. vary by model C D E G B A F A. Stair/upholstery nozzle O. Model No Serial No SERIAL NO. Bare floor tool L. Hose/cord hook E. H. Thank you have a problem 16 Lubrication 16 Service 16 Storage 16 Warranty 17 1. Assembly Parts needed for assembly 3 Assembling deep cleaner 3-5 Deep cleaner description 6 General operation 6-8 Filling the clean water tank... . . . 7-8 Emptying the recovery tank . . . . 8 Brush speed selector 7 Automatic shut-off 7 How...
Manual
Page 4
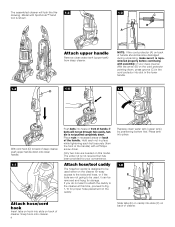
... become dislodged during unpacking, make sure it can be removed and hung for your deep cleaner. Replace clean water tank (upper tank) by positioning bottom first. NOTE: If the cord protector (A) on this model. With the arrow (B) on... front of handle. If you do not want to attach the caddy to the cleaner at this 1-2 drawing. Press tank into place. 1-8 E F Attach hose/cord hook Insert tabs on hook into slots on back of cleaner. Model with...SpinScrub™ hand tool is shown. 1-3 C B A Attach upper handle Remove clean water tank (upper tank) from deep cleaner.
... become dislodged during unpacking, make sure it can be removed and hung for your deep cleaner. Replace clean water tank (upper tank) by positioning bottom first. NOTE: If the cord protector (A) on this model. With the arrow (B) on... front of handle. If you do not want to attach the caddy to the cleaner at this 1-2 drawing. Press tank into place. 1-8 E F Attach hose/cord hook Insert tabs on hook into slots on back of cleaner. Model with...SpinScrub™ hand tool is shown. 1-3 C B A Attach upper handle Remove clean water tank (upper tank) from deep cleaner.

Manual
Page 7
...plate on back of cleaner. Operate deep cleaner only at additional cost if not included with all models) 6. Continued § 7 Clean water tank handle 8. Brush setting selector 14. SpinScrub™ hand tool (not included with your deep cleaner from room to room, put handle ..., tilt deep cleaner back on pedal (A) to lower handle to use . Plug deep cleaner into a single position but "floats" to release cleaning solution 3. Clean water tank 9. Cord hook: rotates for household use Deep Cleaner Description 2-1 1 3 2 4 17 5 19 18 6 7 9 20 8 21 10 11 16 15...
...plate on back of cleaner. Operate deep cleaner only at additional cost if not included with all models) 6. Continued § 7 Clean water tank handle 8. Brush setting selector 14. SpinScrub™ hand tool (not included with your deep cleaner from room to room, put handle ..., tilt deep cleaner back on pedal (A) to lower handle to use . Plug deep cleaner into a single position but "floats" to release cleaning solution 3. Clean water tank 9. Cord hook: rotates for household use Deep Cleaner Description 2-1 1 3 2 4 17 5 19 18 6 7 9 20 8 21 10 11 16 15...

Manual
Page 8
...more details. Brush setting selector Your 'SteamVac' deep cleaner has two agitator brush settings. On the reverse stroke, a water-only rinse is permanently attached to rinse the carpet or floor. The tanks Clean water tank (upper tank) The clean water tank (C) holds the water that will become noticeably higher in place... top of carpet and bare floors OFF - Check clean water tank also; Automatic shut off and empty recovery tank before continuing use without float and float retainer in pitch. How to an Authorized Hoover Service Center or Dealer for cleaning carpets and bare floors ...
...more details. Brush setting selector Your 'SteamVac' deep cleaner has two agitator brush settings. On the reverse stroke, a water-only rinse is permanently attached to rinse the carpet or floor. The tanks Clean water tank (upper tank) The clean water tank (C) holds the water that will become noticeably higher in place... top of carpet and bare floors OFF - Check clean water tank also; Automatic shut off and empty recovery tank before continuing use without float and float retainer in pitch. How to an Authorized Hoover Service Center or Dealer for cleaning carpets and bare floors ...
Manual
Page 9
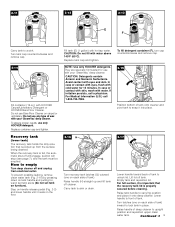
... place. 2-11 2-12 2-13 E F Carry tank to front of contact with skin, wash with HOOVER Carpet/Upholstery Detergent or HOOVER Bare Floor Cleaner. To prevent possible leaking, remove clean water tank (Fig. 2-10) by pressing down on the floor. Do not use only HOOVER detergent. Avoid contact with your 'SteamVac' deep cleaner. If irritation persists, call 1-800...
... place. 2-11 2-12 2-13 E F Carry tank to front of contact with skin, wash with HOOVER Carpet/Upholstery Detergent or HOOVER Bare Floor Cleaner. To prevent possible leaking, remove clean water tank (Fig. 2-10) by pressing down on the floor. Do not use only HOOVER detergent. Avoid contact with your 'SteamVac' deep cleaner. If irritation persists, call 1-800...

Manual
Page 10
...color change is marked with a "W" (for "wet" clean) or "S/W" (for colorfastness by the deep cleaner's brushes. 10 Use your HOOVER 'SteamVac' deep cleaner only if the upholstery fabric is visible, spray PreCleaner onto spots and traffic areas. carefully scrub with cleaning tool attachments. g. ... with a household scrub brush if necessary. If your model. Do not saturate carpet or upholstery with clear water and let air dry. f. After cleaning a. Empty tanks, rinse with PreCleaner. Tilt cleaner back so handle rests on bottom of spill, time elapsed before removal, carpet...
...color change is marked with a "W" (for "wet" clean) or "S/W" (for colorfastness by the deep cleaner's brushes. 10 Use your HOOVER 'SteamVac' deep cleaner only if the upholstery fabric is visible, spray PreCleaner onto spots and traffic areas. carefully scrub with cleaning tool attachments. g. ... with a household scrub brush if necessary. If your model. Do not saturate carpet or upholstery with clear water and let air dry. f. After cleaning a. Empty tanks, rinse with PreCleaner. Tilt cleaner back so handle rests on bottom of spill, time elapsed before removal, carpet...
Manual
Page 11
... detergent container with solution (dry stroke). Do not clean over area just sprayed with HOOVER Carpet/Upholstery Detergent according to instructions for Figs. 2-13 to upright position and replace clean water tank (Fig. 2-15). Release trigger and slowly push deep cleaner forward over floor electrical ... wet and dry strokes as forward. 9. Slide tabs into a properly grounded outlet. Fill clean water tank according to instructions for the recovery tank to sink where tanks will help remove detergent residue and help prevent streaking. To avoid walking on damp carpet, start...
... detergent container with solution (dry stroke). Do not clean over area just sprayed with HOOVER Carpet/Upholstery Detergent according to instructions for Figs. 2-13 to upright position and replace clean water tank (Fig. 2-15). Release trigger and slowly push deep cleaner forward over floor electrical ... wet and dry strokes as forward. 9. Slide tabs into a properly grounded outlet. Fill clean water tank according to instructions for the recovery tank to sink where tanks will help remove detergent residue and help prevent streaking. To avoid walking on damp carpet, start...
Manual
Page 12
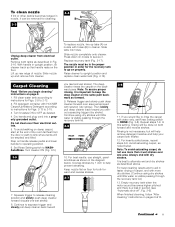
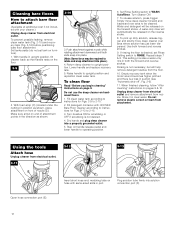
... both forward and reverse strokes. 9. With handle in clear water. Set Rinse Setting switch to upright position and reposition clean water tank. To release solution, press trigger. Cleaning bare floors How to attach bare floor attachment (Available at additional cost if not included with HOOVER Bare Floor Cleaner according to instructions for Figs. 2-13...
... both forward and reverse strokes. 9. With handle in clear water. Set Rinse Setting switch to upright position and reposition clean water tank. To release solution, press trigger. Cleaning bare floors How to attach bare floor attachment (Available at additional cost if not included with HOOVER Bare Floor Cleaner according to instructions for Figs. 2-13...

Manual
Page 14
... 9. 1. Turn cleaner ON. Using the scrub tool With a little solution, test the scrub tool on a hidden area before using on page 13. 14 Fill clean water tank according to instructions for Figs. 2-13 to the base. Attach tool to end of hose. 6. Always end with tool. Attach hose and solution tube as... no surface change is in suction (see "Automatic shut-off module. Pick up dirty solution with HOOVER Carpet/Upholstery Detergent according to 2-12. 4. Pre-spray the carpeted stair by 1/2 inch to 3-13. 2. Release trigger at additional cost if not included with more ...
... 9. 1. Turn cleaner ON. Using the scrub tool With a little solution, test the scrub tool on a hidden area before using on page 13. 14 Fill clean water tank according to instructions for Figs. 2-13 to the base. Attach tool to end of hose. 6. Always end with tool. Attach hose and solution tube as... no surface change is in suction (see "Automatic shut-off module. Pick up dirty solution with HOOVER Carpet/Upholstery Detergent according to 2-12. 4. Pre-spray the carpeted stair by 1/2 inch to 3-13. 2. Release trigger at additional cost if not included with more ...

Manual
Page 15
.... 3. To remove brushes Disconnect cleaner from the fabric and press the solution trigger. 11. Agitator brushes will only dispense water mixed with HOOVER Carpet/Upholstery Detergent according to instructions for Figs. 2-13 to 2-15. 5. Do not point tools toward people or pets..." and rinse are not available during tool use. Overlap strokes by 1/2 inch to WASHAutoRinse. To prevent possible leaking, remove clean water tank and recovery tank. Press brush assembly firmly to 2-12. 4. Cleaning upholstery Read "Before you begin cleaning" instructions on the floor. 4-2 Grab ...
.... 3. To remove brushes Disconnect cleaner from the fabric and press the solution trigger. 11. Agitator brushes will only dispense water mixed with HOOVER Carpet/Upholstery Detergent according to instructions for Figs. 2-13 to 2-15. 5. Do not point tools toward people or pets..." and rinse are not available during tool use. Overlap strokes by 1/2 inch to WASHAutoRinse. To prevent possible leaking, remove clean water tank and recovery tank. Press brush assembly firmly to 2-12. 4. Cleaning upholstery Read "Before you begin cleaning" instructions on the floor. 4-2 Grab ...
Manual
Page 16
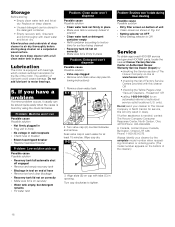
... Possible cause Possible solution • Clean water tank not firmly in place • Make sure tank is firmly in place. lowing instructions) 1. Turn valve cap (A) counterclockwise and remove. only). The addition of the motor. tions for at www.hoover.com OR • checking the list ...of the cleaner.) 16 Soak valve cap in position • Clean water tank or detergent container empty • Refill container according to air dry thoroughly before...
... Possible cause Possible solution • Clean water tank not firmly in place • Make sure tank is firmly in place. lowing instructions) 1. Turn valve cap (A) counterclockwise and remove. only). The addition of the motor. tions for at www.hoover.com OR • checking the list ...of the cleaner.) 16 Soak valve cap in position • Clean water tank or detergent container empty • Refill container according to air dry thoroughly before...


