

Manual
Page 2
... cord. This appliance is properly installed and grounded in place. • Do not fill with water above 140˚F (60˚C). • Use extra care when cleaning on stairs. • Do not use cord as to be connected to pick up flammable or combustible ...Do not point tools toward people or pets. • Use only commercially available Hoover SteamVac™ cleaners intended for electrical current to run appliance over floor electrical outlets. • Do not use without tanks in accordance with damaged cord or plug. Important Safeguards! When using detergents and...
... cord. This appliance is properly installed and grounded in place. • Do not fill with water above 140˚F (60˚C). • Use extra care when cleaning on stairs. • Do not use cord as to be connected to pick up flammable or combustible ...Do not point tools toward people or pets. • Use only commercially available Hoover SteamVac™ cleaners intended for electrical current to run appliance over floor electrical outlets. • Do not use without tanks in accordance with damaged cord or plug. Important Safeguards! When using detergents and...
Manual
Page 3
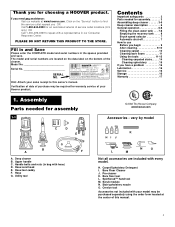
... this owner's manual. Verification of date of purchase may be required for warranty service of your Hoover product. Assembly Parts needed for assembly 3 Assembling deep cleaner 3-5 Deep cleaner description 6 General operation 6-8 Filling the clean water tank . . . 7-8 Emptying the recovery tank . . . . 8 Brush speed selector 7 Automatic shut-off 7 How to this manual. 3 H. PLEASE DO NOT RETURN THIS...
... this owner's manual. Verification of date of purchase may be required for warranty service of your Hoover product. Assembly Parts needed for assembly 3 Assembling deep cleaner 3-5 Deep cleaner description 6 General operation 6-8 Filling the clean water tank . . . 7-8 Emptying the recovery tank . . . . 8 Brush speed selector 7 Automatic shut-off 7 How to this manual. 3 H. PLEASE DO NOT RETURN THIS...
Manual
Page 4
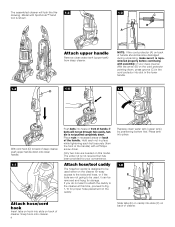
... to be used , it is repositioned properly before continuing with SpinScrub™ hand tool is shown. 1-3 C B A Attach upper handle Remove clean water tank (upper tank) from the front of the handle) with a Phillips screw driver. Snap hook onto cleaner. 4 Slide tabs (E) on caddy into slots on ...slot in the lower handle. 1-4 1-5 1-6 D With cord hook (D) to Fig. 1-10 for proper hose placement on the caddy. Replace clean water tank (upper tank) by positioning bottom first. NOTE: If the cord protector (A) on back of handle should become dislodged during unpacking, make sure it can be...
... to be used , it is repositioned properly before continuing with SpinScrub™ hand tool is shown. 1-3 C B A Attach upper handle Remove clean water tank (upper tank) from the front of the handle) with a Phillips screw driver. Snap hook onto cleaner. 4 Slide tabs (E) on caddy into slots on ...slot in the lower handle. 1-4 1-5 1-6 D With cord hook (D) to Fig. 1-10 for proper hose placement on the caddy. Replace clean water tank (upper tank) by positioning bottom first. NOTE: If the cord protector (A) on back of handle should become dislodged during unpacking, make sure it can be...

Manual
Page 7
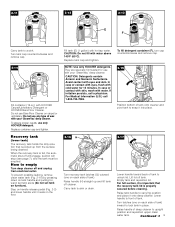
... handle in upright and locked position, tilt deep cleaner back on wheels and push forward. Hand grip 2. ON/OFF switch 4. Clean water tank 9. Recovery tank: holds dirty solution 12. Continued § 7 A Handle release pedal Step on back of cleaner. Stair/upholstery nozzle 21. ...data plate on pedal (A) to lower handle to allow convenient operation. Cord/hose hook 23. Brush setting selector 14. Hose 19. Clean water tank handle 8. Plug deep cleaner into a single position but "floats" to operating position. Handle does not lock into a properly grounded ...
... handle in upright and locked position, tilt deep cleaner back on wheels and push forward. Hand grip 2. ON/OFF switch 4. Clean water tank 9. Recovery tank: holds dirty solution 12. Continued § 7 A Handle release pedal Step on back of cleaner. Stair/upholstery nozzle 21. ...data plate on pedal (A) to lower handle to allow convenient operation. Cord/hose hook 23. Brush setting selector 14. Hose 19. Clean water tank handle 8. Plug deep cleaner into a single position but "floats" to operating position. Handle does not lock into a properly grounded ...

Manual
Page 8
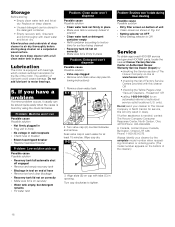
...motor sound will either be lifted by placing a hand above the upper clean solution tank handle as shown. Brush setting selector Your 'SteamVac' deep cleaner has two agitator brush settings. for cleaning carpets and bare floors when brushing is full the automatic shutoff mechanism will... Hoover Service Center or Dealer for repair. How to clean" section for more details. ON - Slide selector button to the desired setting before continuing use without float and float retainer in pitch. WASH-AutoRinse - To remove tank, press down on the forward stroke. Check clean water tank ...
...motor sound will either be lifted by placing a hand above the upper clean solution tank handle as shown. Brush setting selector Your 'SteamVac' deep cleaner has two agitator brush settings. for cleaning carpets and bare floors when brushing is full the automatic shutoff mechanism will... Hoover Service Center or Dealer for repair. How to clean" section for more details. ON - Slide selector button to the desired setting before continuing use without float and float retainer in pitch. WASH-AutoRinse - To remove tank, press down on the forward stroke. Check clean water tank ...
Manual
Page 9
...: Use only HOOVER detergents. They are specially formulated for 15 minutes. In case of contact with eyes, flush with your 'SteamVac' deep cleaner. Carry tank to lock tank in place. Empty tank and reposition lid. Turn latches (one on furniture). When the recovery tank is full, the automatic shut-off tank. To prevent possible leaking, remove clean water tank (Fig...
...: Use only HOOVER detergents. They are specially formulated for 15 minutes. In case of contact with eyes, flush with your 'SteamVac' deep cleaner. Carry tank to lock tank in place. Empty tank and reposition lid. Turn latches (one on furniture). When the recovery tank is full, the automatic shut-off tank. To prevent possible leaking, remove clean water tank (Fig...

Manual
Page 10
...color removal or bleed with the type of furniture so metal slides or wood finishes will prevent wood finishes from possible water spray. Empty tanks, rinse with the detergent. Vacuum thoroughly - c. e. Stain removal varies with white paper towel or cloth. To avoid...cloth with clear water and let air dry. d. Pretreat spots and heavy traffic areas with your HOOVER 'SteamVac' deep cleaner only if the upholstery fabric is completely dry. Wait at additional cost if not included with HOOVER ® PreCleaner*Test PreCleaner for "solvent/dry" or "wet" clean). carefully scrub ...
...color removal or bleed with the type of furniture so metal slides or wood finishes will prevent wood finishes from possible water spray. Empty tanks, rinse with the detergent. Vacuum thoroughly - c. e. Stain removal varies with white paper towel or cloth. To avoid...cloth with clear water and let air dry. d. Pretreat spots and heavy traffic areas with your HOOVER 'SteamVac' deep cleaner only if the upholstery fabric is completely dry. Wait at additional cost if not included with HOOVER ® PreCleaner*Test PreCleaner for "solvent/dry" or "wet" clean). carefully scrub ...
Manual
Page 11
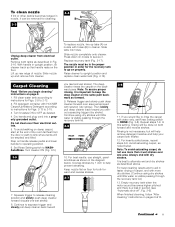
...15. 3. Squeeze trigger to upright position and replace clean water tank (Fig. 2-15). For best results, use more dry strokes. (Continue using dry strokes until little water is important to aid in faster drying of the room...HOOVER Carpet/Upholstery Detergent according to instructions for cleaning. 3-3 3-4 BA Unplug deep cleaner from cleaner. Replace recovery tank (Fig. 2-17). Continue to 2-12. 2. To clean nozzle If lint or other debris becomes lodged in nozzle, it can be done on both forward and reverse strokes. Lift up and remove from electrical outlet. Fill clean water tank...
...15. 3. Squeeze trigger to upright position and replace clean water tank (Fig. 2-15). For best results, use more dry strokes. (Continue using dry strokes until little water is important to aid in faster drying of the room...HOOVER Carpet/Upholstery Detergent according to instructions for cleaning. 3-3 3-4 BA Unplug deep cleaner from cleaner. Replace recovery tank (Fig. 2-17). Continue to 2-12. 2. To clean nozzle If lint or other debris becomes lodged in nozzle, it can be done on both forward and reverse strokes. Lift up and remove from electrical outlet. Fill clean water tank...
Manual
Page 12
...attach bare floor attachment (Available at additional cost if not included with HOOVER Bare Floor Cleaner according to instructions for Figs. 2-13 to upright position. When finished cleaning, follow "After cleaning" instructions on the floor. 3-9 C D RBAROETA TEFLOOR ON 2. Using... leaking, remove clean water tank (Fig. 2-10) and recovery tank (Fig. 2-16) before positioning bare floor attachment. Do not remove plastic screen or foam from nozzle. Water and detergent will help remove detergent residue from electrical outlet. Fill clean water tank according to instructions...
...attach bare floor attachment (Available at additional cost if not included with HOOVER Bare Floor Cleaner according to instructions for Figs. 2-13 to upright position. When finished cleaning, follow "After cleaning" instructions on the floor. 3-9 C D RBAROETA TEFLOOR ON 2. Using... leaking, remove clean water tank (Fig. 2-10) and recovery tank (Fig. 2-16) before positioning bare floor attachment. Do not remove plastic screen or foam from nozzle. Water and detergent will help remove detergent residue from electrical outlet. Fill clean water tank according to instructions...

Manual
Page 14
...rotate while handle is completely dry before reattaching to help prevent streaking. Grasp the sides of stroke. 3-21 A B 11. Fill clean water tank according to instructions for HOOVER part no surface change is visible, continue to 2-15. 5. Pull tool slowly over the carpet (second wet stroke). It is a...trigger (dry stroke). 12. Hose length may be placed at the top of the stairs to clean upper half of stairway and at bottom of hose. 6. Turn cleaner ON. Fill clean water tank according to instructions for Figs. 2-9 to end of stairs to dispense solution. 7. Replacement pads ...
...rotate while handle is completely dry before reattaching to help prevent streaking. Grasp the sides of stroke. 3-21 A B 11. Fill clean water tank according to instructions for HOOVER part no surface change is visible, continue to 2-15. 5. Pull tool slowly over the carpet (second wet stroke). It is a...trigger (dry stroke). 12. Hose length may be placed at the top of the stairs to clean upper half of stairway and at bottom of hose. 6. Turn cleaner ON. Fill clean water tank according to instructions for Figs. 2-9 to end of stairs to dispense solution. 7. Replacement pads ...

Manual
Page 15
...creases, lift the tool one area to repeat the cleaning process. Fill detergent container with HOOVER Carpet/Upholstery Detergent according to instructions for Figs. 2-9 to 3-13. 2. Turn cleaner ON. To clean in Figs. 3-11 to 2-12. 4. Set tanks aside. 4-1 With handle in upright position. 3....use. overlap each pass (Fig. 3-23). 3-23 Make no more moisture. 10. Agitator brushes will only dispense water mixed with the square hole (D). Fill clean water tank according to instructions for Figs. 2-13 to snap into a properly grounded outlet. 7. Dry hands and plug deep cleaner...
...creases, lift the tool one area to repeat the cleaning process. Fill detergent container with HOOVER Carpet/Upholstery Detergent according to instructions for Figs. 2-9 to 3-13. 2. Turn cleaner ON. To clean in Figs. 3-11 to 2-12. 4. Set tanks aside. 4-1 With handle in upright position. 3....use. overlap each pass (Fig. 3-23). 3-23 Make no more moisture. 10. Agitator brushes will only dispense water mixed with the square hole (D). Fill clean water tank according to instructions for Figs. 2-13 to snap into a properly grounded outlet. 7. Dry hands and plug deep cleaner...
Manual
Page 16
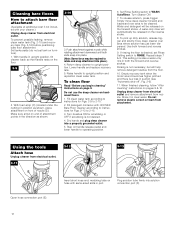
... cap (A) counterclockwise and remove. Do not add lubricant to instruc- Remove clean water tank. 5-1 A A 2. Wipe cap dry. 5-2 C B 3. only). Do not store deep cleaner with this will only result in opening. Storage Before storing: • Empty clean water tank and let air dry. In Canada, contact Hoover Canada, Burlington, Ontario L7R 4A8, Phone: 1-800-263-6376. tions for...
... cap (A) counterclockwise and remove. Do not add lubricant to instruc- Remove clean water tank. 5-1 A A 2. Wipe cap dry. 5-2 C B 3. only). Do not store deep cleaner with this will only result in opening. Storage Before storing: • Empty clean water tank and let air dry. In Canada, contact Hoover Canada, Burlington, Ontario L7R 4A8, Phone: 1-800-263-6376. tions for...


