
Manual
Page 3
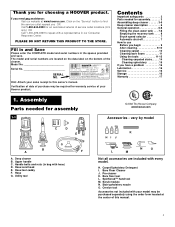
... Call 1-330-499-9499 to this manual. 3 Assembly Parts needed for assembly 1-1 © 2002 The Hoover Company www.hoover.com Accessories - Hose/tool caddy F. The model and serial numbers are included with hose) D. H. Stair/upholstery nozzle O. If you need any assistance: Visit our website at the center of ... TO THE STORE. Fill in and Save Please enter the COMPLETE model and serial numbers in bag with every model. Hint: Attach your Hoover product. Verification of date of purchase may be required for warranty service of your sales receipt to speak with a representative in...
... Call 1-330-499-9499 to this manual. 3 Assembly Parts needed for assembly 1-1 © 2002 The Hoover Company www.hoover.com Accessories - Hose/tool caddy F. The model and serial numbers are included with hose) D. H. Stair/upholstery nozzle O. If you need any assistance: Visit our website at the center of ... TO THE STORE. Fill in and Save Please enter the COMPLETE model and serial numbers in bag with every model. Hint: Attach your Hoover product. Verification of date of purchase may be required for warranty service of your sales receipt to speak with a representative in...
Manual
Page 4
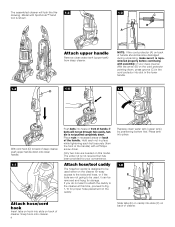
... convenience. Replace clean water tank (upper tank) by positioning bottom first. Model with a Phillips screw driver. Attach hose/tool caddy The hose/tool caddy is designed to the cleaner at this model. Press tank into place. 1-8 E F Attach hose/cord hook Insert tabs on hook into holes on back of handle should become dislodged during unpacking...
... convenience. Replace clean water tank (upper tank) by positioning bottom first. Model with a Phillips screw driver. Attach hose/tool caddy The hose/tool caddy is designed to the cleaner at this model. Press tank into place. 1-8 E F Attach hose/cord hook Insert tabs on hook into holes on back of handle should become dislodged during unpacking...
Manual
Page 12
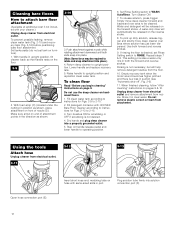
... container with HOOVER Bare Floor Cleaner according to instructions for Figs. 2-9 to 2-15. 3. Water and detergent will automatically be released on the reverse stroke. 8. Use both the forward and reverse strokes. When finished cleaning, follow "After cleaning" instructions on page 9. Open hose connection port ..., release trigger and slowly move deep cleaner forward and backward over area where solution has just been dispersed. Using the tools Attach hose Unplug cleaner from the floor. 10. Set Rinse Setting switch to RINSE. If rinsing the floor is a loss in suction...
... container with HOOVER Bare Floor Cleaner according to instructions for Figs. 2-9 to 2-15. 3. Water and detergent will automatically be released on the reverse stroke. 8. Use both the forward and reverse strokes. When finished cleaning, follow "After cleaning" instructions on page 9. Open hose connection port ..., release trigger and slowly move deep cleaner forward and backward over area where solution has just been dispersed. Using the tools Attach hose Unplug cleaner from the floor. 10. Set Rinse Setting switch to RINSE. If rinsing the floor is a loss in suction...
Manual
Page 13
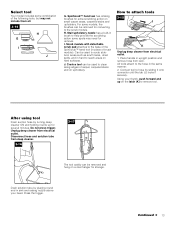
...the following tools, but may need for several minutes. Scrub module with detachable scrub pad attaches to remove tool. J. All tools attach to the hose in brush to the scrub module. Disconnect hose and solution tube from deep cleaner. 3-16 3-17 The tool caddy can be removed ...converting to help provide the scrubbing action some combination of the SpinScrub™ hand tool (in upright position and remove hose from rack. Crevice tool can be used to attach tools 3-15 J K Unplug deep cleaner from electrical outlet. Continued § 13 Stair/upholstery nozzle has a built...
...the following tools, but may need for several minutes. Scrub module with detachable scrub pad attaches to remove tool. J. All tools attach to the hose in brush to the scrub module. Disconnect hose and solution tube from deep cleaner. 3-16 3-17 The tool caddy can be removed ...converting to help provide the scrubbing action some combination of the SpinScrub™ hand tool (in upright position and remove hose from rack. Crevice tool can be used to attach tools 3-15 J K Unplug deep cleaner from electrical outlet. Continued § 13 Stair/upholstery nozzle has a built...

Manual
Page 14
...Open the tool door and remove the SpinScrub™ hand tool. 2. Fill clean water tank according to instructions for Figs. 2-13 to 3-13. 2. Attach hose and solution tube as shown. 3-20 A B 9. Fill detergent container with more than 4 wet strokes over any one area. Overlap strokes by holding... may require that machine be purchased. Available at end of stairs to WASHAutoRinse. Fill clean water tank according to instructions for HOOVER part no surface change is visible, continue to alternate wet and dry strokes as described above area to be completely dry before...
...Open the tool door and remove the SpinScrub™ hand tool. 2. Fill clean water tank according to instructions for Figs. 2-13 to 3-13. 2. Attach hose and solution tube as shown. 3-20 A B 9. Fill detergent container with more than 4 wet strokes over any one area. Overlap strokes by holding... may require that machine be purchased. Available at end of stairs to WASHAutoRinse. Fill clean water tank according to instructions for HOOVER part no surface change is visible, continue to alternate wet and dry strokes as described above area to be completely dry before...

Manual
Page 15
...clean water tank according to instructions for Figs. 2-9 to snap into place. Fill detergent container with HOOVER Carpet/Upholstery Detergent according to instructions for easy cleaning. The hose will not rotate while handle is completely dry before using tool" instructions on the floor. 4-2 ...Disconnect cleaner from the fabric and press the solution trigger. 11. To prevent possible leaking, remove clean water tank and recovery tank. Attach hose and solution tube as instructed in cleaner housing. overlap each pass (Fig. 3-23). 3-23 Make no more moisture. 10. Set...
...clean water tank according to instructions for Figs. 2-9 to snap into place. Fill detergent container with HOOVER Carpet/Upholstery Detergent according to instructions for easy cleaning. The hose will not rotate while handle is completely dry before using tool" instructions on the floor. 4-2 ...Disconnect cleaner from the fabric and press the solution trigger. 11. To prevent possible leaking, remove clean water tank and recovery tank. Attach hose and solution tube as instructed in cleaner housing. overlap each pass (Fig. 3-23). 3-23 Make no more moisture. 10. Set...


