
Manual
Page 1
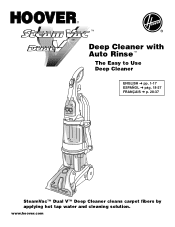
www.hoover.com ™ ® ™ Deep Cleaner with Auto Rinse™ The Easy to Use Deep Cleaner ENGLISH § pp. 1-17 ESPAÑOL § pág. 18-27 FRANÇAIS § p. 28-37 SteamVac™ Dual V™ Deep Cleaner cleans carpet fibers by applying hot tap water and cleaning solution.
www.hoover.com ™ ® ™ Deep Cleaner with Auto Rinse™ The Easy to Use Deep Cleaner ENGLISH § pp. 1-17 ESPAÑOL § pág. 18-27 FRANÇAIS § p. 28-37 SteamVac™ Dual V™ Deep Cleaner cleans carpet fibers by applying hot tap water and cleaning solution.

Manual
Page 2
...8226; Do not put any time. • Do not point tools toward people or pets. • Use only commercially available Hoover SteamVac™ cleaners intended for machine application. Keep children and pets away from carpets until a properly grounded outlet (B) can result in use as ...care when cleaning on cord. Turn off all controls before unplugging. • Unplug before servicing the deep cleaner. • Do not unplug by The Hoover Company; Do not place deep cleaner on surfaces moistened by a metal screw. Do not expose machine to a 2-pole receptacle (E) if a...
...8226; Do not put any time. • Do not point tools toward people or pets. • Use only commercially available Hoover SteamVac™ cleaners intended for machine application. Keep children and pets away from carpets until a properly grounded outlet (B) can result in use as ...care when cleaning on cord. Turn off all controls before unplugging. • Unplug before servicing the deep cleaner. • Do not unplug by The Hoover Company; Do not place deep cleaner on surfaces moistened by a metal screw. Do not expose machine to a 2-pole receptacle (E) if a...
Manual
Page 3
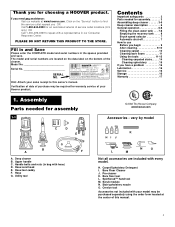
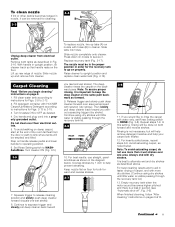
... Carpet/Upholstery Detergent I. Assembly Parts needed for choosing a HOOVER product. Handle bolts and nuts (in bag with every model. Hose/cord hook E. Utility tool Carpet Upholstery Cleaner Bare floor cleaner PreCleaner HI J K N O L M Not all ... serial numbers in our Consumer Response Center. Hint: Attach your Hoover product. Upper handle C. Bare Floor Cleaner J. SpinScrub™ hand tool M. Stair/upholstery nozzle O. If you for assembly 3 Assembling deep cleaner 3-5 Deep cleaner description 6 General operation 6-8 Filling the clean water tank ....
... Carpet/Upholstery Detergent I. Assembly Parts needed for choosing a HOOVER product. Handle bolts and nuts (in bag with every model. Hose/cord hook E. Utility tool Carpet Upholstery Cleaner Bare floor cleaner PreCleaner HI J K N O L M Not all ... serial numbers in our Consumer Response Center. Hint: Attach your Hoover product. Upper handle C. Bare Floor Cleaner J. SpinScrub™ hand tool M. Stair/upholstery nozzle O. If you for assembly 3 Assembling deep cleaner 3-5 Deep cleaner description 6 General operation 6-8 Filling the clean water tank ....
Manual
Page 4
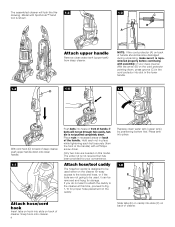
...1-10 for storage. Replace clean water tank (upper tank) by positioning bottom first. Only two nuts are not going to back of deep cleaner, push upper handle down . With the arrow (B) on the caddy. Attach hose/tool caddy The hose/tool caddy is not required but ...of handle. Model with SpinScrub™ hand tool is repositioned properly before continuing with assembly of the handle) with a Phillips screw driver. The assembled cleaner will not go through hole easily, handle is not pushed completely down onto lower handle. 1-7 Push bolts into slot in the lower handle. 1-4 1-5...
...1-10 for storage. Replace clean water tank (upper tank) by positioning bottom first. Only two nuts are not going to back of deep cleaner, push upper handle down . With the arrow (B) on the caddy. Attach hose/tool caddy The hose/tool caddy is not required but ...of handle. Model with SpinScrub™ hand tool is repositioned properly before continuing with assembly of the handle) with a Phillips screw driver. The assembled cleaner will not go through hole easily, handle is not pushed completely down onto lower handle. 1-7 Push bolts into slot in the lower handle. 1-4 1-5...

Manual
Page 5
...J. L Loop hose over top of caddy. 1-12 1-13 1-14 M K Press hose into place. Insert top of bare floor tool (available at bottom of cleaner and press into hose clip. 1-9 H 1-10 I . Solution tube I Storing hose and tools Press hose, a few inches from nozzle connector end (I), into ... SpinScrub™ hand tool is shipped in hook (H) on caddy. Snap tab (M) on other end of hook (K). Slide hose clip (L) toward cleaner handle. To remove the bag before storing hose. J Identify the hose parts before using the tool, open tool door. Bring hose up and ...
...J. L Loop hose over top of caddy. 1-12 1-13 1-14 M K Press hose into place. Insert top of bare floor tool (available at bottom of cleaner and press into hose clip. 1-9 H 1-10 I . Solution tube I Storing hose and tools Press hose, a few inches from nozzle connector end (I), into ... SpinScrub™ hand tool is shipped in hook (H) on caddy. Snap tab (M) on other end of hook (K). Slide hose clip (L) toward cleaner handle. To remove the bag before storing hose. J Identify the hose parts before using the tool, open tool door. Bring hose up and ...

Manual
Page 7
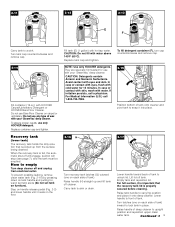
...17 5 19 18 6 7 9 20 8 21 10 11 16 15 12 22 14 12 13 23 The assembled deep cleaner will look like the drawing. Cord/hose hook 23. Operate deep cleaner only at additional cost if not included with all models) 6. Recovery tank handle 11. Recovery tank: holds dirty solution 12.... single position but "floats" to use . Solution trigger: press to operating position. Carrying handle 7. Hose connection port 17. To turn cleaner ON, push switch down. A Handle release pedal Step on pedal (A) to lower handle to release cleaning solution 3. Clean water tank 9....
...17 5 19 18 6 7 9 20 8 21 10 11 16 15 12 22 14 12 13 23 The assembled deep cleaner will look like the drawing. Cord/hose hook 23. Operate deep cleaner only at additional cost if not included with all models) 6. Recovery tank handle 11. Recovery tank: holds dirty solution 12.... single position but "floats" to use . Solution trigger: press to operating position. Carrying handle 7. Hose connection port 17. To turn cleaner ON, push switch down. A Handle release pedal Step on pedal (A) to lower handle to release cleaning solution 3. Clean water tank 9....

Manual
Page 8
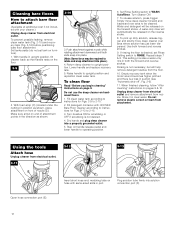
... the water tank. At that time, the yellow float disk will become noticeably higher in place. Brush setting selector Your 'SteamVac' deep cleaner has two agitator brush settings. Slide selector button to the desired setting before continuing use without float and float retainer in pitch...handle and pull forward. 8 This setting cleans your carpet with the water. 2-5 2-6 2-7 B Carrying handle The deep cleaner may need to an Authorized Hoover Service Center or Dealer for repair. for cleaning carpets and bare floors when brushing is applied automatically. Do not use ....
... the water tank. At that time, the yellow float disk will become noticeably higher in place. Brush setting selector Your 'SteamVac' deep cleaner has two agitator brush settings. Slide selector button to the desired setting before continuing use without float and float retainer in pitch...handle and pull forward. 8 This setting cleans your carpet with the water. 2-5 2-6 2-7 B Carrying handle The deep cleaner may need to an Authorized Hoover Service Center or Dealer for repair. for cleaning carpets and bare floors when brushing is applied automatically. Do not use ....
Manual
Page 9
NOTE: Use only HOOVER detergents. Avoid contact with cold water for use any type of tank) inward to sink or drain. Raise handle of deep cleaner to front of contact with eyes, flush with eyes and skin. Continued § 9 Replace container cap ...remove cap. 2-14 Fill container (16 oz.) with your 'SteamVac' deep cleaner. Do not use with HOOVER Carpet/Upholstery Detergent or HOOVER Bare Floor Cleaner. How to snap it onto deep cleaner. CAUTION: Do not fill with your 'SteamVac' deep cleaner. For Medical Information (U.S.) call a physician. Recovery tank (lower ...
NOTE: Use only HOOVER detergents. Avoid contact with cold water for use any type of tank) inward to sink or drain. Raise handle of deep cleaner to front of contact with eyes, flush with eyes and skin. Continued § 9 Replace container cap ...remove cap. 2-14 Fill container (16 oz.) with your 'SteamVac' deep cleaner. Do not use with HOOVER Carpet/Upholstery Detergent or HOOVER Bare Floor Cleaner. How to snap it onto deep cleaner. CAUTION: Do not fill with your 'SteamVac' deep cleaner. For Medical Information (U.S.) call a physician. Recovery tank (lower ...

Manual
Page 10
... pick up furniture skirts and draperies. Pin up PreCleaner and spot. Stain removal varies with your HOOVER 'SteamVac' deep cleaner only if the upholstery fabric is visible, spray PreCleaner onto spots and traffic areas. After cleaning a. b. Remove lint from ...e. Do not saturate carpet or upholstery with the dampened cloth. To prevent staining, use the 'SteamVac' deep cleaner as a dry vacuum cleaner. To help reduce any shading left in Fig. 2-16. Tilt cleaner back so handle rests on various cleaning tasks. *Available at least ten minutes. For upholstery, check...
... pick up furniture skirts and draperies. Pin up PreCleaner and spot. Stain removal varies with your HOOVER 'SteamVac' deep cleaner only if the upholstery fabric is visible, spray PreCleaner onto spots and traffic areas. After cleaning a. b. Remove lint from ...e. Do not saturate carpet or upholstery with the dampened cloth. To prevent staining, use the 'SteamVac' deep cleaner as a dry vacuum cleaner. To help reduce any shading left in Fig. 2-16. Tilt cleaner back so handle rests on various cleaning tasks. *Available at least ten minutes. For upholstery, check...
Manual
Page 11
... tank when the motor sound becomes higher pitched and there is visible passing through the recovery tank lid.) 13. Lift up and remove from cleaner. Slide tabs into a properly grounded outlet. Replace recovery tank (Fig. 2-17). Fill clean water tank according to instructions for Figs. 2-9... end with holes (B) in faster drying of the room farthest from electrical outlet. Release trigger and slowly push deep cleaner forward over area just sprayed with HOOVER Carpet/Upholstery Detergent according to instructions for Figs. 2-13 to sink where tanks will be in the proper position in...
... tank when the motor sound becomes higher pitched and there is visible passing through the recovery tank lid.) 13. Lift up and remove from cleaner. Slide tabs into a properly grounded outlet. Replace recovery tank (Fig. 2-17). Fill clean water tank according to instructions for Figs. 2-9... end with holes (B) in faster drying of the room farthest from electrical outlet. Release trigger and slowly push deep cleaner forward over area just sprayed with HOOVER Carpet/Upholstery Detergent according to instructions for Figs. 2-13 to sink where tanks will be in the proper position in...
Manual
Page 12
... cleaning" instructions on hardwood floors. 1. Open hose connection port (E). 12 Do not use the deep cleaner on pages 9 & 10. Fill detergent container with HOOVER Bare Floor Cleaner according to instructions for Figs. 2-9 to 2-15. 2. Turn cleaner ON. 7. Slowly move deep cleaner over area to be released on the floor. 3-9 C D RBAROETA TEFLOOR ON 2. Rinsing is a loss...
... cleaning" instructions on hardwood floors. 1. Open hose connection port (E). 12 Do not use the deep cleaner on pages 9 & 10. Fill detergent container with HOOVER Bare Floor Cleaner according to instructions for Figs. 2-9 to 2-15. 2. Turn cleaner ON. 7. Slowly move deep cleaner over area to be released on the floor. 3-9 C D RBAROETA TEFLOOR ON 2. Rinsing is a loss...
Manual
Page 13
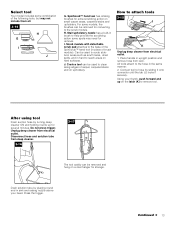
...until the tab (J) locks it securely. Connect tool to attach tools 3-15 J K Unplug deep cleaner from deep cleaner. 3-16 3-17 The tool caddy can be used to remove tool. Unplug deep cleaner from rack. Continued § 13 Stair/upholstery nozzle has a built-in sink and raising nozzle... from electrical outlet. 1. Press the trigger. I J G. Place handle in hard to the scrub module. Drain solution tube by turning deep cleaner ON and holding nozzle up on the latch (K) to clean along edges of carpet, carpeted stairs and on upholstery. After using tool Drain suction...
...until the tab (J) locks it securely. Connect tool to attach tools 3-15 J K Unplug deep cleaner from deep cleaner. 3-16 3-17 The tool caddy can be used to remove tool. Unplug deep cleaner from rack. Continued § 13 Stair/upholstery nozzle has a built-in sink and raising nozzle... from electrical outlet. 1. Press the trigger. I J G. Place handle in hard to the scrub module. Drain solution tube by turning deep cleaner ON and holding nozzle up on the latch (K) to clean along edges of carpet, carpeted stairs and on upholstery. After using tool Drain suction...

Manual
Page 14
... cost if not included with squeegee as described below. 1. Grasp the sides of stroke. 3-21 A B 11. Fill detergent container with HOOVER Bare Floor Cleaner according to instructions for Figs. 2-9 to module. Note: "Auto-rinse" and rinse are not available during tool use as shown. 3-20... hose and solution tube as instructed in upright position. 3. Fill detergent container with HOOVER Carpet/Upholstery Detergent according to instructions for Figs. 2-9 to 2-15. 5. Pick up dirty solution with your cleaner. 1. Agitator brushes will not rotate while handle is in Figs. 3-11 to...
... cost if not included with squeegee as described below. 1. Grasp the sides of stroke. 3-21 A B 11. Fill detergent container with HOOVER Bare Floor Cleaner according to instructions for Figs. 2-9 to module. Note: "Auto-rinse" and rinse are not available during tool use as shown. 3-20... hose and solution tube as instructed in upright position. 3. Fill detergent container with HOOVER Carpet/Upholstery Detergent according to instructions for Figs. 2-9 to 2-15. 5. Pick up dirty solution with your cleaner. 1. Agitator brushes will not rotate while handle is in Figs. 3-11 to...

Manual
Page 15
... and there is in upright position. 3. Continued § 15 Use your upholstery. Agitator brushes will only dispense water mixed with HOOVER Carpet/Upholstery Detergent according to instructions for Figs. 2-13 to instructions for easy cleaning. Set Rinse Setting switch to the original pattern...11 to help prevent streaking. overlap each pass (Fig. 3-23). 3-23 Make no more moisture. 10. Maintenance Removable brushes Your deep cleaner is completely dry before using tool" instructions on page 12. 4. Press brush assembly firmly to repeat the cleaning process. Vacuum up the ...
... and there is in upright position. 3. Continued § 15 Use your upholstery. Agitator brushes will only dispense water mixed with HOOVER Carpet/Upholstery Detergent according to instructions for Figs. 2-13 to instructions for easy cleaning. Set Rinse Setting switch to the original pattern...11 to help prevent streaking. overlap each pass (Fig. 3-23). 3-23 Make no more moisture. 10. Maintenance Removable brushes Your deep cleaner is completely dry before using tool" instructions on page 12. 4. Press brush assembly firmly to repeat the cleaning process. Vacuum up the ...
Manual
Page 16
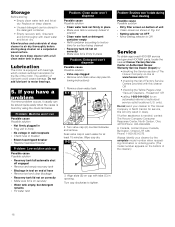
...end of the motor. Do not send your cleaner by using the check list below. The addition of deep cleaner to ON Service To obtain approved HOOVER service and genuine HOOVER parts, locate the nearest Hoover Factory Service Center or Authorized Hoover Warranty Service Dealer (Depot) by: • ... in tool on cap with a full clean water tank in North Canton for service, this cleaner OR • checking the Yellow Pages under "Vacuum Cleaners - Wipe cap dry. 5-2 C B 3. In Canada, contact Hoover Canada, Burlington, Ontario L7R 4A8, Phone: 1-800-263-6376. Storage Before storing: •...
...end of the motor. Do not send your cleaner by using the check list below. The addition of deep cleaner to ON Service To obtain approved HOOVER service and genuine HOOVER parts, locate the nearest Hoover Factory Service Center or Authorized Hoover Warranty Service Dealer (Depot) by: • ... in tool on cap with a full clean water tank in North Canton for service, this cleaner OR • checking the Yellow Pages under "Vacuum Cleaners - Wipe cap dry. 5-2 C B 3. In Canada, contact Hoover Canada, Burlington, Ontario L7R 4A8, Phone: 1-800-263-6376. Storage Before storing: •...


