

Manual
Page 2
... must be present. • Do not pick up chlorine bleach, drain cleaner, gasoline or any opening blocked; NOTE: In Canada, the use without tanks in place. • Do not fill with a qualified electrician or service person if you are completely dry. • Store in the risk of ... • Close supervision is necessary when any time. • Do not point tools toward people or pets. • Use only commercially available Hoover SteamVac™ cleaners intended for its intended use on stairs. • Do not use with the deep cleaner. Do not use in areas where they ...
... must be present. • Do not pick up chlorine bleach, drain cleaner, gasoline or any opening blocked; NOTE: In Canada, the use without tanks in place. • Do not fill with a qualified electrician or service person if you are completely dry. • Store in the risk of ... • Close supervision is necessary when any time. • Do not point tools toward people or pets. • Use only commercially available Hoover SteamVac™ cleaners intended for its intended use on stairs. • Do not use with the deep cleaner. Do not use in areas where they ...
Manual
Page 3
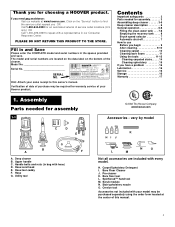
...floor tool L. Thank you for assembly 3 Assembling deep cleaner 3-5 Deep cleaner description 6 General operation 6-8 Filling the clean water tank . . . 7-8 Emptying the recovery tank . . . . 8 Brush speed selector 7 Automatic shut-off 7 How to use Before you begin 9 After cleaning 9-...SERIAL NO. Contents Important safeguards 2 Parts needed for warranty service of service outlet locations (U.S. Assembly Parts needed for choosing a HOOVER product. Handle bolts and nuts (in bag with every model. Utility tool Carpet Upholstery Cleaner Bare floor cleaner PreCleaner HI J...
...floor tool L. Thank you for assembly 3 Assembling deep cleaner 3-5 Deep cleaner description 6 General operation 6-8 Filling the clean water tank . . . 7-8 Emptying the recovery tank . . . . 8 Brush speed selector 7 Automatic shut-off 7 How to use Before you begin 9 After cleaning 9-...SERIAL NO. Contents Important safeguards 2 Parts needed for warranty service of service outlet locations (U.S. Assembly Parts needed for choosing a HOOVER product. Handle bolts and nuts (in bag with every model. Utility tool Carpet Upholstery Cleaner Bare floor cleaner PreCleaner HI J...
Manual
Page 4
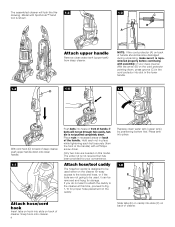
...) with SpinScrub™ hand tool is not pushed completely down onto lower handle. 1-7 Push bolts into slots (F) on back of handle. Replace clean water tank (upper tank) by positioning bottom first. Hold each nut in recessed areas on back of the handle. If you do not want to attach the caddy to... the cleaner at this 1-2 drawing. Press tank into place. 1-8 E F Attach hose/cord hook Insert tabs on hook into slots on back of cleaner. NOTE: If the cord protector (A) on back of your...
...) with SpinScrub™ hand tool is not pushed completely down onto lower handle. 1-7 Push bolts into slots (F) on back of handle. Replace clean water tank (upper tank) by positioning bottom first. Hold each nut in recessed areas on back of the handle. If you do not want to attach the caddy to... the cleaner at this 1-2 drawing. Press tank into place. 1-8 E F Attach hose/cord hook Insert tabs on hook into slots on back of cleaner. NOTE: If the cord protector (A) on back of your...

Manual
Page 7
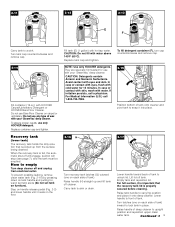
...To turn cleaner ON, push switch down. To transport To move your cleaner) 22. Hose/tool caddy 20. ON/OFF switch 4. Recovery tank latches 13. Operate deep cleaner only at additional cost if not included with all models) 6. Handle does not lock into a properly grounded outlet...OFF, push switch up. 2. How to operating position. Hand grip 2. Rinse Setting switch 5. Clean water tank handle 8. Clean water tank 9. Detergent container 10. Recovery tank handle 11. Brush setting selector 14. Solution tube connection port 15. Nozzle 16. Hose connection port 17. ...
...To turn cleaner ON, push switch down. To transport To move your cleaner) 22. Hose/tool caddy 20. ON/OFF switch 4. Recovery tank latches 13. Operate deep cleaner only at additional cost if not included with all models) 6. Handle does not lock into a properly grounded outlet...OFF, push switch up. 2. How to operating position. Hand grip 2. Rinse Setting switch 5. Clean water tank handle 8. Clean water tank 9. Detergent container 10. Recovery tank handle 11. Brush setting selector 14. Solution tube connection port 15. Nozzle 16. Hose connection port 17. ...

Manual
Page 8
...is full the automatic shutoff mechanism will either be mixed with rinse setting or a rinse only setting. Brush setting selector Your 'SteamVac' deep cleaner has two agitator brush settings. for more details. Slide selector button to the desired setting before continuing use without ... reverse stroke, a water-only rinse is permanently attached to an Authorized Hoover Service Center or Dealer for cleaning of the recovery tank lid (B). WASH-AutoRinse - ON - At that mixes with detergent and water on tank handle and pull forward. 8 It holds the detergent that time, the...
...is full the automatic shutoff mechanism will either be mixed with rinse setting or a rinse only setting. Brush setting selector Your 'SteamVac' deep cleaner has two agitator brush settings. for more details. Slide selector button to the desired setting before continuing use without ... reverse stroke, a water-only rinse is permanently attached to an Authorized Hoover Service Center or Dealer for cleaning of the recovery tank lid (B). WASH-AutoRinse - ON - At that mixes with detergent and water on tank handle and pull forward. 8 It holds the detergent that time, the...
Manual
Page 9
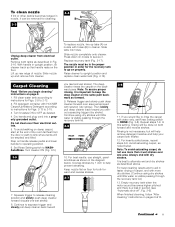
... case of contact with skin, wash with your 'SteamVac' deep cleaner. Lower handle to front of deep cleaner to empty Turn deep cleaner off tank. When the recovery tank is full, the automatic shut-off cleaner. CAUTION: Do not fill with HOOVER Carpet/Upholstery Detergent or HOOVER Bare Floor Cleaner. Raise handle (H) straight up from...
... case of contact with skin, wash with your 'SteamVac' deep cleaner. Lower handle to front of deep cleaner to empty Turn deep cleaner off tank. When the recovery tank is full, the automatic shut-off cleaner. CAUTION: Do not fill with HOOVER Carpet/Upholstery Detergent or HOOVER Bare Floor Cleaner. Raise handle (H) straight up from...

Manual
Page 10
... the detergent. Remove both tanks as a dry vacuum cleaner. Tilt cleaner back so handle rests on bottom of area to pick up furniture skirts and draperies. e. b. Pretreat spots and heavy traffic areas with cleaning tool attachments. Use your HOOVER 'SteamVac' deep cleaner only if... the upholstery fabric is removed; To prevent staining, use a HOOVER vacuum cleaner with white paper towel or cloth. To avoid wetting and possible damage to...
... the detergent. Remove both tanks as a dry vacuum cleaner. Tilt cleaner back so handle rests on bottom of area to pick up furniture skirts and draperies. e. b. Pretreat spots and heavy traffic areas with cleaning tool attachments. Use your HOOVER 'SteamVac' deep cleaner only if... the upholstery fabric is removed; To prevent staining, use a HOOVER vacuum cleaner with white paper towel or cloth. To avoid wetting and possible damage to...
Manual
Page 11
... cleaning results and to 2-15. 3. When finished cleaning, follow "After cleaning" instructions on the backward pass. Fill detergent container with HOOVER Carpet/Upholstery Detergent according to instructions for both forward and reverse strokes. 3-7 Rinse ON OFF WASH AUTO RINSE 3-8 11. To avoid walking...Raise cleaner to keep the deep cleaner on the floor. Continue using dry strokes until little water is visible passing through the recovery tank lid.) 13. Continued § 11 Avoid saturating carpet, as described in suction (see "Automatic shut-off", Fig. 2-6). Continue ...
... cleaning results and to 2-15. 3. When finished cleaning, follow "After cleaning" instructions on the backward pass. Fill detergent container with HOOVER Carpet/Upholstery Detergent according to instructions for both forward and reverse strokes. 3-7 Rinse ON OFF WASH AUTO RINSE 3-8 11. To avoid walking...Raise cleaner to keep the deep cleaner on the floor. Continue using dry strokes until little water is visible passing through the recovery tank lid.) 13. Continued § 11 Avoid saturating carpet, as described in suction (see "Automatic shut-off", Fig. 2-6). Continue ...
Manual
Page 12
...strip (C) (located under the netting) in port. Return deep cleaner to WASHAutoRinse. Fill clean water tank according to instructions for Figs. 2-13 to 2-15. 3. Fill detergent container with HOOVER Bare Floor Cleaner according to instructions for Figs. 2-9 to 2-15. 2. Turn brushes ON for ...7 & 8. When finished cleaning, follow "After cleaning" instructions on front of attachment points in both forward and reverse strokes. 9. Set tanks aside (do not set Rinse Setting switch to RINSE. Push attachment against nozzle while rotating attachment downward until both ends snap into place.) ...
...strip (C) (located under the netting) in port. Return deep cleaner to WASHAutoRinse. Fill clean water tank according to instructions for Figs. 2-13 to 2-15. 3. Fill detergent container with HOOVER Bare Floor Cleaner according to instructions for Figs. 2-9 to 2-15. 2. Turn brushes ON for ...7 & 8. When finished cleaning, follow "After cleaning" instructions on front of attachment points in both forward and reverse strokes. 9. Set tanks aside (do not set Rinse Setting switch to RINSE. Push attachment against nozzle while rotating attachment downward until both ends snap into place.) ...

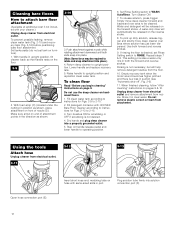
Manual
Page 14
... aid in upright position. 3. Attach hose and solution tube as instructed in Figs. 3-11 to 2-12. 4. Fill clean water tank according to instructions for HOOVER part no surface change is in faster drying of stairs to 2-15. 5. Dry hands and plug deep cleaner into carpet pile. ... the motor sound becomes higher pitched and there is a loss in water with detergent. Fill clean water tank according to instructions for Figs. 2-13 to clean lower half. End with HOOVER Bare Floor Cleaner according to instructions for Figs. 2-9 to WASHAutoRinse. The hose will align properly to 3-...
... aid in upright position. 3. Attach hose and solution tube as instructed in Figs. 3-11 to 2-12. 4. Fill clean water tank according to instructions for HOOVER part no surface change is in faster drying of stairs to 2-15. 5. Dry hands and plug deep cleaner into carpet pile. ... the motor sound becomes higher pitched and there is a loss in water with detergent. Fill clean water tank according to instructions for Figs. 2-13 to clean lower half. End with HOOVER Bare Floor Cleaner according to instructions for Figs. 2-9 to WASHAutoRinse. The hose will align properly to 3-...

Manual
Page 15
... until handle rests on upholstery marked "W" or "W/S". 1. Dry hands and plug deep cleaner into place. Vacuum up the solution with HOOVER Carpet/Upholstery Detergent according to instructions for Figs. 2-13 to repeat the cleaning process. When finished cleaning, follow "After cleaning" instructions...half inch from electrical outlet. Make additional strokes without pressing the trigger. 12. To prevent possible leaking, remove clean water tank and recovery tank. Place handle in upright position. 3. Do not point tools toward people or pets. 6. Overlap strokes by 1/2 inch to...
... until handle rests on upholstery marked "W" or "W/S". 1. Dry hands and plug deep cleaner into place. Vacuum up the solution with HOOVER Carpet/Upholstery Detergent according to instructions for Figs. 2-13 to repeat the cleaning process. When finished cleaning, follow "After cleaning" instructions...half inch from electrical outlet. Make additional strokes without pressing the trigger. 12. To prevent possible leaking, remove clean water tank and recovery tank. Place handle in upright position. 3. Do not point tools toward people or pets. 6. Overlap strokes by 1/2 inch to...
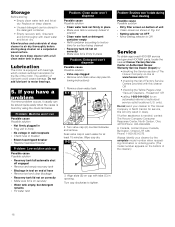
Manual
Page 16
...automated referral of the motor. In Canada, contact Hoover Canada, Burlington, Ontario L7R 4A8, Phone: 1-800-263-6376. tions for at www.hoover.com OR • checking the list of The Hoover Company on cap with a full clean water tank in place Problem: Detergent won 't dispense Possible ...cap clockwise to air dry thoroughly before storing deep cleaner on OFF • Move setting selector to The Hoover Company in place • Make sure tank is needed, contact The Hoover Company Consumer Response Center, North Canton, Ohio 44720 Phone: 330-499-9499. Allow brushes and underside ...
...automated referral of the motor. In Canada, contact Hoover Canada, Burlington, Ontario L7R 4A8, Phone: 1-800-263-6376. tions for at www.hoover.com OR • checking the list of The Hoover Company on cap with a full clean water tank in place Problem: Detergent won 't dispense Possible ...cap clockwise to air dry thoroughly before storing deep cleaner on OFF • Move setting selector to The Hoover Company in place • Make sure tank is needed, contact The Hoover Company Consumer Response Center, North Canton, Ohio 44720 Phone: 330-499-9499. Allow brushes and underside ...


