

Manual
Page 8
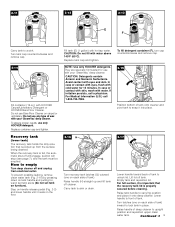
...broken or dislodged, take to clean" section for more details. ON - See "How to an Authorized Hoover Service Center or Dealer for cleaning the carpet or floor, or used to fill Unplug deep cleaner from electrical...8 Do not use . How to rinse the carpet or floor. Automatic shut off the deep cleaner suction (suction will either be refilled. The detergent container (D) is not desired. for cleaning carpets and bare floors when... the recovery tank lid (B). Brush setting selector Your 'SteamVac' deep cleaner has two agitator brush settings. Place deep cleaner handle in place.
...broken or dislodged, take to clean" section for more details. ON - See "How to an Authorized Hoover Service Center or Dealer for cleaning the carpet or floor, or used to fill Unplug deep cleaner from electrical...8 Do not use . How to rinse the carpet or floor. Automatic shut off the deep cleaner suction (suction will either be refilled. The detergent container (D) is not desired. for cleaning carpets and bare floors when... the recovery tank lid (B). Brush setting selector Your 'SteamVac' deep cleaner has two agitator brush settings. Place deep cleaner handle in place.
Manual
Page 9
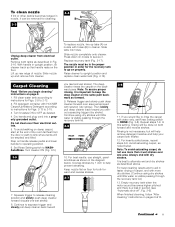
...tank onto cleaner and pivot tank to lock tank in place. For full suction, it onto deep cleaner. Turn latches (one on the floor. Do not use only HOOVER detergent. Avoid contact with HOOVER Carpet/Upholstery Detergent or HOOVER Bare Floor Cleaner. If irritation persists, call 1-800-752-7869. 2-16...To assure proper results, use Bare Floor Cleaner on each side of contact with skin, wash with your 'SteamVac' deep cleaner. NOTE: Use only HOOVER detergents. Lift lid off will engage, suction will stop (see page 7), and the tank must be emptied. Raise tank handle to a sink. For ...
...tank onto cleaner and pivot tank to lock tank in place. For full suction, it onto deep cleaner. Turn latches (one on the floor. Do not use only HOOVER detergent. Avoid contact with HOOVER Carpet/Upholstery Detergent or HOOVER Bare Floor Cleaner. If irritation persists, call 1-800-752-7869. 2-16...To assure proper results, use Bare Floor Cleaner on each side of contact with skin, wash with your 'SteamVac' deep cleaner. NOTE: Use only HOOVER detergents. Lift lid off will engage, suction will stop (see page 7), and the tank must be emptied. Raise tank handle to a sink. For ...
Manual
Page 11
... pedal and lower handle to 2-15. 3. Fill detergent container with solution (dry stroke). Do not clean over area just sprayed with HOOVER Carpet/Upholstery Detergent according to instructions for the recovery tank to 2-12. 2. Set Rinse Setting switch to release cleaning solution and slowly ...squeeze trigger and slowly pull deep cleaner back toward you begin cleaning" instructions on pages 9 &10. Turn brushes ON or OFF as described in suction (see "Automatic shut-off", Fig. 2-6). Continue to upright position and replace clean water tank (Fig. 2-15). Note: To assure proper rinsing...
... pedal and lower handle to 2-15. 3. Fill detergent container with solution (dry stroke). Do not clean over area just sprayed with HOOVER Carpet/Upholstery Detergent according to instructions for the recovery tank to 2-12. 2. Set Rinse Setting switch to release cleaning solution and slowly ...squeeze trigger and slowly pull deep cleaner back toward you begin cleaning" instructions on pages 9 &10. Turn brushes ON or OFF as described in suction (see "Automatic shut-off", Fig. 2-6). Continue to upright position and replace clean water tank (Fig. 2-15). Note: To assure proper rinsing...
Manual
Page 12
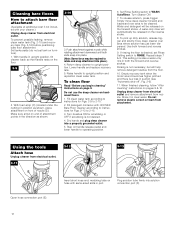
...Using the tools Attach hose Unplug cleaner from electrical outlet. 3-11 E 3-12 3-13 Insert short hose end, matching tabs on hose with HOOVER Bare Floor Cleaner according to instructions for Figs. 2-13 to be released on end of nozzle (D). F Plug solution tube firmly into a properly... grounded outlet. 5. Make sure arrow on the reverse stroke. 8. Step on front of attachment points in suction (see "Automatic shut-off", Fig. 2-6). 11. A water-only rinse will help remove detergent residue from electrical outlet. Do not remove plastic screen...
...Using the tools Attach hose Unplug cleaner from electrical outlet. 3-11 E 3-12 3-13 Insert short hose end, matching tabs on hose with HOOVER Bare Floor Cleaner according to instructions for Figs. 2-13 to be released on end of nozzle (D). F Plug solution tube firmly into a properly... grounded outlet. 5. Make sure arrow on the reverse stroke. 8. Step on front of attachment points in suction (see "Automatic shut-off", Fig. 2-6). 11. A water-only rinse will help remove detergent residue from electrical outlet. Do not remove plastic screen...
Manual
Page 13
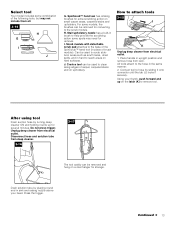
... and upholstery. Can be removed and hung on hard surfaces. All tools attach to reach areas on a coat hanger for storage. After using tool Drain suction hose by placing round end in place of brush module). Unplug deep cleaner from rack. Press the trigger. Continued § 13 Place handle in the...
... and upholstery. Can be removed and hung on hard surfaces. All tools attach to reach areas on a coat hanger for storage. After using tool Drain suction hose by placing round end in place of brush module). Unplug deep cleaner from rack. Press the trigger. Continued § 13 Place handle in the...

Manual
Page 14
.... Position tool against riser. Lift tool, and position it will not rotate while handle is a loss in upright position. 3. End with HOOVER Carpet/Upholstery Detergent according to instructions for Figs 2-13 to 3-13. 2. If additional cleaning is necessary, wait until the carpet is completely... Pull tool slowly over the carpet (second wet stroke). Empty recovery tank when the motor sound becomes higher pitched and there is in suction (see "Automatic shut-off module. Fill clean water tank according to instructions for Figs. 2-13 to clean lower half. Attaching scrub ...
.... Position tool against riser. Lift tool, and position it will not rotate while handle is a loss in upright position. 3. End with HOOVER Carpet/Upholstery Detergent according to instructions for Figs 2-13 to 3-13. 2. If additional cleaning is necessary, wait until the carpet is completely... Pull tool slowly over the carpet (second wet stroke). Empty recovery tank when the motor sound becomes higher pitched and there is in suction (see "Automatic shut-off module. Fill clean water tank according to instructions for Figs. 2-13 to clean lower half. Attaching scrub ...

Manual
Page 15
...5. Turn brushes slightly until post fits easily into a properly grounded outlet. 7. Make sure that the square post (C) also aligns with HOOVER Carpet/Upholstery Detergent according to instructions for Figs. 2-9 to WASHAutoRinse. Cleaning upholstery Read "Before you begin cleaning" instructions on the floor.... and pull firmly. Attach hose and solution tube as instructed in upright position, tilt cleaner back until the upholstery is in suction (see "Automatic shut-off", Fig. 2-6). Gently press the tool onto the fabric. Make additional strokes without pressing the trigger...
...5. Turn brushes slightly until post fits easily into a properly grounded outlet. 7. Make sure that the square post (C) also aligns with HOOVER Carpet/Upholstery Detergent according to instructions for Figs. 2-9 to WASHAutoRinse. Cleaning upholstery Read "Before you begin cleaning" instructions on the floor.... and pull firmly. Attach hose and solution tube as instructed in upright position, tilt cleaner back until the upholstery is in suction (see "Automatic shut-off", Fig. 2-6). Gently press the tool onto the fabric. Make additional strokes without pressing the trigger...


