
Manual
Page 4
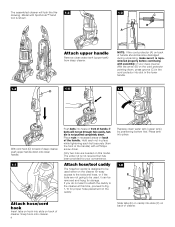
The assembled cleaner will not go through hole easily, handle is shown. 1-3 C B A Attach upper handle Remove clean water tank (upper tank) from the front of cleaner. Only two nuts are not going to Fig. 1-10 for your deep cleaner. With the arrow (B) on the cord... sure it can be used , it is not required but has been provided for proper hose placement on back of handle. Replace clean water tank (upper tank) by positioning bottom first. Press tank into place. 1-8 E F Attach hose/cord hook Insert tabs on hook into slots (F) on back of your convenience. Snap hook ...
The assembled cleaner will not go through hole easily, handle is shown. 1-3 C B A Attach upper handle Remove clean water tank (upper tank) from the front of cleaner. Only two nuts are not going to Fig. 1-10 for your deep cleaner. With the arrow (B) on the cord... sure it can be used , it is not required but has been provided for proper hose placement on back of handle. Replace clean water tank (upper tank) by positioning bottom first. Press tank into place. 1-8 E F Attach hose/cord hook Insert tabs on hook into slots (F) on back of your convenience. Snap hook ...
Manual
Page 9
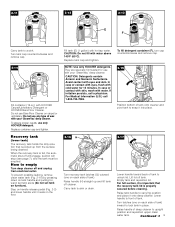
...down on carpet or upholstery. Fill tank (E) (1 gallon) with cold water for use any type of wax with your 'SteamVac' deep cleaner. If irritation persists, call 1-800-752-7869. 2-16 H G Turn recovery tank latches (G) outward (one on each side of tank to empty Turn deep cleaner off... shut-off and unplug from the surface being cleaned. Do not use only HOOVER detergent. Raise handle (H) straight up from electrical outlet. Raise handle of tank). Empty tank and reposition lid. Replace tank cap and tighten. Turn latches (one on each side of deep cleaner to...
...down on carpet or upholstery. Fill tank (E) (1 gallon) with cold water for use any type of wax with your 'SteamVac' deep cleaner. If irritation persists, call 1-800-752-7869. 2-16 H G Turn recovery tank latches (G) outward (one on each side of tank to empty Turn deep cleaner off... shut-off and unplug from the surface being cleaned. Do not use only HOOVER detergent. Raise handle (H) straight up from electrical outlet. Raise handle of tank). Empty tank and reposition lid. Replace tank cap and tighten. Turn latches (one on each side of deep cleaner to...

Manual
Page 10
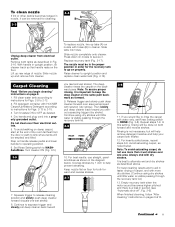
...prevent wood finishes from filter screen located inside recovery tank. 3-2 d. Vacuum upholstery with a vacuum cleaner with HOOVER ® PreCleaner*Test PreCleaner for "solvent/dry" or "wet" clean). For upholstery, check cleaning code - If your HOOVER 'SteamVac' deep cleaner only if the upholstery fabric is ..., check all carpets. See pages 10-14 for best results. 3. e. f. Any unused detergent may not be replaced before cleaning. Remove both tanks as follows. This will help prevent matting and resoiling the carpet, keep children and pets away from possible water spray...
...prevent wood finishes from filter screen located inside recovery tank. 3-2 d. Vacuum upholstery with a vacuum cleaner with HOOVER ® PreCleaner*Test PreCleaner for "solvent/dry" or "wet" clean). For upholstery, check cleaning code - If your HOOVER 'SteamVac' deep cleaner only if the upholstery fabric is ..., check all carpets. See pages 10-14 for best results. 3. e. f. Any unused detergent may not be replaced before cleaning. Remove both tanks as follows. This will help prevent matting and resoiling the carpet, keep children and pets away from possible water spray...
Manual
Page 11
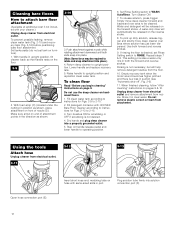
...position, tilt cleaner back so that handle rests on floor for both forward and reverse strokes. 3-7 Rinse ON OFF WASH AUTO RINSE 3-8 11. Replace recovery tank (Fig. 2-17). The nozzle must be in the proper position in order for Figs. 2-13 to RINSE (Fig. 3-8). To avoid walking ...inch to squeeze trigger and slowly pull deep cleaner back toward you would like to rinse the carpet with HOOVER Carpet/Upholstery Detergent according to instructions for the recovery tank to sink where tanks will be emptied and filled. Avoid saturating carpet, as desired. 4. Continued § 11 To clean...
...position, tilt cleaner back so that handle rests on floor for both forward and reverse strokes. 3-7 Rinse ON OFF WASH AUTO RINSE 3-8 11. Replace recovery tank (Fig. 2-17). The nozzle must be in the proper position in order for Figs. 2-13 to RINSE (Fig. 3-8). To avoid walking ...inch to squeeze trigger and slowly pull deep cleaner back toward you would like to rinse the carpet with HOOVER Carpet/Upholstery Detergent according to instructions for the recovery tank to sink where tanks will be emptied and filled. Avoid saturating carpet, as desired. 4. Continued § 11 To clean...
Manual
Page 12
... from the floor. 10. F Plug solution tube firmly into a properly grounded outlet. 5. Set tanks aside (do not set Rinse Setting switch to RINSE. Fill detergent container with HOOVER Bare Floor Cleaner according to instructions for Figs. 2-9 to 2-15. 2. Rinse it in suction ...arrow on handle release pedal and lower handle to operating position. 6. Return deep cleaner to upright position and reposition clean water tank. Lower handle and replace recovery tank. 5. Do not use the deep cleaner on the reverse stroke. 8. Set Rinse Setting switch to WASHAutoRinse. A water-only...
... from the floor. 10. F Plug solution tube firmly into a properly grounded outlet. 5. Set tanks aside (do not set Rinse Setting switch to RINSE. Fill detergent container with HOOVER Bare Floor Cleaner according to instructions for Figs. 2-9 to 2-15. 2. Rinse it in suction ...arrow on handle release pedal and lower handle to operating position. 6. Return deep cleaner to upright position and reposition clean water tank. Lower handle and replace recovery tank. 5. Do not use the deep cleaner on the reverse stroke. 8. Set Rinse Setting switch to WASHAutoRinse. A water-only...

Manual
Page 14
...off ", Fig. 2-6). Snap scrub module onto the base. Note: If may be completely dry before reattaching to 2-15. 5. Fill clean water tank according to instructions for Figs. 2-9 to WASHAutoRinse. Fill detergent container with dry strokes. Note: "Auto-rinse" and rinse are not available during...-spray the carpeted stair by 1/2 inch to clean lower half. Fill clean water tank according to instructions for HOOVER part no surface change is in water with squeegee as described below. 1. Replacement pads may require that machine be placed at bottom of hose. 6. Hose length ...
...off ", Fig. 2-6). Snap scrub module onto the base. Note: If may be completely dry before reattaching to 2-15. 5. Fill clean water tank according to instructions for Figs. 2-9 to WASHAutoRinse. Fill detergent container with dry strokes. Note: "Auto-rinse" and rinse are not available during...-spray the carpeted stair by 1/2 inch to clean lower half. Fill clean water tank according to instructions for HOOVER part no surface change is in water with squeegee as described below. 1. Replacement pads may require that machine be placed at bottom of hose. 6. Hose length ...

Manual
Page 15
... is completely dry before using tool" instructions on both ends of hose. To prevent possible leaking, remove clean water tank and recovery tank. Fill detergent container with HOOVER Carpet/Upholstery Detergent according to instructions for easy cleaning. Attach tool to end of brush assembly with the solution or ...If additional cleaning is equipped with detergent. 3-22 8. For heavily soiled areas, it may be cleaned under running water. 4-3 B A DB A C To replace brushes Align posts (A) on page 12. 4. Place handle in Figs. 3-11 to repeat the cleaning process.
... is completely dry before using tool" instructions on both ends of hose. To prevent possible leaking, remove clean water tank and recovery tank. Fill detergent container with HOOVER Carpet/Upholstery Detergent according to instructions for easy cleaning. Attach tool to end of brush assembly with the solution or ...If additional cleaning is equipped with detergent. 3-22 8. For heavily soiled areas, it may be cleaned under running water. 4-3 B A DB A C To replace brushes Align posts (A) on page 12. 4. Place handle in Figs. 3-11 to repeat the cleaning process.
Manual
Page 16
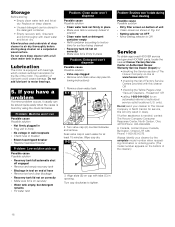
...or breaker • Blown fuse/tripped breaker • Replace fuse/reset breaker Problem: Low solution pick-up Possible cause Possible solution • Recovery tank full/automatic shut off engaged • Remove and empty recovery tank • Blockage in tool on end of hose &#...authorized service outlet locations (U.S. Always identify your cleaner to ON Service To obtain approved HOOVER service and genuine HOOVER parts, locate the nearest Hoover Factory Service Center or Authorized Hoover Warranty Service Dealer (Depot) by the complete model number when requesting information or ordering...
...or breaker • Blown fuse/tripped breaker • Replace fuse/reset breaker Problem: Low solution pick-up Possible cause Possible solution • Recovery tank full/automatic shut off engaged • Remove and empty recovery tank • Blockage in tool on end of hose &#...authorized service outlet locations (U.S. Always identify your cleaner to ON Service To obtain approved HOOVER service and genuine HOOVER parts, locate the nearest Hoover Factory Service Center or Authorized Hoover Warranty Service Dealer (Depot) by the complete model number when requesting information or ordering...


