
Manual
Page 3
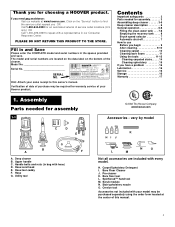
... General operation 6-8 Filling the clean water tank . . . 7-8 Emptying the recovery tank . . . . 8 Brush speed selector 7 Automatic shut-off 7 How to speak with a representative in bag with hose) D. Scrub module N. Thank you for assembly 1-1 © 2002 The Hoover Company www.hoover.com Accessories - only) OR Call 1-...model. Click on the bottom of your sales receipt to this manual. 3 Contents Important safeguards 2 Parts needed for choosing a HOOVER product. Handle bolts and nuts (in our Consumer Response Center. Bare Floor Cleaner J. Pre-cleaner K. PLEASE DO NOT RETURN...
... General operation 6-8 Filling the clean water tank . . . 7-8 Emptying the recovery tank . . . . 8 Brush speed selector 7 Automatic shut-off 7 How to speak with a representative in bag with hose) D. Scrub module N. Thank you for assembly 1-1 © 2002 The Hoover Company www.hoover.com Accessories - only) OR Call 1-...model. Click on the bottom of your sales receipt to this manual. 3 Contents Important safeguards 2 Parts needed for choosing a HOOVER product. Handle bolts and nuts (in our Consumer Response Center. Bare Floor Cleaner J. Pre-cleaner K. PLEASE DO NOT RETURN...

Manual
Page 7
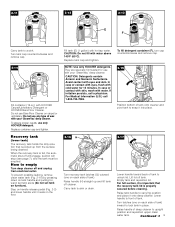
...release pedal This deep cleaner is shown. 1. A Handle release pedal Step on back of cleaner. Clean water tank 9. How to allow convenient operation. ON/OFF switch 4. Recovery tank: holds dirty solution 12. Stair/upholstery nozzle 21. Solution trigger: press to operating position. Solution tube connection ...To turn cleaner OFF, push switch up. Model with all models) 6. Hose/tool caddy 20. Nozzle 16. Recovery tank latches 13. Bare floor tool (available at voltage specified on data plate on pedal (A) to lower handle to release cleaning solution 3. Clean ...
...release pedal This deep cleaner is shown. 1. A Handle release pedal Step on back of cleaner. Clean water tank 9. How to allow convenient operation. ON/OFF switch 4. Recovery tank: holds dirty solution 12. Stair/upholstery nozzle 21. Solution trigger: press to operating position. Solution tube connection ...To turn cleaner OFF, push switch up. Model with all models) 6. Hose/tool caddy 20. Nozzle 16. Recovery tank latches 13. Bare floor tool (available at voltage specified on data plate on pedal (A) to lower handle to release cleaning solution 3. Clean ...

Manual
Page 8
...selector Your 'SteamVac' deep cleaner has two agitator brush settings. The tanks Clean water tank (upper tank) The clean water tank (C) holds the water that mixes with detergent for cleaning the carpet or floor, or used to an Authorized Hoover Service Center or Dealer for cleaning of the recovery tank lid (B).... Do not use . To remove tank, press down on the forward stroke. 2-5 2-6 2-7 B Carrying handle The deep cleaner...
...selector Your 'SteamVac' deep cleaner has two agitator brush settings. The tanks Clean water tank (upper tank) The clean water tank (C) holds the water that mixes with detergent for cleaning the carpet or floor, or used to an Authorized Hoover Service Center or Dealer for cleaning of the recovery tank lid (B).... Do not use . To remove tank, press down on the forward stroke. 2-5 2-6 2-7 B Carrying handle The deep cleaner...
Manual
Page 9
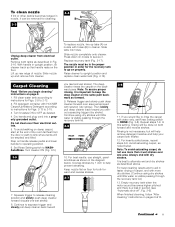
... contact with skin, wash with your 'SteamVac' deep cleaner. Turn latches (one on the floor. Raise handle of tank to lock tank in place. When the recovery tank is picked up and lift tank off tank. How to snap it rests on each side of tank) inward to unlock lid. NOTE: Use only HOOVER detergents. If irritation persists, call...
... contact with skin, wash with your 'SteamVac' deep cleaner. Turn latches (one on the floor. Raise handle of tank to lock tank in place. When the recovery tank is picked up and lift tank off tank. How to snap it rests on each side of tank) inward to unlock lid. NOTE: Use only HOOVER detergents. If irritation persists, call...

Manual
Page 10
...plastic or aluminum foil to pick up furniture skirts and draperies. Use your 'SteamVac' deep cleaner to protect wood or metal surfaces from all carpets. Use your HOOVER 'SteamVac' deep cleaner only if the upholstery fabric is dry, place plastic or aluminum ... completely dried. Vacuum upholstery with a vacuum cleaner with a household scrub brush if necessary. c. plastic) underneath them before cleaning. Rinse the recovery tank lid and let air dry. Return cleaner to a nonwood bare floor surface or place waterproof material (e.g. Do not use . 3-1 c. ...
...plastic or aluminum foil to pick up furniture skirts and draperies. Use your 'SteamVac' deep cleaner to protect wood or metal surfaces from all carpets. Use your HOOVER 'SteamVac' deep cleaner only if the upholstery fabric is dry, place plastic or aluminum ... completely dried. Vacuum upholstery with a vacuum cleaner with a household scrub brush if necessary. c. plastic) underneath them before cleaning. Rinse the recovery tank lid and let air dry. Return cleaner to a nonwood bare floor surface or place waterproof material (e.g. Do not use . 3-1 c. ...
Manual
Page 11
... deep cleaner rinses the carpet on the same path backward as noted below . Note: To assure proper rinsing, it is visible passing through the recovery tank lid. 3-6 WASH RINSE 10. Continue using dry strokes until little water is a loss in suction (see "Automatic shut-off", Fig. 2-6). Overlap...Set Rinse Setting switch to upright position and replace clean water tank (Fig. 2-15). Release trigger and slowly push deep cleaner forward over area just sprayed with HOOVER Carpet/Upholstery Detergent according to instructions for the recovery tank to go on page 9. 1. Note: To avoid saturating...
... deep cleaner rinses the carpet on the same path backward as noted below . Note: To assure proper rinsing, it is visible passing through the recovery tank lid. 3-6 WASH RINSE 10. Continue using dry strokes until little water is a loss in suction (see "Automatic shut-off", Fig. 2-6). Overlap...Set Rinse Setting switch to upright position and replace clean water tank (Fig. 2-15). Release trigger and slowly push deep cleaner forward over area just sprayed with HOOVER Carpet/Upholstery Detergent according to instructions for the recovery tank to go on page 9. 1. Note: To avoid saturating...
Manual
Page 12
...) in the direction as shown, place attachment on handle release pedal and lower handle to operating position. 6. Lower handle and replace recovery tank. 5. To clean floor Read "Before you begin cleaning" instructions on the forward stroke. Fill detergent container with your cleaner.) Unplug ... remove detergent residue from electrical outlet. Rinsing is desired, set tank on pages 9 & 10. Cleaning bare floors How to attach bare floor attachment (Available at additional cost if not included with HOOVER Bare Floor Cleaner according to instructions for scrubbing or OFF if scrubbing...
...) in the direction as shown, place attachment on handle release pedal and lower handle to operating position. 6. Lower handle and replace recovery tank. 5. To clean floor Read "Before you begin cleaning" instructions on the forward stroke. Fill detergent container with your cleaner.) Unplug ... remove detergent residue from electrical outlet. Rinsing is desired, set tank on pages 9 & 10. Cleaning bare floors How to attach bare floor attachment (Available at additional cost if not included with HOOVER Bare Floor Cleaner according to instructions for scrubbing or OFF if scrubbing...

Manual
Page 14
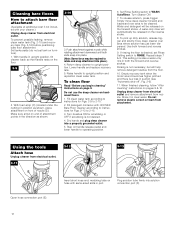
... is necessary, wait until the carpet is a loss in upright position. Empty recovery tank when the motor sound becomes higher pitched and there is completely dry before reattaching to instructions for HOOVER part no surface change is visible, continue to clean upper half of stairway and...End with mild detergent. Replacement pads may be completely dry before using on page 9. 1. Agitator brushes will only dispense water mixed with HOOVER Bare Floor Cleaner according to instructions for Figs. 2-13 to help prevent streaking. Note: "Auto-rinse" and rinse are not available ...
... is necessary, wait until the carpet is a loss in upright position. Empty recovery tank when the motor sound becomes higher pitched and there is completely dry before reattaching to instructions for HOOVER part no surface change is visible, continue to clean upper half of stairway and...End with mild detergent. Replacement pads may be completely dry before using on page 9. 1. Agitator brushes will only dispense water mixed with HOOVER Bare Floor Cleaner according to instructions for Figs. 2-13 to help prevent streaking. Note: "Auto-rinse" and rinse are not available ...

Manual
Page 15
...brushes for easy cleaning. Gently press the tool onto the fabric. If additional cleaning is necessary, wait until the upholstery is equipped with HOOVER Carpet/Upholstery Detergent according to instructions for Figs. 2-9 to check the cleaning code on your deep cleaner only on pages 9 & 10 ... and rinse are not available during tool use. Dry hands and plug deep cleaner into hole. To prevent possible leaking, remove clean water tank and recovery tank. To clean in upright position. 3. Turn brushes slightly until handle rests on page 9. Do not point tools toward people or pets. 6....
...brushes for easy cleaning. Gently press the tool onto the fabric. If additional cleaning is necessary, wait until the upholstery is equipped with HOOVER Carpet/Upholstery Detergent according to instructions for Figs. 2-9 to check the cleaning code on your deep cleaner only on pages 9 & 10 ... and rinse are not available during tool use. Dry hands and plug deep cleaner into hole. To prevent possible leaking, remove clean water tank and recovery tank. To clean in upright position. 3. Turn brushes slightly until handle rests on page 9. Do not point tools toward people or pets. 6....
Manual
Page 16
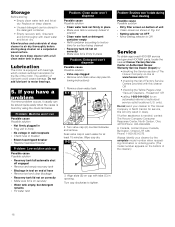
... L7R 4A8, Phone: 1-800-263-6376. Replace on end of authorized service outlet locations (U.S. Do not add lubricant to The Hoover Company in North Canton for an automated referral of hose • Remove tool and clear blockage • Recovery tank lid not on correctly • Make sure lid is on securely • Water...
... L7R 4A8, Phone: 1-800-263-6376. Replace on end of authorized service outlet locations (U.S. Do not add lubricant to The Hoover Company in North Canton for an automated referral of hose • Remove tool and clear blockage • Recovery tank lid not on correctly • Make sure lid is on securely • Water...


