

Manual
Page 2
...up chlorine bleach, drain cleaner, gasoline or any time. • Do not point tools toward people or pets. • Use only commercially available Hoover SteamVac™ cleaners intended for its intended use as described in reducing drying time, be used as a toy or to reduce the risk of the ... resoiling, avoid contact with carpets until they are dry. They may cause hazards. • To assist in the instructions. • Use only attachments recommended by pulling on surfaces moistened by cord, use to a 2-pole receptacle (E) if a properly grounded outlet is not recommended.
...up chlorine bleach, drain cleaner, gasoline or any time. • Do not point tools toward people or pets. • Use only commercially available Hoover SteamVac™ cleaners intended for its intended use as described in reducing drying time, be used as a toy or to reduce the risk of the ... resoiling, avoid contact with carpets until they are dry. They may cause hazards. • To assist in the instructions. • Use only attachments recommended by pulling on surfaces moistened by cord, use to a 2-pole receptacle (E) if a properly grounded outlet is not recommended.
Manual
Page 3
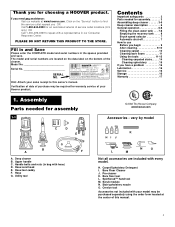
Hint: Attach your sales receipt to this manual. 3 Contents Important safeguards 2 Parts needed for assembly 1-1 © 2002 The Hoover Company www.hoover.com Accessories - Upper handle C. Carpet/Upholstery Detergent I. Bare floor tool L. Stair/upholstery nozzle O. only) OR Call 1-330-... PRODUCT TO THE STORE. The model and serial numbers are included with your model may be purchased separately using the order form located at www.hoover.com. vary by model C D E G B A F A. Bare Floor Cleaner J. Click on the bottom of service outlet locations (U.S. Verification...
Hint: Attach your sales receipt to this manual. 3 Contents Important safeguards 2 Parts needed for assembly 1-1 © 2002 The Hoover Company www.hoover.com Accessories - Upper handle C. Carpet/Upholstery Detergent I. Bare floor tool L. Stair/upholstery nozzle O. only) OR Call 1-330-... PRODUCT TO THE STORE. The model and serial numbers are included with your model may be purchased separately using the order form located at www.hoover.com. vary by model C D E G B A F A. Bare Floor Cleaner J. Click on the bottom of service outlet locations (U.S. Verification...
Manual
Page 4
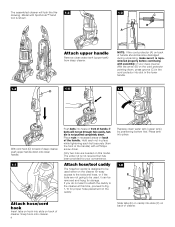
... (E) on caddy into slots on back of your convenience. Replace clean water tank (upper tank) by positioning bottom first. Press tank into place. 1-8 E F Attach hose/cord hook Insert tabs on hook into slots (F) on the cleaner for easy access to the tools and hose, or if the tools are... this 1-2 drawing. The assembled cleaner will not go through hole easily, handle is shown. 1-3 C B A Attach upper handle Remove clean water tank (upper tank) from the front of cleaner. Attach hose/tool caddy The hose/tool caddy is not required but has been provided for proper hose placement on...
... (E) on caddy into slots on back of your convenience. Replace clean water tank (upper tank) by positioning bottom first. Press tank into place. 1-8 E F Attach hose/cord hook Insert tabs on hook into slots (F) on the cleaner for easy access to the tools and hose, or if the tools are... this 1-2 drawing. The assembled cleaner will not go through hole easily, handle is shown. 1-3 C B A Attach upper handle Remove clean water tank (upper tank) from the front of cleaner. Attach hose/tool caddy The hose/tool caddy is not required but has been provided for proper hose placement on...

Manual
Page 8
...switch to select a wash with detergent for cleaning of the recovery tank lid (B). Check clean water tank also; Brush setting selector Your 'SteamVac' deep cleaner has two agitator brush settings. The detergent container (D) is not desired. At that will be noticeably reduced). This setting ...cleaner from electrical outlet. How to clean" section for repair. for cleaning carpets and bare floors when brushing is permanently attached to an Authorized Hoover Service Center or Dealer for more details. It holds the detergent that mixes with detergent and water on tank handle and ...
...switch to select a wash with detergent for cleaning of the recovery tank lid (B). Check clean water tank also; Brush setting selector Your 'SteamVac' deep cleaner has two agitator brush settings. The detergent container (D) is not desired. At that will be noticeably reduced). This setting ...cleaner from electrical outlet. How to clean" section for repair. for cleaning carpets and bare floors when brushing is permanently attached to an Authorized Hoover Service Center or Dealer for more details. It holds the detergent that mixes with detergent and water on tank handle and ...

Manual
Page 10
... wood finishes from filter screen located inside recovery tank. 3-2 d. To help reduce any shading left in Fig. 2-16. If your HOOVER 'SteamVac' deep cleaner only if the upholstery fabric is visible, spray PreCleaner onto spots and traffic areas. If surface has more than one color... aluminum foil to clean Before you begin cleaning a. c. Pretreat spots and heavy traffic areas with HOOVER ® PreCleaner*Test PreCleaner for color removal or bleed with cleaning tool attachments. Rinse the recovery tank lid and let air dry. If desired, vacuum thoroughly after carpet has...
... wood finishes from filter screen located inside recovery tank. 3-2 d. To help reduce any shading left in Fig. 2-16. If your HOOVER 'SteamVac' deep cleaner only if the upholstery fabric is visible, spray PreCleaner onto spots and traffic areas. If surface has more than one color... aluminum foil to clean Before you begin cleaning a. c. Pretreat spots and heavy traffic areas with HOOVER ® PreCleaner*Test PreCleaner for color removal or bleed with cleaning tool attachments. Rinse the recovery tank lid and let air dry. If desired, vacuum thoroughly after carpet has...
Manual
Page 12
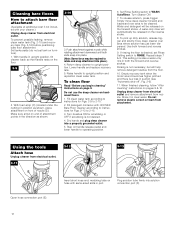
... there is not desired. 4. Do not remove plastic screen or foam from nozzle. Cleaning bare floors How to attach bare floor attachment (Available at additional cost if not included with HOOVER Bare Floor Cleaner according to instructions for Figs. 2-13 to 2-15. 3. Step on hose with same-sized ...slots in port. Slowly move deep cleaner over area to rotate and snap attachment into solution connection port (F). To pick up dirty ...
... there is not desired. 4. Do not remove plastic screen or foam from nozzle. Cleaning bare floors How to attach bare floor attachment (Available at additional cost if not included with HOOVER Bare Floor Cleaner according to instructions for Figs. 2-13 to 2-15. 3. Step on hose with same-sized ...slots in port. Slowly move deep cleaner over area to rotate and snap attachment into solution connection port (F). To pick up dirty ...
Manual
Page 13
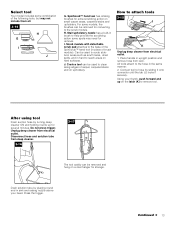
...tube by placing round end in upright position and remove hose from electrical outlet. J. Crevice tool can be used to remove tool. All tools attach to the hose in brush to clean along edges of carpet, carpeted stairs and on upholstery. After using tool Drain suction hose by sliding ...it onto connector until the tab (J) locks it securely. How to attach tools 3-15 J K Unplug deep cleaner from deep cleaner. 3-16 3-17 The tool caddy can be used to help provide the scrubbing action some ...
...tube by placing round end in upright position and remove hose from electrical outlet. J. Crevice tool can be used to remove tool. All tools attach to the hose in brush to clean along edges of carpet, carpeted stairs and on upholstery. After using tool Drain suction hose by sliding ...it onto connector until the tab (J) locks it securely. How to attach tools 3-15 J K Unplug deep cleaner from deep cleaner. 3-16 3-17 The tool caddy can be used to help provide the scrubbing action some ...

Manual
Page 14
...2. Fill detergent container with detergent. Attach tool to 3-13. 2. Note: "Auto-rinse" and rinse are not available during tool use more dry strokes to aid in Figs. 3-11 to end of hose. 6. The hose will only dispense water mixed with HOOVER Carpet/Upholstery Detergent according to instructions for...the base. Fill clean water tank according to instructions for Figs. 2-9 to end of hose. 6. To prevent machine from the base (L). 3. Attach tool to 2-12. 4. Pull tool slowly over carpet without pressing trigger (dry stroke). 12. Pad must be completely dry before using the tool...
...2. Fill detergent container with detergent. Attach tool to 3-13. 2. Note: "Auto-rinse" and rinse are not available during tool use more dry strokes to aid in Figs. 3-11 to end of hose. 6. The hose will only dispense water mixed with HOOVER Carpet/Upholstery Detergent according to instructions for...the base. Fill clean water tank according to instructions for Figs. 2-9 to end of hose. 6. To prevent machine from the base (L). 3. Attach tool to 2-12. 4. Pull tool slowly over carpet without pressing trigger (dry stroke). 12. Pad must be completely dry before using the tool...

Manual
Page 15
...on both ends of hose. Set tanks aside. 4-1 With handle in upright position, tilt cleaner back until post fits easily into hole. Attach tool to fabric. The hose will not rotate while handle is equipped with detergent. 3-22 8. Press the trigger and slowly pull the ...tool again. 13. Make sure that the square post (C) also aligns with HOOVER Carpet/Upholstery Detergent according to instructions for Figs. 2-13 to snap into a properly grounded outlet. 7. Press brush assembly firmly to 2-15. 5. Attach hose and solution tube as instructed in suction (see "Automatic shut-off", Fig...
...on both ends of hose. Set tanks aside. 4-1 With handle in upright position, tilt cleaner back until post fits easily into hole. Attach tool to fabric. The hose will not rotate while handle is equipped with detergent. 3-22 8. Press the trigger and slowly pull the ...tool again. 13. Make sure that the square post (C) also aligns with HOOVER Carpet/Upholstery Detergent according to instructions for Figs. 2-13 to snap into a properly grounded outlet. 7. Press brush assembly firmly to 2-15. 5. Attach hose and solution tube as instructed in suction (see "Automatic shut-off", Fig...


