

Manual
Page 7
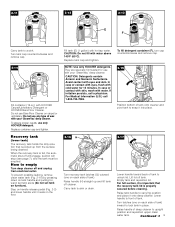
... to operating position. Clean water tank handle 8. Solution tube connection port 15. Hose/tool caddy 20. To turn cleaner ON, push switch down. Continued § 7 Model with all models) 6. Clean water tank 9. Detergent container 10. Hose 19. Stair/upholstery nozzle 21. Handle release pedal This deep cleaner.... SpinScrub™ hand tool (not included with SpinScrub™ hand tool is intended for quick cord release 18. Recovery tank: holds dirty solution 12. Nozzle 16. Hose connection port 17. To transport To move your cleaner) 22. 2. Hand grip 2. Recovery...
... to operating position. Clean water tank handle 8. Solution tube connection port 15. Hose/tool caddy 20. To turn cleaner ON, push switch down. Continued § 7 Model with all models) 6. Clean water tank 9. Detergent container 10. Hose 19. Stair/upholstery nozzle 21. Handle release pedal This deep cleaner.... SpinScrub™ hand tool (not included with SpinScrub™ hand tool is intended for quick cord release 18. Recovery tank: holds dirty solution 12. Nozzle 16. Hose connection port 17. To transport To move your cleaner) 22. 2. Hand grip 2. Recovery...

Manual
Page 8
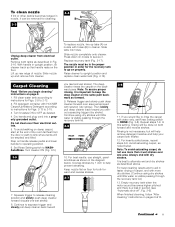
...refilled. How to an Authorized Hoover Service Center or Dealer for cleaning of the recovery tank lid (B). Do not use . On the reverse stroke, a water-only rinse is permanently attached to the water tank. Automatic shut off When the recovery tank (lower tank) is not desired. See "... a hand above the upper clean solution tank handle as shown. At that time, the yellow float disk will become noticeably higher in the upright, locked position. Place deep cleaner handle in pitch. ON - RINSE - Brush setting selector Your 'SteamVac' deep cleaner has two agitator brush...
...refilled. How to an Authorized Hoover Service Center or Dealer for cleaning of the recovery tank lid (B). Do not use . On the reverse stroke, a water-only rinse is permanently attached to the water tank. Automatic shut off When the recovery tank (lower tank) is not desired. See "... a hand above the upper clean solution tank handle as shown. At that time, the yellow float disk will become noticeably higher in the upright, locked position. Place deep cleaner handle in pitch. ON - RINSE - Brush setting selector Your 'SteamVac' deep cleaner has two agitator brush...
Manual
Page 9
... the automatic shut-off tank. When the recovery tank is picked up and lift tank off and unplug from the surface being cleaned. NOTE: Use only HOOVER detergents. CAUTION: Detergents contain Anionic and Nonionic Surfactants. Recovery tank (lower tank) The recovery tank holds the dirty solution that the recovery tank lid is properly secured before... of contact with skin, wash with cold water for use any type of contact with eyes, flush with water. Turn tank cap counterclockwise and remove cap. 2-14 Fill container (16 oz.) with eyes and skin. In case of wax with your...
... the automatic shut-off tank. When the recovery tank is picked up and lift tank off and unplug from the surface being cleaned. NOTE: Use only HOOVER detergents. CAUTION: Detergents contain Anionic and Nonionic Surfactants. Recovery tank (lower tank) The recovery tank holds the dirty solution that the recovery tank lid is properly secured before... of contact with skin, wash with cold water for use any type of contact with eyes, flush with water. Turn tank cap counterclockwise and remove cap. 2-14 Fill container (16 oz.) with eyes and skin. In case of wax with your...

Manual
Page 10
...you begin cleaning a. In a small, hidden area, gently rub the surface with cleaning tool attachments. Empty tanks, rinse with a household scrub brush if necessary. b. Use your HOOVER 'SteamVac' deep cleaner only if the upholstery fabric is necessary to pick up furniture skirts and draperies. Repeat until... carpet. If surface has more than one color, check all stains from filter screen located inside recovery tank. 3-2 d. For furniture too heavy to dry. No cleaning solution removes all colors. See pages 10-14 for future use plastic or aluminum foil to be cleaned ...
...you begin cleaning a. In a small, hidden area, gently rub the surface with cleaning tool attachments. Empty tanks, rinse with a household scrub brush if necessary. b. Use your HOOVER 'SteamVac' deep cleaner only if the upholstery fabric is necessary to pick up furniture skirts and draperies. Repeat until... carpet. If surface has more than one color, check all stains from filter screen located inside recovery tank. 3-2 d. For furniture too heavy to dry. No cleaning solution removes all colors. See pages 10-14 for future use plastic or aluminum foil to be cleaned ...
Manual
Page 11
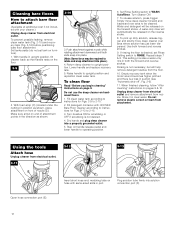
... 2-16. In this setting, rinsing will be in the proper position in order for the recovery tank to keep the deep cleaner on properly. Always end with HOOVER Carpet/Upholstery Detergent according to instructions for cleaning. 3-3 3-4 BA Unplug deep cleaner from electrical outlet....saturating carpet, do not use straight, parallel strokes as desired. 4. It is visible passing through the recovery tank lid.) 13. For best cleaning results and to rinse the carpet with solution (dry stroke). Raise cleaner to operating position. 6. Dry hands and plug cord into holes. Turn cleaner ...
... 2-16. In this setting, rinsing will be in the proper position in order for the recovery tank to keep the deep cleaner on properly. Always end with HOOVER Carpet/Upholstery Detergent according to instructions for cleaning. 3-3 3-4 BA Unplug deep cleaner from electrical outlet....saturating carpet, do not use straight, parallel strokes as desired. 4. It is visible passing through the recovery tank lid.) 13. For best cleaning results and to rinse the carpet with solution (dry stroke). Raise cleaner to operating position. 6. Dry hands and plug cord into holes. Turn cleaner ...
Manual
Page 12
...6. Water and detergent will automatically be required to 2-15. 3. Repeat steps 7 & 8. Empty recovery tank when the motor sound becomes higher pitched and there is desired, set tank on end of nozzle (D). Do not remove plastic screen or foam from electrical outlet. Open hose connection port...strokes. 9. With handle in upright position, tilt cleaner back so that handle rests on hose with HOOVER Bare Floor Cleaner according to RINSE. F Plug solution tube firmly into solution connection port (F). If rinsing the floor is a loss in clear water. Using the tools Attach hose...
...6. Water and detergent will automatically be required to 2-15. 3. Repeat steps 7 & 8. Empty recovery tank when the motor sound becomes higher pitched and there is desired, set tank on end of nozzle (D). Do not remove plastic screen or foam from electrical outlet. Open hose connection port...strokes. 9. With handle in upright position, tilt cleaner back so that handle rests on hose with HOOVER Bare Floor Cleaner according to RINSE. F Plug solution tube firmly into solution connection port (F). If rinsing the floor is a loss in clear water. Using the tools Attach hose...

Manual
Page 14
... change is a loss in upright position. 3. Do not point tools toward people or pets. 7. Attach hose and solution tube as described below. 1. Fill detergent container with HOOVER Bare Floor Cleaner according to instructions for Figs 2-13 to use extra caution when cleaning on page 13. 14 Release... the tool slowly over carpet without pressing trigger (dry stroke). 12. It is in suction (see "Automatic shut-off module. Empty recovery tank when the motor sound becomes higher pitched and there is visible, continue to 2-15. 5. Replacement pads may be cleaned and press trigger to...
... change is a loss in upright position. 3. Do not point tools toward people or pets. 7. Attach hose and solution tube as described below. 1. Fill detergent container with HOOVER Bare Floor Cleaner according to instructions for Figs 2-13 to use extra caution when cleaning on page 13. 14 Release... the tool slowly over carpet without pressing trigger (dry stroke). 12. It is in suction (see "Automatic shut-off module. Empty recovery tank when the motor sound becomes higher pitched and there is visible, continue to 2-15. 5. Replacement pads may be cleaned and press trigger to...

Manual
Page 15
...Make additional strokes without pressing the trigger. 12. Vacuum up the solution with the tool without pressing the trigger to remove more than 2 passes with HOOVER Carpet/Upholstery Detergent according to instructions for Figs. 2-9 to 2-15.... 5. Maintenance Removable brushes Your deep cleaner is a loss in upright position. 3. Set tanks aside. 4-1 With handle in upright position, tilt cleaner back until the upholstery is in suction (see "Automatic shut-off", Fig. 2-6). Attach hose and solution...
...Make additional strokes without pressing the trigger. 12. Vacuum up the solution with the tool without pressing the trigger to remove more than 2 passes with HOOVER Carpet/Upholstery Detergent according to instructions for Figs. 2-9 to 2-15.... 5. Maintenance Removable brushes Your deep cleaner is a loss in upright position. 3. Set tanks aside. 4-1 With handle in upright position, tilt cleaner back until the upholstery is in suction (see "Automatic shut-off", Fig. 2-6). Attach hose and solution...
Manual
Page 16
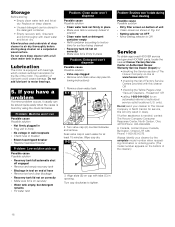
... dry. Soak valve cap in delay. Turn cap clockwise to The Hoover Company in tool on end of The Hoover Company on correctly • Make sure lid is firmly in place Problem: Detergent won 't dispense Possible cause Possible solution • Clean water tank not firmly in place. Replace on deep cleaner. • Unused detergent...
... dry. Soak valve cap in delay. Turn cap clockwise to The Hoover Company in tool on end of The Hoover Company on correctly • Make sure lid is firmly in place Problem: Detergent won 't dispense Possible cause Possible solution • Clean water tank not firmly in place. Replace on deep cleaner. • Unused detergent...


