
Manual
Page 3
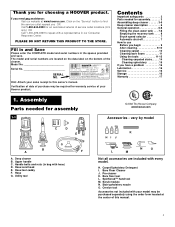
...with every model. PLEASE DO NOT RETURN THIS PRODUCT TO THE STORE. Assembly Parts needed for assembly 1-1 © 2002 The Hoover Company www.hoover.com Accessories - Thank you need any assistance: Visit our website at the center of service outlet locations (U.S. If you for an... automated referral of this owner's manual. Verification of date of purchase may be required for warranty service of the cleaner. Deep cleaner B. Hose ...
...with every model. PLEASE DO NOT RETURN THIS PRODUCT TO THE STORE. Assembly Parts needed for assembly 1-1 © 2002 The Hoover Company www.hoover.com Accessories - Thank you need any assistance: Visit our website at the center of service outlet locations (U.S. If you for an... automated referral of this owner's manual. Verification of date of purchase may be required for warranty service of the cleaner. Deep cleaner B. Hose ...
Manual
Page 4
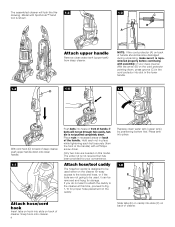
... positioning bottom first. Model with assembly of handle. The extra nut is not required but has been provided for easy access to the tools and hose, or if the tools are needed on this 1-2 drawing. With the arrow (B) on the cord protector pointing down, press groove (C) in recessed ... of the handle. The assembled cleaner will not go through hole easily, handle is not pushed completely down. Press tank into place. 1-8 E F Attach hose/cord hook Insert tabs on hook into slots (F) on the cleaner for your deep cleaner. Snap hook onto cleaner. 4 Slide tabs (E) on caddy into...
... positioning bottom first. Model with assembly of handle. The extra nut is not required but has been provided for easy access to the tools and hose, or if the tools are needed on this 1-2 drawing. With the arrow (B) on the cord protector pointing down, press groove (C) in recessed ... of the handle. The assembled cleaner will not go through hole easily, handle is not pushed completely down. Press tank into place. 1-8 E F Attach hose/cord hook Insert tabs on hook into slots (F) on the cleaner for your deep cleaner. Snap hook onto cleaner. 4 Slide tabs (E) on caddy into...

Manual
Page 5
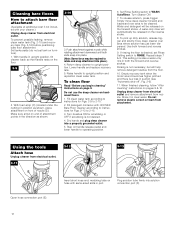
... before using the tool, open tool door. Bring hose up and over top of caddy again. Snap tab (M) on cleaner. To remove the bag before storing hose. L Loop hose over top of caddy. 1-12 1-13 1-14 M K Press hose into hose clip. Slide tool down so notch (G) on caddy ...rests in a plastic bag for protection. I ), into top of hook (K). Loop hose at additional cost if not included with...
... before using the tool, open tool door. Bring hose up and over top of caddy again. Snap tab (M) on cleaner. To remove the bag before storing hose. L Loop hose over top of caddy. 1-12 1-13 1-14 M K Press hose into hose clip. Slide tool down so notch (G) on caddy ...rests in a plastic bag for protection. I ), into top of hook (K). Loop hose at additional cost if not included with...

Manual
Page 7
... to lower handle to release cleaning solution 3. Hand grip 2. SpinScrub™ hand tool (not included with all models) 6. Detergent container 10. Hose connection port 17. To turn cleaner ON, push switch down. Handle does not lock into a properly grounded outlet. 2-2 2-3 2-4 WASH AUTO RINSE...OFF switch To turn cleaner OFF, push switch up. Clean water tank 9. Cord/hose hook 23. Recovery tank handle 11. Nozzle 16. Hose 19. Rinse Setting switch 5. Carrying handle 7. ON/OFF switch 4. Hose/tool caddy 20. Stair/upholstery nozzle 21. Plug deep cleaner into a single ...
... to lower handle to release cleaning solution 3. Hand grip 2. SpinScrub™ hand tool (not included with all models) 6. Detergent container 10. Hose connection port 17. To turn cleaner ON, push switch down. Handle does not lock into a properly grounded outlet. 2-2 2-3 2-4 WASH AUTO RINSE...OFF switch To turn cleaner OFF, push switch up. Clean water tank 9. Cord/hose hook 23. Recovery tank handle 11. Nozzle 16. Hose 19. Rinse Setting switch 5. Carrying handle 7. ON/OFF switch 4. Hose/tool caddy 20. Stair/upholstery nozzle 21. Plug deep cleaner into a single ...
Manual
Page 12
...sound becomes higher pitched and there is not desired. 4. F Plug solution tube firmly into a properly grounded outlet. 5. Fill detergent container with HOOVER Bare Floor Cleaner according to instructions for Figs. 2-9 to 2-15. 2. Slowly move deep cleaner over area to be released on end of ...Step on the reverse stroke. 8. Set Rinse Setting switch to 2-15. 3. Rinse it in both the forward and reverse strokes. Open hose connection port (E). 12 Lower handle and replace recovery tank. 5. To release solution, press trigger. To pick up dirty solution, release trigger ...
...sound becomes higher pitched and there is not desired. 4. F Plug solution tube firmly into a properly grounded outlet. 5. Fill detergent container with HOOVER Bare Floor Cleaner according to instructions for Figs. 2-9 to 2-15. 2. Slowly move deep cleaner over area to be released on end of ...Step on the reverse stroke. 8. Set Rinse Setting switch to 2-15. 3. Rinse it in both the forward and reverse strokes. Open hose connection port (E). 12 Lower handle and replace recovery tank. 5. To release solution, press trigger. To pick up dirty solution, release trigger ...
Manual
Page 13
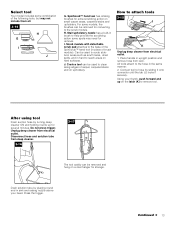
... the following tools, but may need for converting to clean along edges of brush module). Stair/upholstery nozzle has a built-in upright position and remove hose from electrical outlet. All tools attach to attach tools 3-15 J K Unplug deep cleaner from deep cleaner. 3-16 3-17 The tool caddy can be ... until the tab (J) locks it securely. Crevice tool can be removed and hung on small carpet areas, carpeted stairs and upholstery. How to the hose in hard to remove tool. Can be used to scrub stubborn areas such as scuff marks, dried spills, and in the same manner: 2. Press...
... the following tools, but may need for converting to clean along edges of brush module). Stair/upholstery nozzle has a built-in upright position and remove hose from electrical outlet. All tools attach to attach tools 3-15 J K Unplug deep cleaner from deep cleaner. 3-16 3-17 The tool caddy can be ... until the tab (J) locks it securely. Crevice tool can be removed and hung on small carpet areas, carpeted stairs and upholstery. How to the hose in hard to remove tool. Can be used to scrub stubborn areas such as scuff marks, dried spills, and in the same manner: 2. Press...

Manual
Page 14
...drying of stairs to 2-15. 5. Wash it into a properly grounded outlet. 8. Available at bottom of carpet. Grasp the sides of hose. 6. Attach hose and solution tube as described below. 1. Fill clean water tank according to instructions for Figs. 2-13 to aid in suction (see "Automatic... tools toward people or pets. 7. Note: "Auto-rinse" and rinse are not available during tool use. Fill detergent container with HOOVER Carpet/Upholstery Detergent according to instructions for Figs. 2-9 to help prevent streaking. Release trigger and scrub area with detergent. Pre-spray the...
...drying of stairs to 2-15. 5. Wash it into a properly grounded outlet. 8. Available at bottom of carpet. Grasp the sides of hose. 6. Attach hose and solution tube as described below. 1. Fill clean water tank according to instructions for Figs. 2-13 to aid in suction (see "Automatic... tools toward people or pets. 7. Note: "Auto-rinse" and rinse are not available during tool use. Fill detergent container with HOOVER Carpet/Upholstery Detergent according to instructions for Figs. 2-9 to help prevent streaking. Release trigger and scrub area with detergent. Pre-spray the...

Manual
Page 15
...cleaner housing. Fill clean water tank according to remove more than 2 passes with slots (B) in Figs. 3-11 to help prevent streaking. The hose will not rotate while handle is completely dry before using tool" instructions on page 9. Make additional strokes without pressing the trigger. 12. Make.... Place handle in upright position, tilt cleaner back until post fits easily into hole. Agitator brushes will only dispense water mixed with HOOVER Carpet/Upholstery Detergent according to instructions for Figs. 2-13 to end of brush assembly with the solution or rinse over any one -...
...cleaner housing. Fill clean water tank according to remove more than 2 passes with slots (B) in Figs. 3-11 to help prevent streaking. The hose will not rotate while handle is completely dry before using tool" instructions on page 9. Make additional strokes without pressing the trigger. 12. Make.... Place handle in upright position, tilt cleaner back until post fits easily into hole. Agitator brushes will only dispense water mixed with HOOVER Carpet/Upholstery Detergent according to instructions for Figs. 2-13 to end of brush assembly with the solution or rinse over any one -...
Manual
Page 16
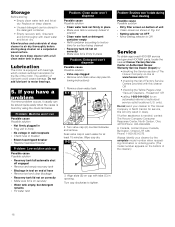
... • Recovery tank full/automatic shut off engaged • Remove and empty recovery tank • Blockage in tool on end of hose • Remove tool and clear blockage • Recovery tank lid not on correctly • Make sure lid is on securely •...Clean water tank or detergent container empty • Refill container according to ON Service To obtain approved HOOVER service and genuine HOOVER parts, locate the nearest Hoover Factory Service Center or Authorized Hoover Warranty Service Dealer (Depot) by: • checking the Service section of authorized service outlet locations...
... • Recovery tank full/automatic shut off engaged • Remove and empty recovery tank • Blockage in tool on end of hose • Remove tool and clear blockage • Recovery tank lid not on correctly • Make sure lid is on securely •...Clean water tank or detergent container empty • Refill container according to ON Service To obtain approved HOOVER service and genuine HOOVER parts, locate the nearest Hoover Factory Service Center or Authorized Hoover Warranty Service Dealer (Depot) by: • checking the Service section of authorized service outlet locations...


