
Product Manual
Page 5
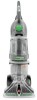
...before disposing of packing materials. F. Accessories not included with hose) D. Tighten with screwdriver. 1.2 1.3 Cord Protector -V2 1.4 1.5 5 Actual model may be in bag with your model may be purchased separately by visiting hoover.com. Cleaner B. Cleaner ASSEMBLY Carton contents 1.1 Carpet Upholstery...® Hand Tool* *Available on select models only. Hose/Tool Caddy* G Hose H Stair/Upholstery Nozzle I B E A A. Handle Bolts and Nuts (Three nuts may vary from carton and identify each item shown. Attach handle 1.2 Remove tank. 1.3 Position cord protector. 1.4...
...before disposing of packing materials. F. Accessories not included with hose) D. Tighten with screwdriver. 1.2 1.3 Cord Protector -V2 1.4 1.5 5 Actual model may be in bag with your model may be purchased separately by visiting hoover.com. Cleaner B. Cleaner ASSEMBLY Carton contents 1.1 Carpet Upholstery...® Hand Tool* *Available on select models only. Hose/Tool Caddy* G Hose H Stair/Upholstery Nozzle I B E A A. Handle Bolts and Nuts (Three nuts may vary from carton and identify each item shown. Attach handle 1.2 Remove tank. 1.3 Position cord protector. 1.4...
Product Manual
Page 6
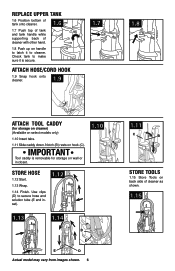
Attach hose/cord hook 1.9 1.9 Snap hook onto cleaner. 1.7 1.8 Attach tool caddy (for storage on cleaner) (Available on handle to latch it... while supporting back of cleaner as shown. 1.15 Notch (B) rests on wall or in closet. 1.10 Store hose 1.12 Start. 1.13 Wrap. 1.14 Finish. IMPORTANT Tool caddy is secure. Use clips (D) to make sure it to... cleaner. Check tank to secure hose and solution tube (E and inset). 1.12 1.13 1.14 D E E D Actual model may vary from images shown. 6 ...
Attach hose/cord hook 1.9 1.9 Snap hook onto cleaner. 1.7 1.8 Attach tool caddy (for storage on cleaner) (Available on handle to latch it... while supporting back of cleaner as shown. 1.15 Notch (B) rests on wall or in closet. 1.10 Store hose 1.12 Start. 1.13 Wrap. 1.14 Finish. IMPORTANT Tool caddy is secure. Use clips (D) to make sure it to... cleaner. Check tank to secure hose and solution tube (E and inset). 1.12 1.13 1.14 D E E D Actual model may vary from images shown. 6 ...
Product Manual
Page 7
... Hand Grip 2. SolutionTrigger: press to remove dirt 17 near baseboards 12 13 14 22 16. Dirty Water Tank Latches 10 13. Hose/Tool Caddy* 21. Cord/Hose Hook 23. CAUTION ! 24. SpinScrub® Hand Tool* 5 19 20 6. SpinScrub® Mode Selector 14. Cord Hook: ... position, tilt cleaner back on pedal (A) to lower handle to allow convenient operation. 2.3 Transporting To move your WITHOUT PROPER ATTACHMENT MAY SCRATCH OR local HOOVER® service center. HOW TO USE Cleaner Description 1. Handle Release Pedal ! USING THIS MACHINE ON HARD FLOORS by placing ...
... Hand Grip 2. SolutionTrigger: press to remove dirt 17 near baseboards 12 13 14 22 16. Dirty Water Tank Latches 10 13. Hose/Tool Caddy* 21. Cord/Hose Hook 23. CAUTION ! 24. SpinScrub® Hand Tool* 5 19 20 6. SpinScrub® Mode Selector 14. Cord Hook: ... position, tilt cleaner back on pedal (A) to lower handle to allow convenient operation. 2.3 Transporting To move your WITHOUT PROPER ATTACHMENT MAY SCRATCH OR local HOOVER® service center. HOW TO USE Cleaner Description 1. Handle Release Pedal ! USING THIS MACHINE ON HARD FLOORS by placing ...

Product Manual
Page 13
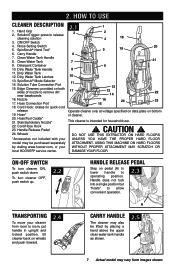
...converting to Remove 4.2 Squeeze latches (C) on top and bottom of injury from images shown. Snap door into solution connection port (B). TOOLS Attach hose ! How to the scrub module. (Available on select models only) has rotating brushes for removal. 4. SpinScrub® Hand Tool (...area. For some spots may vary from moving parts, unplug cleaner. 4.1 A How to snap free if it to Attach 4.1 Open hose connection port (A). Push hose into port and lock in connection port. tools A. CAUTION ! To reposition the tool, reverse this procedure. SpinScrub®...
...converting to Remove 4.2 Squeeze latches (C) on top and bottom of injury from images shown. Snap door into solution connection port (B). TOOLS Attach hose ! How to the scrub module. (Available on select models only) has rotating brushes for removal. 4. SpinScrub® Hand Tool (...area. For some spots may vary from moving parts, unplug cleaner. 4.1 A How to snap free if it to Attach 4.1 Open hose connection port (A). Push hose into port and lock in connection port. tools A. CAUTION ! To reposition the tool, reverse this procedure. SpinScrub®...
Product Manual
Page 14
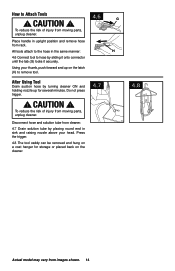
...by placing round end in the same manner: H 4.6 Connect tool to hose by turning cleaner ON and holding nozzle up on the cleaner. 4.7 4.8 Actual model may vary from moving parts, unplug cleaner. All tools attach to the hose in sink and raising nozzle above your thumb, push forward and up ...for storage or placed back on the latch (H) to Attach Tools ! After Using Tool Drain suction hose by sliding it onto connector until the tab (G) locks it securely. To reduce the risk of injury from moving parts, unplug ...
...by placing round end in the same manner: H 4.6 Connect tool to hose by turning cleaner ON and holding nozzle up on the cleaner. 4.7 4.8 Actual model may vary from moving parts, unplug cleaner. All tools attach to the hose in sink and raising nozzle above your thumb, push forward and up ...for storage or placed back on the latch (H) to Attach Tools ! After Using Tool Drain suction hose by sliding it onto connector until the tab (G) locks it securely. To reduce the risk of injury from moving parts, unplug ...

Product Manual
Page 15
Attach hose and solution tube as described above the carpet and push it forward while pressing the trigger (equals one area. Place handle in Figs. 4.1 and 4.2. Fill detergent container with HOOVER® detergent according to instructions for Figs. 2.9 to 2.11. WARNING ! To prevent machine from images shown. Do ...the stairs to clean upper half of stairway and at end of stroke. 4.10 Lift tool, and position it into a properly grounded outlet. Attach tool to end of stairs to clean lower half. ! Turn cleaner ON. 4.9 Pre-spray the carpeted stair by 1/2 inch to WASH. ...
Attach hose and solution tube as described above the carpet and push it forward while pressing the trigger (equals one area. Place handle in Figs. 4.1 and 4.2. Fill detergent container with HOOVER® detergent according to instructions for Figs. 2.9 to 2.11. WARNING ! To prevent machine from images shown. Do ...the stairs to clean upper half of stairway and at end of stroke. 4.10 Lift tool, and position it into a properly grounded outlet. Attach tool to end of stairs to clean lower half. ! Turn cleaner ON. 4.9 Pre-spray the carpeted stair by 1/2 inch to WASH. ...
Product Manual
Page 16
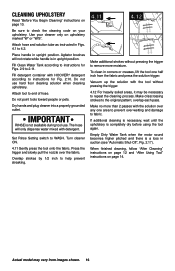
Be sure to end of hose. Attach hose and solution tube as instructed in suction (see "Automatic Shut-Off", Fig. 2.17). ...pitched and there is not available during tool use hard floor cleaning solution when cleaning upholstery. Do not use . Attach tool to check the cleaning code on your cleaner only on upholstery marked "W" or "W/S". Set Rinse Setting switch ...pressing the trigger to fabric. Do not point tools toward people or pets. Vacuum up the solution with HOOVER® detergent according to WASH. Place handle in corners or creases, lift the tool one area to ...
Be sure to end of hose. Attach hose and solution tube as instructed in suction (see "Automatic Shut-Off", Fig. 2.17). ...pitched and there is not available during tool use hard floor cleaning solution when cleaning upholstery. Do not use . Attach tool to check the cleaning code on your cleaner only on upholstery marked "W" or "W/S". Set Rinse Setting switch ...pressing the trigger to fabric. Do not point tools toward people or pets. Vacuum up the solution with HOOVER® detergent according to WASH. Place handle in corners or creases, lift the tool one area to ...


