Product Manual
Page 4
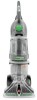
... appliance is for electrical current to whether the outlet is properly installed and grounded in the risk of body away from openings and moving parts. • Use indoors only. • Do not put any object into an appropriate outlet (B) that may reduce air flow. ...The plug must be installed by the Canadian Electrical Code. 1 A 2 E D F BGROUNDING OUTLET BOX G C 4 Do not modify the plug provided with all parts of electric shock. A temporary adapter (D) may damage the machine. • Keep hair, loose clothing, fingers, feet and all local codes and ordinances. The temporary ...
... appliance is for electrical current to whether the outlet is properly installed and grounded in the risk of body away from openings and moving parts. • Use indoors only. • Do not put any object into an appropriate outlet (B) that may reduce air flow. ...The plug must be installed by the Canadian Electrical Code. 1 A 2 E D F BGROUNDING OUTLET BOX G C 4 Do not modify the plug provided with all parts of electric shock. A temporary adapter (D) may damage the machine. • Keep hair, loose clothing, fingers, feet and all local codes and ordinances. The temporary ...

Product Manual
Page 5
... in bag with your model may be in bag but only two or need for assembly. SpinScrub® Brush Assembly Remove all parts are located before disposing of packing materials. NOTE: Phillips screwdriver needed for assembly. F. Tighten with screwdriver. 1.2 1.3 Cord Protector ...-V2 1.4 1.5 5 Actual model may be purchased separately by visiting hoover.com. Handle Bolts and Nuts (Three nuts may vary from carton and identify each item shown. Hose/Cord Hook E. Make sure all parts from images shown. Attach handle 1.2 Remove tank. 1.3 Position cord protector. 1.4 ...
... in bag with your model may be in bag but only two or need for assembly. SpinScrub® Brush Assembly Remove all parts are located before disposing of packing materials. NOTE: Phillips screwdriver needed for assembly. F. Tighten with screwdriver. 1.2 1.3 Cord Protector ...-V2 1.4 1.5 5 Actual model may be purchased separately by visiting hoover.com. Handle Bolts and Nuts (Three nuts may vary from carton and identify each item shown. Hose/Cord Hook E. Make sure all parts from images shown. Attach handle 1.2 Remove tank. 1.3 Position cord protector. 1.4 ...

Product Manual
Page 13
... into place. 4.4 4.2 C B B 4.5 13 Actual model may need for extra 4.3 scrubbing action on select models only) has rotating brushes for removal. Remove solution tube from moving parts, unplug cleaner. 4.1 A How to Reattach Tool Cover 4.5 The tool cover is pushed open too far.
... into place. 4.4 4.2 C B B 4.5 13 Actual model may need for extra 4.3 scrubbing action on select models only) has rotating brushes for removal. Remove solution tube from moving parts, unplug cleaner. 4.1 A How to Reattach Tool Cover 4.5 The tool cover is pushed open too far.
Product Manual
Page 14
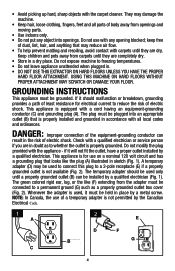
Disconnect hose and solution tube from cleaner. 4.7 Drain solution tube by placing round end in upright position and remove hose from moving parts, unplug cleaner. Do not press trigger. ! Press the trigger. 4.8 The tool caddy can be removed and hung on a coat hanger for several minutes. After Using ... in the same manner: H 4.6 Connect tool to hose by turning cleaner ON and holding nozzle up on the cleaner. 4.7 4.8 Actual model may vary from moving parts, unplug cleaner. CAUTION ! How to remove tool.
Disconnect hose and solution tube from cleaner. 4.7 Drain solution tube by placing round end in upright position and remove hose from moving parts, unplug cleaner. Do not press trigger. ! Press the trigger. 4.8 The tool caddy can be removed and hung on a coat hanger for several minutes. After Using ... in the same manner: H 4.6 Connect tool to hose by turning cleaner ON and holding nozzle up on the cleaner. 4.7 4.8 Actual model may vary from moving parts, unplug cleaner. CAUTION ! How to remove tool.
Product Manual
Page 17
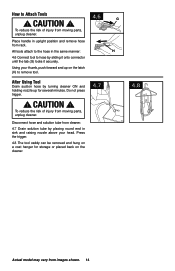
Slide nozzle up and remove from moving parts, unplug cleaner before servicing. 5.3 How to Replace C 5.4 Align posts (A) on nozzle to Change and Clean Your cleaner is equipped with these directions for changing brush ... proper use and care of injury from images shown. CAUTION ! Press brush assembly firmly to snap into place. 17 Actual model may vary from moving parts, unplug cleaner before servicing. brushes: How to secure it can be done by an authorized service representative. With handle in cleaner housing. Turn brushes slightly...
Slide nozzle up and remove from moving parts, unplug cleaner before servicing. 5.3 How to Replace C 5.4 Align posts (A) on nozzle to Change and Clean Your cleaner is equipped with these directions for changing brush ... proper use and care of injury from images shown. CAUTION ! Press brush assembly firmly to snap into place. 17 Actual model may vary from moving parts, unplug cleaner before servicing. brushes: How to secure it can be done by an authorized service representative. With handle in cleaner housing. Turn brushes slightly...

Product Manual
Page 20
...PLEASE DO NOT RETURN THIS PRODUCT TO THE STORE. 20 Customers) or hoover.ca (Canadian customers). 7. Service To obtain approved Hoover® service and genuine Hoover® parts, locate the nearest Authorized Hoover® Warranty Service Dealer (Depot) by the complete model number when ...requesting information or ordering parts. (The model number appears on the bottom of ...
...PLEASE DO NOT RETURN THIS PRODUCT TO THE STORE. 20 Customers) or hoover.ca (Canadian customers). 7. Service To obtain approved Hoover® service and genuine Hoover® parts, locate the nearest Authorized Hoover® Warranty Service Dealer (Depot) by the complete model number when ...requesting information or ordering parts. (The model number appears on the bottom of ...
Product Manual
Page 21
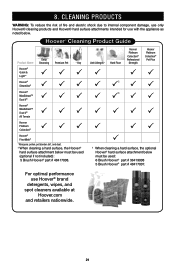
...® 1 Allergens: pollen, pet dander, dirt, and dust. 2 When cleaning a hard surface, the Hoover® hard surface attachment below . For optimal performance use with the appliance as noted below must be used : 6 Brush Hoover® part # 36419008 5 Brush Hoover® part # 48417007. 87. ClLeEaAnNiInNG pPrRoOdDuUCtTsS WARNING: To reduce the risk of fire and electric shock...
...® 1 Allergens: pollen, pet dander, dirt, and dust. 2 When cleaning a hard surface, the Hoover® hard surface attachment below . For optimal performance use with the appliance as noted below must be used : 6 Brush Hoover® part # 36419008 5 Brush Hoover® part # 48417007. 87. ClLeEaAnNiInNG pPrRoOdDuUCtTsS WARNING: To reduce the risk of fire and electric shock...
Product Manual
Page 22
...warranted against original defects in the U.S.A., phone: 1-800-944-9200 OR visit Hoover® online at no cost to you . During the Warranty Period, Hoover® will provide labor and parts, at www.hoover.com. Military Exchanges and Canada. This warranty does not cover products purchased ...from a party that vary from date of warranty service outlets, phone the Hoover® Consumer Response Center, Phone 1-...
...warranted against original defects in the U.S.A., phone: 1-800-944-9200 OR visit Hoover® online at no cost to you . During the Warranty Period, Hoover® will provide labor and parts, at www.hoover.com. Military Exchanges and Canada. This warranty does not cover products purchased ...from a party that vary from date of warranty service outlets, phone the Hoover® Consumer Response Center, Phone 1-...


