Product Manual
Page 2
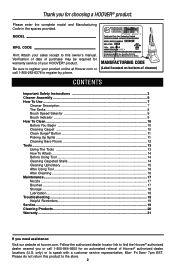
... Reminders 19 Service...19 Cleaning Products...20 Warranty...21 If you for warranty service of your product online at hoover.com. Model MFG. Manufacturing code (Label located on bottom of Hoover® authorized dealer locations (U.S. Mon- only) or to the store. 2 Fri 8am- 7pm EST.... manual. CODE Hint: Attach your sales receipt to register your HOOVER® product. Please enter the complete model and Manufacturing Code in the spaces provided. Follow the authorized dealer locator link to find the Hoover® authorized dealer nearest you or call 1-800-263-6376 ...
... Reminders 19 Service...19 Cleaning Products...20 Warranty...21 If you for warranty service of your product online at hoover.com. Model MFG. Manufacturing code (Label located on bottom of Hoover® authorized dealer locations (U.S. Mon- only) or to the store. 2 Fri 8am- 7pm EST.... manual. CODE Hint: Attach your sales receipt to register your HOOVER® product. Please enter the complete model and Manufacturing Code in the spaces provided. Follow the authorized dealer locator link to find the Hoover® authorized dealer nearest you or call 1-800-263-6376 ...
Product Manual
Page 3
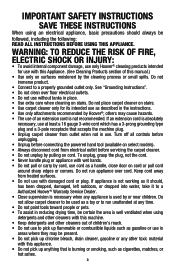
...Do not use as gasoline or use in use of children's reach. • Do not use with this manual.) • Use only on select models). • Always disconnect cord from outlet when not in areas where they may cause hazards. • The use . Turn off all controls before unplugging... extension cord is absolutely necessary, use at any time. • Do not point tools toward people or pets. • To assist in the instructions. • Use only attachments recommended by Hoover®; WARNING: TO REDUCE THE RISK OF FIRE, ELECTRIC SHOCK OR INJURY: • To avoid internal component...
...Do not use as gasoline or use in use of children's reach. • Do not use with this manual.) • Use only on select models). • Always disconnect cord from outlet when not in areas where they may cause hazards. • The use . Turn off all controls before unplugging... extension cord is absolutely necessary, use at any time. • Do not point tools toward people or pets. • To assist in the instructions. • Use only attachments recommended by Hoover®; WARNING: TO REDUCE THE RISK OF FIRE, ELECTRIC SHOCK OR INJURY: • To avoid internal component...
Product Manual
Page 5
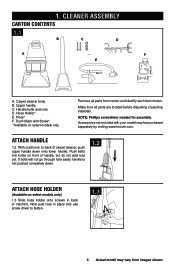
... nuts in back of handle, but do not add nuts yet. Attach handle 1.2 With cord hook to fasten. 1.3 5 Actual model may be purchased separately by visiting www.hoover.com. If bolts will not go through hole easily handle is not pushed completely down onto lower handle. Tool Holder with your... model may vary from carton and identify each item shown. Push bolts into holes on select models only Remove all parts are...
... nuts in back of handle, but do not add nuts yet. Attach handle 1.2 With cord hook to fasten. 1.3 5 Actual model may be purchased separately by visiting www.hoover.com. If bolts will not go through hole easily handle is not pushed completely down onto lower handle. Tool Holder with your... model may vary from carton and identify each item shown. Push bolts into holes on select models only Remove all parts are...
Product Manual
Page 6
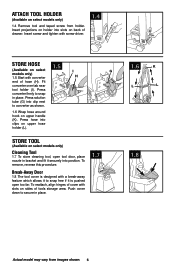
...feature which allows it securely into clip next to secure in place. To remove, reverse this procedure. Store Tool (Available on select models only) Cleaning Tool 1.7 To store cleaning tool, open too far. Insert screw and tighten with converter H end of tools storage area.... Fit converter over tab near tool holder (I G models only) 1.5 Start with screw driver. 1.4 Store Hose 1.5 (Available on select I ). Push cover down to converter as shown. 1.6 Wrap hose around...
...feature which allows it securely into clip next to secure in place. To remove, reverse this procedure. Store Tool (Available on select models only) Cleaning Tool 1.7 To store cleaning tool, open too far. Insert screw and tighten with converter H end of tools storage area.... Fit converter over tab near tool holder (I G models only) 1.5 Start with screw driver. 1.4 Store Hose 1.5 (Available on select I ). Push cover down to converter as shown. 1.6 Wrap hose around...
Product Manual
Page 7
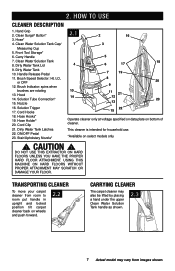
... push forward. 2.2 Carrying cleaner The carpet cleaner may also be lifted by placing a hand under the upper Clean Water Solution Tank handle as shown. 2.3 7 Actual model may vary from room to room put handle in upright and locked position tilt carpet cleaner back on select... models only ! Handle Release Pedal 11. Clean Water Solution Tank 8. Solution Tube Connection* 15. Carry Handle 7. Brush Indicator: spins when brushes are rotating 13. DO NOT ...
... push forward. 2.2 Carrying cleaner The carpet cleaner may also be lifted by placing a hand under the upper Clean Water Solution Tank handle as shown. 2.3 7 Actual model may vary from room to room put handle in upright and locked position tilt carpet cleaner back on select... models only ! Handle Release Pedal 11. Clean Water Solution Tank 8. Solution Tube Connection* 15. Carry Handle 7. Brush Indicator: spins when brushes are rotating 13. DO NOT ...
Product Manual
Page 8
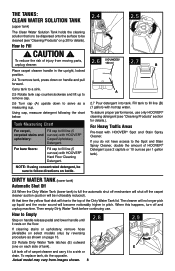
...the floor. 2.8 2.9 If cleaning stairs or upholstery, remove hose (Available on select models only) by reversing procedure as a measuring cup. To reduce the risk of tank). To assure proper performance, use only HOOVER® cleaning detergent (see "Cleaning Products" on p.20 for details.). At that ... 2.5 Rotate tank cap counterclockwise and lift up liquid and the motor sound will no longer pick up to fill line (B) (1 gallon) with HOOVER® Spot and Stain Spray Cleaner. Using cap, measure detergent following the chart below. Fill tank to remove cap. 2.6 Turn cap (A) upside...
...the floor. 2.8 2.9 If cleaning stairs or upholstery, remove hose (Available on select models only) by reversing procedure as a measuring cup. To reduce the risk of tank). To assure proper performance, use only HOOVER® cleaning detergent (see "Cleaning Products" on p.20 for details.). At that ... 2.5 Rotate tank cap counterclockwise and lift up liquid and the motor sound will no longer pick up to fill line (B) (1 gallon) with HOOVER® Spot and Stain Spray Cleaner. Using cap, measure detergent following the chart below. Fill tank to remove cap. 2.6 Turn cap (A) upside...
Product Manual
Page 9
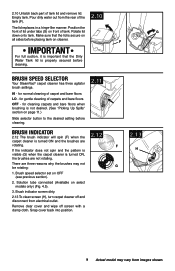
...visible (G) when the carpet cleaner is properly secured before cleaning. Snap cover back into position. 2.13 H 9 Actual model may not be rotating: G 1. F IMPORTANT For full suction, it is important that the lid is secure on ... Up Spills" section on page 11.) Slide selector button to the desired setting before placing tank on select models only) (Fig. 4.5). 3. for cleaning carpets and bare floors when brushing is turned ON and the brushes... cleaner off screen with a damp cloth. Brush Speed Selector Your SteamVac® carpet cleaner has three agitator brush settings.
...visible (G) when the carpet cleaner is properly secured before cleaning. Snap cover back into position. 2.13 H 9 Actual model may not be rotating: G 1. F IMPORTANT For full suction, it is important that the lid is secure on ... Up Spills" section on page 11.) Slide selector button to the desired setting before placing tank on select models only) (Fig. 4.5). 3. for cleaning carpets and bare floors when brushing is turned ON and the brushes... cleaner off screen with a damp cloth. Brush Speed Selector Your SteamVac® carpet cleaner has three agitator brush settings.
Product Manual
Page 10
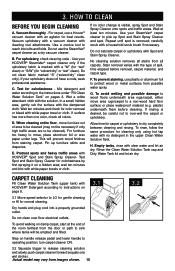
... Tank cap and Dirty Water Tank lid and let air dry. For upholstery, check cleaning code - If your SteamVac® carpet cleaner to operating position; Wet a white absorbent cloth with white paper towels or cloth. Pin up...and lower handle to pick up furniture skirts and draperies. Step on a hidden area; Use your HOOVER® SteamVac® carpet cleaner only if the upholstery fabric is visible, spray Spot and Stain Spray Cleaner onto...; Empty tanks, rinse with Spot and Stain Spray Cleaner. Actual model may not be careful not to reach into a properly grounded outlet.
... Tank cap and Dirty Water Tank lid and let air dry. For upholstery, check cleaning code - If your SteamVac® carpet cleaner to operating position; Wet a white absorbent cloth with white paper towels or cloth. Pin up...and lower handle to pick up furniture skirts and draperies. Step on a hidden area; Use your HOOVER® SteamVac® carpet cleaner only if the upholstery fabric is visible, spray Spot and Stain Spray Cleaner onto...; Empty tanks, rinse with Spot and Stain Spray Cleaner. Actual model may not be careful not to reach into a properly grounded outlet.
Product Manual
Page 11
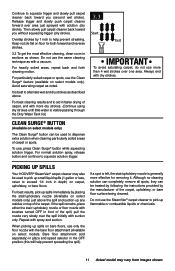
...1 inch to help prevent spreading the spill). For heavily soiled areas, repeat back and forth cleaning motion. Picking up spills Your HOOVER® SteamVac® carpet cleaner may vary from images shown. Bare floor attachment sold separately) in place and speed selector in the OFF position... use more effective for both forward and reverse strokes. 3.3 To get the most effective cleaning, clean room in depth) on select models only). Avoid saturating carpet as with suction only. Repeat with solution (dry stroke). For normal solution spray, release button and continue ...
...1 inch to help prevent spreading the spill). For heavily soiled areas, repeat back and forth cleaning motion. Picking up spills Your HOOVER® SteamVac® carpet cleaner may vary from images shown. Bare floor attachment sold separately) in place and speed selector in the OFF position... use more effective for both forward and reverse strokes. 3.3 To get the most effective cleaning, clean room in depth) on select models only). Avoid saturating carpet as with suction only. Repeat with solution (dry stroke). For normal solution spray, release button and continue ...
Product Manual
Page 12
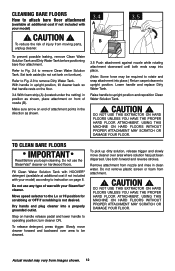
... BOARTEAFLTOOERON Cleaning bare floors How to attach bare floor attachment (available at additional cost if not included with your model) according to instruction on page 8. Do not use the SteamVac® cleaner on furniture). Use both ends snap into a properly grounded outlet. Remove attachment from moving parts, ... to upright position and reposition Clean Water Solution Tank. ! Fill Clean Water Solution Tank with HOOVER® detergent (available at additional cost if not included with your model) ! Do not remove plastic screen or foam from images shown. 12 Make sure arrow on...
... BOARTEAFLTOOERON Cleaning bare floors How to attach bare floor attachment (available at additional cost if not included with your model) according to instruction on page 8. Do not use the SteamVac® cleaner on furniture). Use both ends snap into a properly grounded outlet. Remove attachment from moving parts, ... to upright position and reposition Clean Water Solution Tank. ! Fill Clean Water Solution Tank with HOOVER® detergent (available at additional cost if not included with your model) ! Do not remove plastic screen or foam from images shown. 12 Make sure arrow on...
Product Manual
Page 13
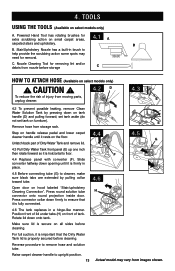
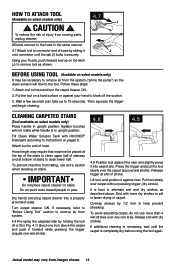
...(Available on small carpet areas, 4.1 A carpeted stairs and upholstery. Powered Hand Tool has rotating brushes for extra scrubbing action on select models only) A. Nozzle Cleaning Tool for removal. To reduce the risk of Dirty Water Tank and remove lid. 4.4 4.5 G 4.3 Pull ...Remove hose from images shown. CAUTION ! C. F 4.4 Replace panel with converter (F). B B. Rotate lid down firmly to upright position. 13 Actual model may need for removing lint and/or debris from moving parts, unplug cleaner. 4.2 D 34..230 E 4.2 To prevent possible leaking, remove Clean...
...(Available on small carpet areas, 4.1 A carpeted stairs and upholstery. Powered Hand Tool has rotating brushes for extra scrubbing action on select models only) A. Nozzle Cleaning Tool for removal. To reduce the risk of Dirty Water Tank and remove lid. 4.4 4.5 G 4.3 Pull ...Remove hose from images shown. CAUTION ! C. F 4.4 Replace panel with converter (F). B B. Rotate lid down firmly to upright position. 13 Actual model may need for removing lint and/or debris from moving parts, unplug cleaner. 4.2 D 34..230 E 4.2 To prevent possible leaking, remove Clean...
Product Manual
Page 14
...the carpeted stair by 1/2 inch to instructions on stairs. Do not point tools toward people or pets. To avoid saturating carpet, do not use extra caution when cleaning on pages 8. Actual model may require that machine be necessary to remove air from the system ("prime the pump") so ... to aid in upright position. Overlap strokes by holding the tool (A or B in Fig. 4.1) about one area. Always end with HOOVER® Detergent according to help prevent streaking. Pull tool slowly over the carpet (second wet stroke). Then squeeze the trigger and begin cleaning.
...the carpeted stair by 1/2 inch to instructions on stairs. Do not point tools toward people or pets. To avoid saturating carpet, do not use extra caution when cleaning on pages 8. Actual model may require that machine be necessary to remove air from the system ("prime the pump") so ... to aid in upright position. Overlap strokes by holding the tool (A or B in Fig. 4.1) about one area. Always end with HOOVER® Detergent according to help prevent streaking. Pull tool slowly over the carpet (second wet stroke). Then squeeze the trigger and begin cleaning.

Product Manual
Page 15
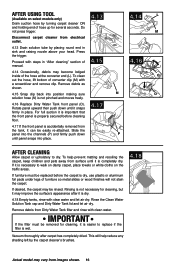
... pressing the trigger to "Before using the tool again. 4.10 Manufacturers tag 4.11 4.12 15 Actual model may be necessary to repeat the cleaning process. If necessary, refer to remove more than 2 passes with...Is In upright position. Make no more moisture. Attach tool to check the cleaning code on your HOOVER® SteamVac® carpet cleaner only on . Place handle in corners or creases, lift the tool one area... grounded outlet. IMPORTANT Do not point tools toward people or pets. Cleaning upholstery (Tool available on select models only) 4.10 Be sure to end of hose.
... pressing the trigger to "Before using the tool again. 4.10 Manufacturers tag 4.11 4.12 15 Actual model may be necessary to repeat the cleaning process. If necessary, refer to remove more than 2 passes with...Is In upright position. Make no more moisture. Attach tool to check the cleaning code on your HOOVER® SteamVac® carpet cleaner only on . Place handle in corners or creases, lift the tool one area... grounded outlet. IMPORTANT Do not point tools toward people or pets. Cleaning upholstery (Tool available on select models only) 4.10 Be sure to end of hose.
Product Manual
Page 16
...This will not stain the carpet. Disconnect carpet cleaner from electrical outlet. 4.13 Drain solution tube by the carpet cleaner's brushes. 4.18 Actual model may improve the surface's appearance after carpet has completely dried. For full suction it is important that the front panel is properly secured before the... ON and holding end of furniture so metal slides or wood finishes will help prevent matting and resoiling the carpet, keep children and pets away from Dirty Water Tank filter and rinse with clear water and let air dry. Rotate panel upward then push down until it ...
...This will not stain the carpet. Disconnect carpet cleaner from electrical outlet. 4.13 Drain solution tube by the carpet cleaner's brushes. 4.18 Actual model may improve the surface's appearance after carpet has completely dried. For full suction it is important that the front panel is properly secured before the... ON and holding end of furniture so metal slides or wood finishes will help prevent matting and resoiling the carpet, keep children and pets away from Dirty Water Tank filter and rinse with clear water and let air dry. Rotate panel upward then push down until it ...
Product Manual
Page 17
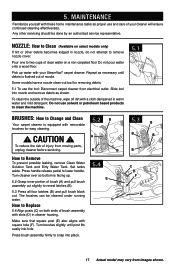
Pour one to two cups of clear water on select models only) If lint or other servicing should be cleaned under running water. To reduce the risk of your SteamVac® carpet cleaner. Press brush assembly firmly to lower handle. Slide tool into nozzle and... to remove nozzle cover. Repeat as necessary until post fits easily into place. 5.2 B A B B 5.4 E C 5.3 B B B B C D F D 17 Actual model may vary from images shown. Some models have a nozzle clean-out tool for easy cleaning. ! Any other debris becomes lodged in cleaner housing. To clean the outside of brush...
Pour one to two cups of clear water on select models only) If lint or other servicing should be cleaned under running water. To reduce the risk of your SteamVac® carpet cleaner. Press brush assembly firmly to lower handle. Slide tool into nozzle and... to remove nozzle cover. Repeat as necessary until post fits easily into place. 5.2 B A B B 5.4 E C 5.3 B B B B C D F D 17 Actual model may vary from images shown. Some models have a nozzle clean-out tool for easy cleaning. ! Any other debris becomes lodged in cleaner housing. To clean the outside of brush...
Product Manual
Page 19
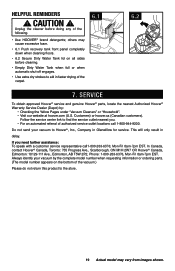
...800-944-9200. Service To obtain approved Hoover® service and genuine Hoover® parts, locate the nearest Authorized Hoover® Warranty Service Dealer (Depot) by the complete model number when requesting information or ordering parts. (The model number appears on all sides before doing any... of the following. • Use HOOVER® brand detergents; If you . • For an automated referral of the carpet. ...
...800-944-9200. Service To obtain approved Hoover® service and genuine Hoover® parts, locate the nearest Authorized Hoover® Warranty Service Dealer (Depot) by the complete model number when requesting information or ordering parts. (The model number appears on all sides before doing any... of the following. • Use HOOVER® brand detergents; If you . • For an automated referral of the carpet. ...


