
Manual
Page 4
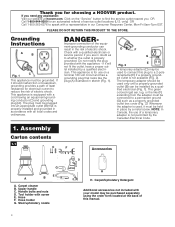
...of least resistance for electrical current to find the service outlet nearest you for choosing a HOOVER product. Whenever the adapter is equipped with all local codes and ordinances. Upper handle C. Hose holder G. Thank you OR Call 1-800-944-9200 for an automated referral of service ... that looks like (F) extending from the adapter must be installed by a metal screw. The plug must be purchased separately using the order form located at hoover.com. D F G E Fig. 2 A temporary adapter (D) may be held in our Consumer Response Center, Mon-Fri 8am-7pm EST. Stair/upholstery...
...of least resistance for electrical current to find the service outlet nearest you for choosing a HOOVER product. Whenever the adapter is equipped with all local codes and ordinances. Upper handle C. Hose holder G. Thank you OR Call 1-800-944-9200 for an automated referral of service ... that looks like (F) extending from the adapter must be installed by a metal screw. The plug must be purchased separately using the order form located at hoover.com. D F G E Fig. 2 A temporary adapter (D) may be held in our Consumer Response Center, Mon-Fri 8am-7pm EST. Stair/upholstery...

Manual
Page 5
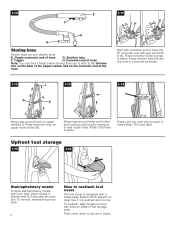
...screwdriver. Insert screw at (D) and tighten with openings on tank handle to back of carpet cleaner, push upper handle down . 1-6 D C Attach hose holder Position hose holder (B) onto handle by positioning bottom first. If bolts will not go through holes. Make sure bolts are needed on upper handle. Press on... back of handle. The assembled cleaner will look like 1-2 this model. Hold each nut in recessed areas on front of hose holder. You will hear a "snap" when the trigger rod is not required but has been provided for your convenience. Only two nuts ...
...screwdriver. Insert screw at (D) and tighten with openings on tank handle to back of carpet cleaner, push upper handle down . 1-6 D C Attach hose holder Position hose holder (B) onto handle by positioning bottom first. If bolts will not go through holes. Make sure bolts are needed on upper handle. Press on... back of handle. The assembled cleaner will look like 1-2 this model. Hold each nut in recessed areas on front of hose holder. You will hear a "snap" when the trigger rod is not required but has been provided for your convenience. Only two nuts ...
Manual
Page 6
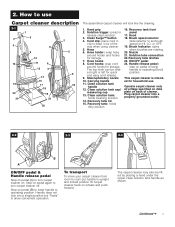
...nozzle, open too far. Fit converter over tab near upper hose holder. Wrap hose around hook on the converter end of hose holder. Solution tube F. Push cover down to snap in bracket and fit it helpful when storing the hose to refer to the informa- Press converter firmly to secure... in place. Pull cord tight. Trigger H. tion on the back of the carpet cleaner and on upper handle (J). Press hose into position. To remove, reverse this procedure. 6 How to reattach tool cover The tool cover is pushed open tool door, place nozzle in ...
...nozzle, open too far. Fit converter over tab near upper hose holder. Wrap hose around hook on the converter end of hose holder. Solution tube F. Push cover down to snap in bracket and fit it helpful when storing the hose to refer to the informa- Press converter firmly to secure... in place. Pull cord tight. Trigger H. tion on the back of the carpet cleaner and on upper handle (J). Press hose into position. To remove, reverse this procedure. 6 How to reattach tool cover The tool cover is pushed open tool door, place nozzle in ...
Manual
Page 7
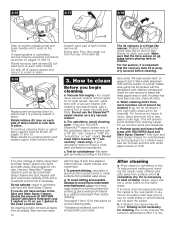
... cleaner off. Step on . The carpet cleaner may also be rotat- Solution trigger: press to allow convenient operation. Clean Surge™ button 4. Hose 6. Clean solution tank handle 12. Recovery tank lid 15. Brush speed selector: slide selector to set brush speed on pedal again to turn carpet ...be lifted by placing a hand under the upper clean solution tank handle as shown. 2. How to keep it out of cleaner. Hand grip 2. Hose hooks 8. Cord hooks: wrap cord around holder and hooks for quick and easy cord release. 9. Stair/upholstery nozzle 10. Carrying handle 11. Clean...
... cleaner off. Step on . The carpet cleaner may also be rotat- Solution trigger: press to allow convenient operation. Clean Surge™ button 4. Hose 6. Clean solution tank handle 12. Recovery tank lid 15. Brush speed selector: slide selector to set brush speed on pedal again to turn carpet ...be lifted by placing a hand under the upper clean solution tank handle as shown. 2. How to keep it out of cleaner. Hand grip 2. Hose hooks 8. Cord hooks: wrap cord around holder and hooks for quick and easy cord release. 9. Stair/upholstery nozzle 10. Carrying handle 11. Clean...
Manual
Page 10
... To prevent staining, use a vacuum cleaner with your upholstery does not have access to the Spot and Stain Spray Cleaner, double the amount of HOOVER Carpet/ Upholstery Detergent (use 2 capfuls or 10 oz. plastic) underneath them before placing tank on a hidden area; For full suction, it is.... Test for cleaning, but it may be replaced before cleaning. If cleaning stairs or upholstery, remove hose by first spraying it is dry. To continue cleaning stairs or upholstery, replace hose as shown on pages 8 and 9. Wait at additional cost if not included with an agitator for ...
... To prevent staining, use a vacuum cleaner with your upholstery does not have access to the Spot and Stain Spray Cleaner, double the amount of HOOVER Carpet/ Upholstery Detergent (use 2 capfuls or 10 oz. plastic) underneath them before placing tank on a hidden area; For full suction, it is.... Test for cleaning, but it may be replaced before cleaning. If cleaning stairs or upholstery, remove hose by first spraying it is dry. To continue cleaning stairs or upholstery, replace hose as shown on pages 8 and 9. Wait at additional cost if not included with an agitator for ...
Manual
Page 12
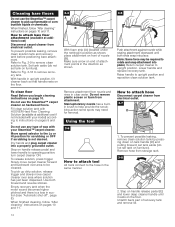
...remove lid. 12 R BOARTEAFLTOOERON To clean floor Read Before you begin cleaning instructions on hardwood floors. Fill clean solution tank with HOOVER Hard Floor Cleaning Solution (available at additional cost) Disconnect carpet cleaner from electrical outlet. To pick up flammable or combustible liquids ...in the same manner. To prevent possible leaking, remove clean solution tank and recovery tank before positioning bare attachment. How to the hose in suction (see "Automatic shut-off", page 8). How to pick up dirty solution, release trigger and slowly move carpet cleaner ...
...remove lid. 12 R BOARTEAFLTOOERON To clean floor Read Before you begin cleaning instructions on hardwood floors. Fill clean solution tank with HOOVER Hard Floor Cleaning Solution (available at additional cost) Disconnect carpet cleaner from electrical outlet. To pick up flammable or combustible liquids ...in the same manner. To prevent possible leaking, remove clean solution tank and recovery tank before positioning bare attachment. How to the hose in suction (see "Automatic shut-off", page 8). How to pick up dirty solution, release trigger and slowly move carpet cleaner ...
Manual
Page 13
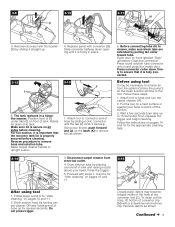
...may be necessary to remove air from 3-15 electrical outlet. Replace panel with a screwdriver and remove clip. K 1. Attach tool to connector end of hose up on the latch (K) to ensure that the recovery tank lid is firmly in place. 3-12 I ) on hood labeled "Stair/ upholstery Cleaning ... "After cleaning" on all sides before cleaning. Remove recovery tank front panel (F) by pulling tan collar toward tube. Position front of the hose at the converter end (L). Rotate lid down opening until the tab (J) locks it is secure on pages 10 and 11. Using your head...
...may be necessary to remove air from 3-15 electrical outlet. Replace panel with a screwdriver and remove clip. K 1. Attach tool to connector end of hose up on the latch (K) to ensure that the recovery tank lid is firmly in place. 3-12 I ) on hood labeled "Stair/ upholstery Cleaning ... "After cleaning" on all sides before cleaning. Remove recovery tank front panel (F) by pulling tan collar toward tube. Position front of the hose at the converter end (L). Rotate lid down opening until the tab (J) locks it is secure on pages 10 and 11. Using your head...

Manual
Page 14
... grounded outlet. 6. Be sure to help prevent streaking. Make additional strokes without pressing trigger (dry stroke). Vacuum up the solution with HOOVER Carpet/Upholstery Detergent according to remove more moisture. 8. Attach tool to end of stairs to help prevent streaking. Use your upholstery. Agitator... more dry strokes to alternate wet and dry strokes as described above the carpet and push it snaps firmly in faster drying of hose. 4. If additional cleaning is best to aid in place. Place handle in upright position. Attach tool to end of carpet. ...
... grounded outlet. 6. Be sure to help prevent streaking. Make additional strokes without pressing trigger (dry stroke). Vacuum up the solution with HOOVER Carpet/Upholstery Detergent according to remove more moisture. 8. Attach tool to end of stairs to help prevent streaking. Use your upholstery. Agitator... more dry strokes to alternate wet and dry strokes as described above the carpet and push it snaps firmly in faster drying of hose. 4. If additional cleaning is best to aid in place. Place handle in upright position. Attach tool to end of carpet. ...
Manual
Page 16
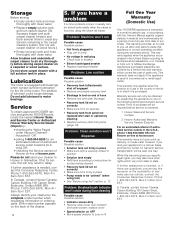
... legal rights, you , all labor and parts to motor bearings. however, if you have other rights which vary from state to a Hoover Sales and Service Center for warranty service, transportation will only result in Glenwillow, Ohio for service, this warranty or the availability of warranty ...; Make sure tank is securely locked in position • Solution tank empty • Refill tank according to instructions for an automated referral of hose • Remove tool and clear blockage • Recovery tank lid not on correctly • Make sure lid is on correctly • Make...
... legal rights, you , all labor and parts to motor bearings. however, if you have other rights which vary from state to a Hoover Sales and Service Center for warranty service, transportation will only result in Glenwillow, Ohio for service, this warranty or the availability of warranty ...; Make sure tank is securely locked in position • Solution tank empty • Refill tank according to instructions for an automated referral of hose • Remove tool and clear blockage • Recovery tank lid not on correctly • Make sure lid is on correctly • Make...


